background image

• Seal the cut surfaces with a sealant to

prevent moisture from causing

swelling.

• Protect the bottom of the appliance

from steam and moisture.

• Do not install the appliance next to a

door or under a window. This

prevents hot cookware from falling

from the appliance when the door or

the window is opened.

• If the appliance is installed above

drawers make sure that the space,

between the bottom of the appliance

and the upper drawer is sufficient for

air circulation.

• The bottom of the appliance can get

hot. Make sure to install a separation

panel made from plywood, kitchen

carcass material or other non-

flammable materials under the

appliance to prevent access to the

bottom.

• The separation panel has to cover the

area under the hob completely.

2.2 Electrical Connection

WARNING!

Risk of fire and electric

shock.

• All electrical connections should be

made by a qualified electrician.

• The appliance must be earthed.

• Before carrying out any operation

make sure that the appliance is

disconnected from the power supply.

• Make sure that the parameters on the

rating plate are compatible with the

electrical ratings of the mains power

supply.

• Make sure the appliance is installed

correctly. Loose and incorrect

electricity mains cable or plug (if

applicable) can make the terminal

become too hot.

• Use the correct electricity mains

cable.

• Do not let the electricity mains cable

tangle.

• Make sure that a shock protection is

installed.

• Use the strain relief clamp on the

cable.

• Make sure the mains cable or plug (if

applicable) does not touch the hot

appliance or hot cookware, when you

connect the appliance to the near

sockets.

• Do not use multi-plug adapters and

extension cables.

• Make sure not to cause damage to

the mains plug (if applicable) or to the

mains cable. Contact our Authorised

Service Centre or an electrician to

change a damaged mains cable.

• The shock protection of live and

insulated parts must be fastened in

such a way that it cannot be removed

without tools.

• Connect the mains plug to the mains

socket only at the end of the

installation. Make sure that there is

access to the mains plug after the

installation.

• If the mains socket is loose, do not

connect the mains plug.

• Do not pull the mains cable to

disconnect the appliance. Always pull

the mains plug.

• Use only correct isolation devices: line

protecting cut-outs, fuses (screw type

fuses removed from the holder), earth

leakage trips and contactors.

• The electrical installation must have

an isolation device which lets you

disconnect the appliance from the

mains at all poles. The isolation

device must have a contact opening

width of minimum 3 mm.

2.3 Use

WARNING!

Risk of injury, burns and

electric shock.

• Remove all the packaging, labelling

and protective film (if applicable)

before first use.

• This appliance is for household

(indoors) use only.

• Do not change the specification of this

appliance.

• Make sure that the ventilation

openings are not blocked.

• Do not let the appliance stay

unattended during operation.

• Set the cooking zone to “off” after

each use.

ENGLISH

5

Summary of Contents for GK69TSO

Page 1: ...GK69TSO EN Hob User Manual 2 DE Kochfeld Benutzerinformation 20 ...

Page 2: ...ice brochures trouble shooter service and repair information www electrolux com support Register your product for better service www registerelectrolux com Buy Accessories Consumables and Original spare parts for your appliance www electrolux com shop CUSTOMER CARE AND SERVICE Always use original spare parts When contacting our Authorised Service Centre ensure that you have the following data avai...

Page 3: ...hat they do not play with the appliance Keep all packaging away from children and dispose of it appropriately WARNING Keep children and pets away from the appliance when it operates or when it cools down Accessible parts become hot during use If the appliance has a child safety device it should be activated Children shall not carry out cleaning and user maintenance of the appliance without supervi...

Page 4: ...ly In either case contact the Authorised Service Centre If the supply cord is damaged it must be replaced by the manufacturer an authorized Service or similarly qualified persons in order to avoid a hazard WARNING Use only hob guards designed by the manufacturer of the cooking appliance or indicated by the manufacturer of the appliance in the instructions for use as suitable or hob guards incorpor...

Page 5: ...on is installed Use the strain relief clamp on the cable Make sure the mains cable or plug if applicable does not touch the hot appliance or hot cookware when you connect the appliance to the near sockets Do not use multi plug adapters and extension cables Make sure not to cause damage to the mains plug if applicable or to the mains cable Contact our Authorised Service Centre or an electrician to ...

Page 6: ...okware made of cast iron aluminium or with a damaged bottom can cause scratches on the glass glass ceramic Always lift these objects up when you have to move them on the cooking surface This appliance is for cooking purposes only It must not be used for other purposes for example room heating 2 4 Care and cleaning Clean the appliance regularly to prevent the deterioration of the surface material S...

Page 7: ...ly line the fixed home electrical system must include an isolating device with at least a 3 mm contact separation to enable a simultaneous and all pole cut off from the mains according to NIN SEV 1000 1 2 3 1 2 3 1 2 3 1 2 3 3 5 Attaching the seal Integrated installation 1 Clean the rabbets in the worktop 2 Cut the supplied 3x10mm seal stripe into 4 stripes The stripes must have the same length as...

Page 8: ...ood please see the installation instructions of the hood for the minimum distance between the appliances min 50mm min 500mm ON TOP INSTALLATION 47 31 min 55 700 550 510 490 1 680 1 max R5 min 1500 280 60 min 12 min 28 486 min 12 mm min 60 mm INTEGRATED INSTALLATION 13 8 13 R10 R5 490 1 516 1 706 1 680 1 51 35 min 55 700 550 510 490 1 680 1 max R5 min 1500 280 60 min 12 min 28 486 min 28 mm www ele...

Page 9: ...p installation 3 8 Protection box If you use a protection box an additional accessory the protective floor directly below the hob is not necessary The protection box accessory may not be available in some countries Contact Customer Support Service You cannot use the protection box if you install the hob above an oven 4 PRODUCT DESCRIPTION 4 1 Cooking surface layout 170 210 mm 145 mm 145 mm 120 180...

Page 10: ...n 4 To activate and deactivate the outer ring 5 Heat setting display To show the heat setting 6 Timer indicators of cook ing zones To show for which zone you set the time 7 Timer display To show the time in minutes 8 To activate and deactivate the outer ring 9 To select the cooking zone 10 To increase or decrease the time 11 Automatic Heat Up To activate and deactivate the function 12 Control bar ...

Page 11: ...own 5 DAILY USE WARNING Refer to Safety chapters 5 1 Activating and deactivating Touch for 1 second to activate or deactivate the hob 5 2 Automatic Switch Off The function deactivates the hob automatically if all cooking zones are deactivated you do not set the heat setting after you activate the hob you spill something or put something on the control panel for more than 10 seconds a pan a cloth e...

Page 12: ...ooking zone starts to flash the time counts down To see the remaining time touch to set the cooking zone The indicator of the cooking zone starts to flash The display shows the remaining time To change the time touch to set the cooking zone Touch or To deactivate the function touch to set the cooking zone and then touch The remaining time counts down to 00 The indicator of the cooking zone disappe...

Page 13: ...his function 5 9 Child Safety Device This function prevents an accidental operation of the hob To activate the function activate the hob with Do not set any heat setting Touch for 4 seconds comes on Deactivate the hob with To deactivate the function activate the hob with Do not set any heat setting Touch for 4 seconds comes on Deactivate the hob with To override the function for only one cooking t...

Page 14: ...okware 1 3 Hollandaise sauce melt but ter chocolate gelatine 5 25 Mix from time to time 1 3 Solidify fluffy omelettes baked eggs 10 40 Cook with a lid on 3 5 Simmer rice and milkbased dishes heat up ready cooked meals 25 50 Add at least twice as much liquid as rice mix milk dishes halfway through the procedure 5 7 Steam vegetables fish meat 20 45 Add a couple of tablespoons of liquid 7 9 Steam pot...

Page 15: ... clean the glass surface with a cloth 8 TROUBLESHOOTING WARNING Refer to Safety chapters 8 1 What to do if Problem Possible cause Remedy You cannot activate or operate the hob The hob is not connected to an electrical supply or it is connected incorrectly Check if the hob is correctly connected to the electrical supply The fuse is blown Make sure that the fuse is the cause of the malfunction If th...

Page 16: ...he cookware is too large or you put it too near to the controls Put large cookware on the rear zones if possible There is no sound when you touch the panel sen sor fields The sounds are deactiva ted Activate the sounds Refer to Daily use comes on Child Safety Device or Lock operates Refer to Daily use and a number come on There is an error in the hob Deactivate the hob and acti vate it again after...

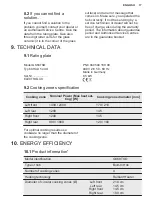
Page 17: ... the guarantee booklet 9 TECHNICAL DATA 9 1 Rating plate Model GK69TSO PNC 949 599 180 00 Typ 60 HAD 54 XO 400 V 2 3 50 60 Hz Made in Germany Ser Nr 6 5 kW ELECTROLUX 9 2 Cooking zones specification Cooking zone Nominal Power Max heat set ting W Cooking zone diameter mm Left front 1400 2300 170 210 Left rear 1200 145 Right front 1200 145 Right rear 900 1800 120 180 For optimal cooking results use ...

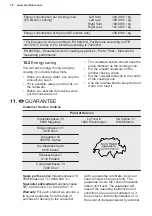
Page 18: ...s Put the cookware directly in the centre of the cooking zone Use the residual heat to keep the food warm or to melt it 11 CH GUARANTEE Customer Service Centres Point of Service Industriestrasse 10 5506 Mägenwil Le Trési 6 1028 Préverenges Via Violino 11 6928 Manno Morgenstrasse 131 3018 Bern Langgasse 10 9008 St Gallen Am Mattenhof 4a b 6010 Kriens Schlossstrasse 1 4133 Pratteln Comercialstrasse ...

Page 19: ...aste of electrical and electronic appliances Do not dispose of appliances marked with the symbol with the household waste Return the product to your local recycling facility or contact your municipal office For Switzerland Where should you take your old equipment Anywhere that sells new equipment or hand it in to official SENS collection points or official SENS recycling firms The list of official...

Page 20: ...esuchen Sie uns auf unserer Website um Anwendungshinweise Prospekte Informationen zu Fehlerbehebung Service und Reparatur zu erhalten www electrolux com support Registrieren Sie Ihr Produkt um einen erstklassigen Service zu erhalten www registerelectrolux com Um Zubehör Verbrauchsmaterial und Original Ersatzteile für Ihr Gerät zu kaufen www electrolux com shop KUNDENDIENST UND SERVICE Verwenden Si...

Page 21: ...dnungsgemäßer Bedienung bestehen Kinder unter 8 Jahren und Personen mit schweren Behinderungen oder Mehrfachbehinderung sollten vom Gerät ferngehalten werden wenn sie nicht ständig beaufsichtigt werden Kinder sollten beaufsichtigt werden um sicherzustellen dass sie nicht mit dem Gerät Halten Sie sämtliches Verpackungsmaterial von Kindern fern und entsorgen Sie es ordnungsgemäß WARNUNG Halten Sie K...

Page 22: ...ht werden WARNUNG Brandgefahr Legen Sie keine Gegenstände auf dem Kochfeld ab Legen Sie keine Metallgegenstände wie Messer Gabeln Löffel oder Topfdeckel auf die Oberfläche des Kochfelds da diese heiß werden können Verwenden Sie ds Gerät nicht bevor es in den Einbauschrank gesetzt wird Reinigen Sie das Gerät nicht mit einem Dampfstrahlreiniger Hat die Glaskeramik Glasoberfläche einen Sprung schalte...

Page 23: ...as Gerät nicht direkt neben einer Tür oder unter einem Fenster So kann heißes Kochgeschirr nicht herunterfallen wenn die Tür oder das Fenster geöffnet wird Wird das Gerät über Schubladen eingebaut achten Sie darauf dass zwischen dem Geräteboden und der oberen Schublade ein ausreichender Abstand für die Luftzirkulation vorhanden ist Der Boden des Geräts kann heiß werden Achten Sie darauf eine feuer...

Page 24: ...von der Stromversorgung trennen können Die Trenneinrichtung muss mit einer Kontaktöffnungsbreite von mindestens 3 mm ausgeführt sein 2 3 Gebrauch WARNUNG Verletzungs Verbrennungs und Stromschlaggefahr Entfernen Sie vor dem ersten Gebrauch das gesamte Verpackungsmaterial die Aufkleber und Schutzfolie falls vorhanden Dieses Gerät ist ausschließlich zur Verwendung im Haushalt in Innenräumen bestimmt ...

Page 25: ... aus und lassen Sie es abkühlen Reinigen Sie das Gerät nicht mit Wasserspray oder Dampf Reinigen Sie das Geräts mit einem weichen feuchten Tuch Verwenden Sie ausschließlich Neutralreiniger Benutzen Sie keine Scheuermittel scheuernde Reinigungsschwämmchen Lösungsmittel oder Metallgegenstände 2 5 Wartung Wenden Sie sich zur Reparatur des Geräts an den autorisierten Kundendienst Dabei dürfen ausschli...

Page 26: ...ufweisen mit der Sie das Gerät allpolig von der Stromversorgung trennen können gemäß NIN SEV 1000 1 2 3 1 2 3 1 2 3 1 2 3 3 5 Anbringen der Dichtung Integrierte Montage 1 Reinigen Sie die Falze in der Arbeitsplatte 2 Schneiden Sie das 3 x 10 mm Dichtungsband in vier Streifen Die Streifen müssen dieselbe Länge wie die Falze haben 3 Schneiden Sie die Enden der Streifen in einem Winkel von 45 Grad Si...

Page 27: ...bau Wenn Sie das Kochfeld unter einer Dunstabzugshaube installieren beachten Sie bitte die Montageanleitung der Dunstabzugshaube für den Mindestabstand zwischen den Geräten min 50mm min 500mm AUFLIEGENDE MONTAGE 47 31 min 55 700 550 510 490 1 680 1 max R5 min 1500 280 60 min 12 min 28 486 min 12 mm min 60 mm INTEGRIERTE MONTAGE 13 8 13 R10 R5 490 1 516 1 706 1 680 1 51 35 min 55 700 550 510 490 1 ...

Page 28: ...tion 3 8 Schutzkasten Wenn Sie einen Schutzkasten zusätzliches Zubehör verwenden ist der Schutzboden direkt unter dem Kochfeld nicht erforderlich Das Schutzkasten Zubehör ist möglicherweise in einigen Ländern nicht erhältlich Wenden Sie sich an den Kundendienst Service Der Schutzkasten kann nicht verwendet werden wenn das Kochfeld über einem Backofen installiert wird 4 GERÄTEBESCHREIBUNG 4 1 Anord...

Page 29: ... Ein und Ausschalten der Funktion 4 Ein und Ausschalten des äußeren Krei ses 5 Kochstufenanzeige Zeigt die Kochstufe an 6 Kochzonen Anzeigen des Timers Zeigt an für welche Kochzone die Zeit eingestellt wurde 7 Timer Anzeige Zeigt die Zeit in Minuten an 8 Ein und Ausschalten des äußeren Krei ses 9 Auswählen der Kochzone 10 Erhöhen oder Verringern der Zeit 11 Automatisches Aufheizen Ein und Ausschal...

Page 30: ...ne noch heiß ist Die Anzeige erlischt wenn die Kochzone abgekühlt ist 5 TÄGLICHER GEBRAUCH WARNUNG Siehe Kapitel Sicherheitshinweise 5 1 Ein und Ausschalten Berühren Sie 1 Sekunde lang um das Kochfeld ein oder auszuschalten 5 2 Automatische Abschaltung Mit dieser Funktion wird das Kochfeld in folgenden Fällen automatisch ausgeschaltet Alle Kochzonen sind ausgeschaltet Nach dem Einschalten des Koch...

Page 31: ...danach die gewünschte Kochstufe Nach 3 Sekunden leuchtet Ausschalten der Funktion Ändern Sie die Kochstufe 5 6 Timer Countdown Timer Sie können diese Funktion verwenden um die Dauer eines einzelnen Kochvorgangs einzustellen Stellen Sie zuerst die Kochstufe für die Kochzone und erst danach die Funktion ein Auswählen der Kochzone Berühren Sie wiederholt bis die Anzeige der gewünschten Kochzone ersch...

Page 32: ...ymbole des Bedienfelds verriegelt Die Funktion unterbricht nicht die Timer Funktionen Berühren Sie zum Einschalten der Funktion leuchtet Die Kochstufe verringert sich auf 1 Berühren Sie zum Ausschalten der Funktion Es erscheint die vorherige Kochstufe 5 8 Verriegelung Sie können das Bedienfeld sperren wenn Kochzonen eingeschaltet sind So wird verhindert dass die Kochstufe versehentlich geändert wi...

Page 33: ... 6 1 Kochgeschirr Der Boden des Kochgeschirrs muss so dick und flach wie möglich sein Stellen Sie sicher dass die Topfböden sauber sind bevor Sie sie auf das Kochfeld stellen Um Kratzer zu vermeiden darf der Topf nicht auf dem Keramikglas verschoben werden Kochgeschirr aus Stahlemaille oder mit Aluminium oder Kupferböden kann Verfärbungen der Glaskeramikoberfläche verursachen 6 2 Öko Timer Öko Tim...

Page 34: ...as Kochfeld nach jedem Gebrauch Verwenden Sie stets Kochgeschirr mit sauberen Böden Kratzer oder dunkle Flecken auf der Oberfläche beeinträchtigen die Funktionsfähigkeit des Kochfelds nicht Verwenden Sie einen Spezialreiniger zur Reinigung der Kochfeldoberfläche Verwenden Sie einen speziellen Reinigungsschaber für das Glas 7 2 Reinigen des Kochfelds Folgendes muss sofort entfernt werden Geschmolze...

Page 35: ... 2 oder mehr Sensorfelder gleichzeitig berührt Berühren Sie nur ein Sen sorfeld Pause ist eingeschaltet Siehe Täglicher Gebrauch Auf dem Bedienfeld befin den sich Wasser oder Fettspritzer Reinigen Sie das Bedienfeld Ein akustisches Signal ertönt und das Kochfeld wird ausgeschaltet Wenn das Kochfeld aus geschaltet ist ertönt ein akustisches Signal Sie haben etwas auf ein oder mehrere Sensorfelder g...

Page 36: ...Täglicher Gebrauch leuchtet Kindersicherung oder Ver riegelung ist eingeschaltet Siehe Täglicher Gebrauch und eine Zahl werden angezeigt Es ist ein Fehler im Koch feld aufgetreten Schalten Sie das Kochfeld aus und nach 30 Sekunden wieder ein Wenn erneut erscheint trennen Sie das Kochfeld von der Span nungsversorgung Schalten Sie nach 30 Sekunden das Kochfeld wieder ein Wenn das Problem weiterhin b...

Page 37: ...en über Garantiezeitraum und autorisierte Kundendienststellen finden Sie in der Garantiebroschüre 9 TECHNISCHE DATEN 9 1 Typenschild Modell GK69TSO Produkt Nummer PNC 949 599 180 00 Typ 60 HAD 54 XO 400 V 2 3 50 60 Hz Hergestellt in Deutschland Ser Nr 6 5 kW ELECTROLUX 9 2 Technische Daten der Kochzonen Kochzone Nennleistung höchste Koch stufe W Durchmesser der Kochzone mm Vorne links 1400 2300 17...

Page 38: ...ärmen verwenden Sie nur die benötigte Menge Decken Sie Kochgeschirr wenn möglich mit einem Deckel ab Stellen Sie Kochgeschirr auf die Kochzone bevor Sie sie einschalten Der Boden des Kochgeschirrs sollte denselben Durchmesser wie die Kochzone haben Stellen Sie kleineres Kochgeschirr auf die kleineren Kochzonen Stellen Sie das Kochgeschirr mittig auf die Kochzone Nutzen Sie die Restwärme um die Spe...

Page 39: ...erwendung von Nicht Original Teilen 12 UMWELTTIPPS Recyceln Sie Materialien mit dem Symbol Entsorgen Sie die Verpackung in den entsprechenden Recyclingbehältern Recyceln Sie zum Umwelt und Gesundheitsschutz elektrische und elektronische Geräte Entsorgen Sie Geräte mit diesem Symbol nicht mit dem Hausmüll Bringen Sie das Gerät zu Ihrer örtlichen Sammelstelle oder wenden Sie sich an Ihr Gemeindeamt ...

Page 40: ...www electrolux com shop 867366483 A 092021 ...

Reviews: