20/38
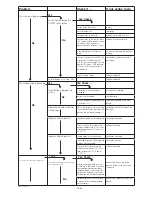
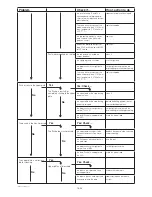
Problem
Check if …
If not, action to do
louvers are not clogged or
deformed
clean or change the part if
necessary
Abnormal noise
Noise during opening/closing
the lid
lid springs don’t make noise in
movement
put some grease or cooking oil
Noise permanent when ma-
chine is on
transformer fan is free rotating
remove the obstacles, readjust
the position of the fan or replace
it if broken
magnetron fans are free rotating
remove the obstacles, readjust the po-
sition of the fan or replace it if broken
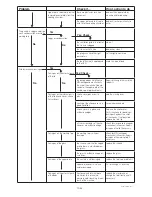
The machine goes in prehea-
ting/cooling frequently
the phenomenon raises after a
stdby mode or switching on of
the machine
the the stdby parameter is ac-
cording customer expectation
adjust it
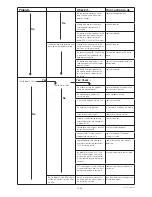
the phenomenon raises sud-
dently during operation
there is enough free clearance
on the lateral sides for the coo-
ling airfl ow
give the clearance according to
the installation diagram
there is an air sucktion fl ow on
the right lateral side
clean the louvers
the unit also displays err3
the fan is working
reconnect the wires of the fan or
replace the fan
there is enough free clearance
on the lateral sides for the coo-
ling airfl ow
give the clearance according to
the installation diagram
there is an air sucktion fl ow on
the right lateral side
clean the louvers
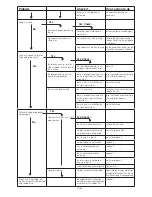
Automatic lid opening doesn’t
work properly
lid doesn’t arrive or stay in full
open position
the lid has a free movement
remove the obstacle
springs are both in place and
not broken and well adjusted
adjust or replace them
gas spring is in place
adjust or replace it
spring support is not broken
replace it
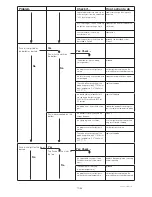
axis is not broken and not
deformed
replace it
tube is not broken and not
deformed
replace it
the bushings are not broken
and are in place
adjust or replace it
screws of the tube axis are tighted
tighten them
lid opens too fast
springs are both well adjusted
adjust them by having a pretension
enough to lift the lid of 19cm on the
front without the gas spring working
Error 4 or 5 is indicated, but
the Panino reaches the desired
core temperature
the amperometric transformer is
working by measuring the Voltage
on connector TM (approx. 3V)
replace it
HSPP tech GB 03 09
No
Yes
Yes: Check ...
No
Yes
Yes: Check ...
No
Yes
Yes: Check ...
Summary of Contents for HSG Panini
Page 1: ...Service Manual GB 07 2009 HSG Panini Service manual ...
Page 2: ...2 2 50mm 50mm 7 5 190mm ...
Page 3: ......
Page 4: ......
Page 11: ...7 38 Explanation on software settings EU Version U207 ...
Page 12: ...8 38 Explanation on software settings US Version U202 U208 ...
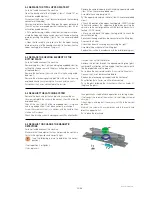
Page 28: ...24 38 HSPP tech GB 03 09 ADJUST THE SPRINGS ...
Page 29: ...25 38 HSPP tech GB 03 09 ...
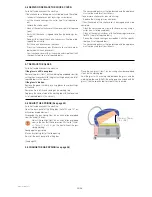
Page 30: ...26 38 ...
Page 31: ...27 38 5 9 CHANGE THE GAS SPRING ...
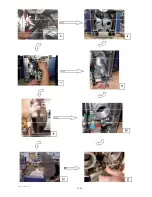
Page 32: ...28 38 ...
Page 33: ...29 38 ...
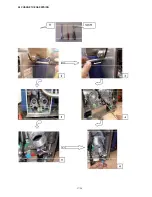
Page 41: ...37 38 ...
Page 43: ......
Page 49: ...Vue éclatée Couvercle Cover exploded view Explosionszeichnung Haube F HSPP FR 03 09 ...
Page 51: ...Esploso coperchio Despiece tapa Sprängskiss lock H HSPP FR 03 09 ...
Page 53: ...Vue éclatée Articulation Hinge exploded view Explosionszeichnung Gelenk J HSPP FR 06 09 ...
Page 55: ...Esploso articolazione Despiece articulación Sprängskiss Rotation L HSPP FR 06 09 ...
Page 59: ...Vue éclatée Electrique Electric exploded view Explosionszeichnung Elektrik P HSPP FR 03 09 ...
Page 61: ...Esploso elettronica Despiece electricidad Sprängskiss elektronik R HSPP FR 03 09 ...
Page 64: ......


