background image

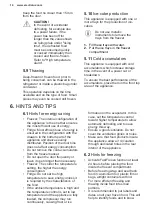
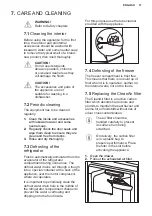
3. Insert the new air filter in the slot.

4. Close the drawer.

To get the best performance the drawer

should be placed properly and the

CleanAir filter should be changed once

every year.

The air filter is a consumable

accessory and as such is not

covered by the guarantee.

New active air filters can be

purchased from your local

dealer. To change the air

filter repeat the procedure.

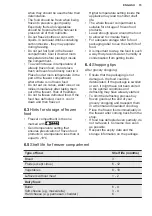
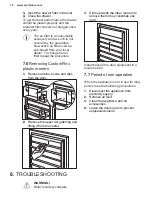
7.6 Removing CustomFlex

plastic runners

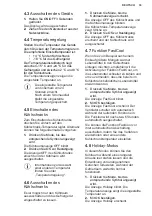
1. Remove all bins, boxes and clips

from the door.

1

1

2

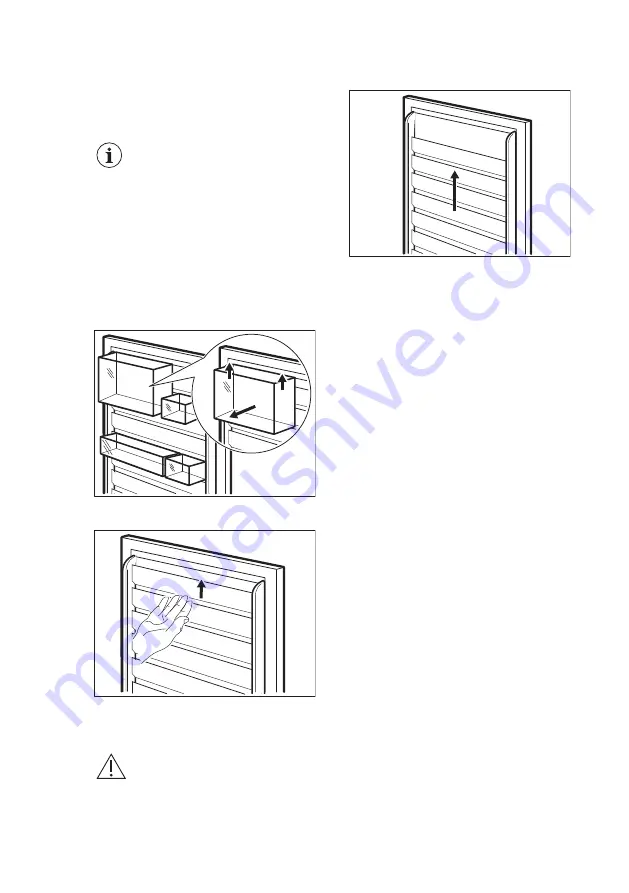
2. Remove the upper rail grabbing and

lifting it from the center.

3. Slide upwards the other runners to

remove them (they constitute one

part).

Install back all the door equipment in a

reverse order.

7.7 Period of non-operation

When the appliance is not in use for long

period, take the following precautions:

1. Disconnect the appliance from

electricity supply.

2. Remove all food.

3. Clean the appliance and all

accessories.

4. Leave the doors open to prevent

unpleasant smells.

8. TROUBLESHOOTING

WARNING!

Refer to Safety chapters.

www.electrolux.com

18

Summary of Contents for IK2581BNR

Page 1: ...IK2581BNR EN Fridge Freezer User Manual 2 DE Kühl Gefrierschrank Benutzerinformation 24 ...

Page 2: ...lcome to Electrolux Visit our website to Get usage advice brochures trouble shooter service and repair information www electrolux com support Register your product for better service www registerelectrolux com Buy Accessories Consumables and Original spare parts for your appliance www electrolux com shop CUSTOMER CARE AND SERVICE Always use original spare parts When contacting our Authorised Servi...

Page 3: ...liance may be used by persons with very extensive and complex disabilities provided that they have been properly instructed Children of less than 3 years of age should be kept away from the appliance unless continuously supervised Children should be supervised to ensure that they do not play with the appliance Children shall not carry out cleaning and user maintenance of the appliance without supe...

Page 4: ...ts Do not use abrasive products abrasive cleaning pads solvents or metal objects When the appliance is empty for long period switch it off defrost clean dry and leave the door open to prevent mould from developing within the appliance Do not store explosive substances such as aerosol cans with a flammable propellant in this appliance If the supply cord is damaged it must be replaced by the manufac...

Page 5: ...mponents The mains cable must stay below the level of the mains plug Connect the mains plug to the mains socket only at the end of the installation Make sure that there is access to the mains plug after the installation Do not pull the mains cable to disconnect the appliance Always pull the mains plug 2 3 Use WARNING Risk of injury burns electric shock or fire The appliance contains flammable gas ...

Page 6: ...liance contact the Authorised Service Centre Use original spare parts only Please note that self repair or non professional repair can have safety consequences and might void the guarantee The following spare parts will be available for 7 years after the model has been discontinued thermostats temperature sensors printed circuit boards light sources door handles door hinges trays and baskets Pleas...

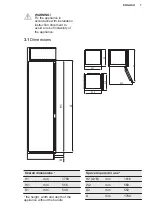
Page 7: ...t to avoid a risk of instability of the appliance 3 1 Dimensions B A H1 W1 D1 W2 D2 W3 D3 Overall dimensions H1 mm 1769 W1 mm 556 D1 mm 549 the height width and depth of the appliance without the handle Space required in use H2 A B mm 1816 W2 mm 560 D2 mm 552 A mm 1780 ENGLISH 7 ...

Page 8: ...perature range If you have any doubts regarding where to install the appliance please turn to the vendor to our customer service or to the nearest Authorised Service Centre It must be possible to disconnect the appliance from the mains power supply The plug must therefore be easily accessible after installation 3 3 Electrical connection Before plugging in ensure that the voltage and frequency show...

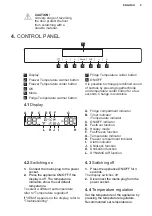
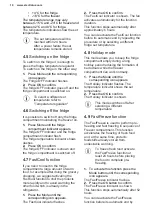
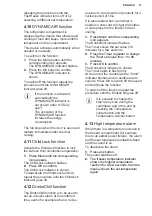
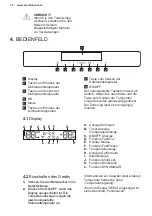
Page 9: ...dicator D FastCool function E Holiday mode F FastFreeze function G Temperature indicator H Freezer compartment indicator I Alarm indicator J ChildLock function K DrinksChill function L DYNAMICAIR function 4 2 Switching on 1 Connect the mains plug to the power socket 2 Press the appliance ON OFF if the display is off The temperature indicators show the set default temperature To select a different ...

Page 10: ...efrigerator 1 Press the Mode until the corresponding icon appears The FastCool indicator flashes 2 Press the OK to confirm The FastCool indicator is shown The fan activates automatically for the function duration This function stops automatically after approximately 6 hours You can deactivate the FastCool function before its automatic end by repeating the procedure or by selecting a different frid...

Page 11: ...ction The DrinksChill function is to be used to set an acoustic alarm at the preferred time useful for example when a recipe requires to cool down food products for a certain period of time It is also useful when a reminder is needed in order not to forget the bottles or cans placed in the freezer for fast cooling 1 Press Mode until the corresponding icon appears The DrinksChill indicator flashes ...

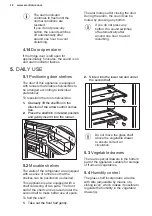
Page 12: ...the direction of the arrows until it comes free 2 Place the shelf bin in desired position and gently insert it into the runner 1 1 2 5 2 Movable shelves The walls of the refrigerator are equipped with a series of runners so that the shelves can be positioned as desired This appliance is also equipped with a shelf consisting of two parts The front half of the shelf can be placed under the second ha...

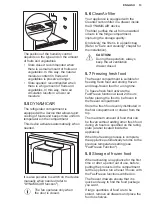
Page 13: ...bag Refer to Care and cleaning chapter for the installation CAUTION During the operation always keep the air ventilation drawer closed 5 7 Freezing fresh food The freezer compartment is suitable for freezing fresh food and storing frozen and deep frozen food for a long time To freeze fresh food activate the FastFreeze function at least 24 hours before placing the food to be frozen in the freezer c...

Page 14: ...f energy is ensured in the configuration with the drawers in the bottom part of the appliance and shelves evenly distributed Position of the door bins does not affect energy consumption Do not remove the cold accumulators from the freezer basket Do not open the door frequently or leave it open longer than necessary Freezer The colder the temperature setting the higher the energy consumption Fridge...

Page 15: ...8 C Higher temperature setting inside the appliance may lead to shorter shelf life The whole freezer compartment is suitable for storage of frozen food products Leave enough space around the food to allow air to circulate freely For adequate storage refer to food packaging label to see the shelf life of food It is important to wrap the food in such a way that prevents water humidity or condensatio...

Page 16: ...serting it To prevent food waste the new stock of food should always be placed behind the old one 6 7 Hints for food refrigeration Fresh food compartment is the one marked on the rating plate with Meat all types wrap in a suitable packaging and place it on the glass shelf above the vegetable drawer Store meat for at most 1 2 days Fruit and vegetables clean thoroughly eliminate the soil and place i...

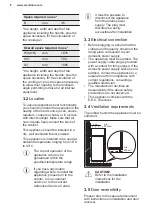
Page 17: ...normal use The defrost water drains out through a trough into a special container at the back of the appliance over the motor compressor where it evaporates It is important to periodically clean the defrost water drain hole in the middle of the refrigerator compartment channel to prevent the water overflowing and dripping onto the food inside For this purpose use the tube cleaner provided with the...

Page 18: ...astic runners 1 Remove all bins boxes and clips from the door 1 1 2 2 Remove the upper rail grabbing and lifting it from the center 3 Slide upwards the other runners to remove them they constitute one part Install back all the door equipment in a reverse order 7 7 Period of non operation When the appliance is not in use for long period take the following precautions 1 Disconnect the appliance from...

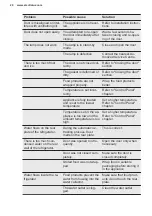
Page 19: ...larm or High Tempera ture Alarm The door is left open Close the door The compressor operates continually Temperature is set incor rectly Refer to Control Panel chapter Many food products were put in at the same time Wait a few hours and then check the temperature again The room temperature is too high Refer to Installation chap ter Food products placed in the appliance were too warm Allow food pro...

Page 20: ...pter Appliance is fully loaded and is set to the lowest temperature Set a higher temperature Refer to Control Panel chapter Temperature set in the ap pliance is too low and the ambient temperature is too high Set a higher temperature Refer to Control Panel chapter Water flows on the rear plate of the refrigerator During the automatic de frosting process frost melts on the rear plate This is correc...

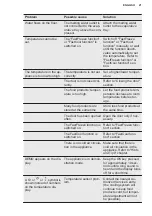
Page 21: ...e decrease to room temperature before stor age Many food products are stored at the same time Store less food products at the same time The door has been opened often Open the door only if nec essary The FastFreeze function is switched on Refer to FastFreeze func tion section The FastCool function is switched on Refer to FastCool func tion section There is no cold air circula tion in the appliance...

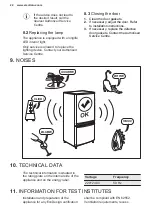
Page 22: ...the door Refer to installation instructions 3 If necessary replace the defective door gaskets Contact the Authorised Service Centre 9 NOISES SSSRRR CLICK HISSS BRRR BLUBB 10 TECHNICAL DATA The technical information is situated in the rating plate on the internal side of the appliance and on the energy label Voltage Frequency 220 240 V 50 Hz 11 INFORMATION FOR TEST INSTITUTES Installation and prepa...

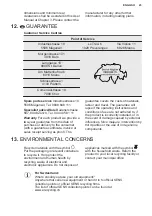
Page 23: ...ng as proof The guarantee covers the costs of materials labour and travel The guarantee will lapse if the operating instructions and conditions of use are not adhered to if the product is incorrectly installed or in the event of damage caused by external influences force majeure intervention by third parties or the use of non genuine components 13 ENVIRONMENTAL CONCERNS Recycle materials with the ...

Page 24: ...n dass Sie großartige Ergebnisse erzielen werden Willkommen bei Electrolux Besuchen Sie uns auf unserer Website um Anwendungshinweise Prospekte Informationen zu Fehlerbehebung Service und Reparatur zu erhalten www electrolux com support Registrieren Sie Ihr Produkt um einen erstklassigen Service zu erhalten www registerelectrolux com Um Zubehör Verbrauchsmaterial und Original Ersatzteile für Ihr G...

Page 25: ...ändige Person beaufsichtigt werden oder von dieser Person Anweisungen erhalten haben wie das Gerät sicher zu bedienen ist und welche Gefahren bei nicht ordnungsgemäßer Bedienung bestehen Kinder zwischen 3 und 8 Jahren dürfen das Gerät be und entladen vorausgesetzt sie wurden ordnungsgemäß eingewiesen Dieses Gerät kann von Personen mit schweren und komplexen Behinderungen benutzt werden vorausgeset...

Page 26: ...ank so dass sie nicht mit anderen Lebensmitteln in Berührung kommen oder auf diese tropfen WARNUNG Halten Sie die Lüftungsöffnungen im Gerätegehäuse oder in der Einbaunische frei von Hindernissen WARNUNG Versuchen Sie nicht den Abtauvorgang durch andere als vom Hersteller empfohlene mechanische oder sonstige Hilfsmittel zu beschleunigen WARNUNG Achten Sie darauf den Kältekreislauf nicht zu beschäd...

Page 27: ...huhwerk Stellen Sie sicher dass die Luft um das Gerät zirkulieren kann Warten Sie nach der Montage oder dem Wechsel des Türanschlags mindestens 4 Stunden bevor Sie das Gerät an die Stromversorgung anschließen So kann das Öl in den Kompressor zurückfließen Ziehen Sie den Stecker aus der Steckdose bevor Sie am Gerät arbeiten z B Wechsel des Türanschlags Stellen Sie das Gerät nicht in der Nähe von He...

Page 28: ...eck zugelassen sind Wird der Kältekreislauf beschädigt stellen Sie bitte sicher dass keine Flammen und Zündquellen im Raum vorhanden sind Lüften Sie den Raum Achten Sie darauf dass keine heißen Gegenstände auf die Kunststoffteile des Geräts gelangen Geben Sie keine Softdrinks in das Gefrierfach Dadurch entsteht Druck auf den Getränkebehälter Lagern Sie keine brennbaren Gase und Flüssigkeiten im Ge...

Page 29: ...Thermostate Temperatursensoren Platinen Lichtquellen Lichtquellen Türscharniere Backbleche und Körbe Bitte beachten Sie dass einige dieser Ersatzteile nur an Reparaturbetriebe geliefert werden können und nicht alle Ersatzteile für alle Modelle relevant sind Türdichtungen sind innerhalb von 10 Jahren nach Produkteinstellung des Modells erhältlich 2 7 Entsorgung WARNUNG Verletzungs und Erstickungsge...

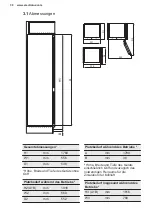
Page 30: ...Platzbedarf während des Betriebs H2 A B mm 1816 W2 mm 560 D2 mm 552 Platzbedarf während des Betriebs A mm 1780 B mm 36 Höhe Breite und Tiefe des Geräts einschließlich Griff und zuzüglich des notwendigen Freiraums für die Zirkulation der Kühlluft Platzbedarf insgesamt während des Betriebs H3 A B mm 1816 W3 mm 780 www electrolux com 30 ...

Page 31: ...stellungsort des Geräts wenden Sie sich an den Verkäufer unseren Kundendienst oder nächstgelegenen autorisierten Kundendienst Es muss möglich sein das Gerät vom Netz zu trennen Daher muss der Stecker nach der Installation zugänglich bleiben 3 3 Elektroanschluss Kontrollieren Sie vor dem Einschalten des Geräts ob die Netzspannung und frequenz Ihres Hausanschlusses mit den auf dem Typenschild angege...

Page 32: ...erung lässt sich rückgängig machen 4 1 Display Off min A B C D E F G I H J K L A Anzeige Kühlraum B Timer Anzeige Temperaturanzeige C ON OFF Anzeige D Funktion FastCool E Holiday Modus F Funktion FastFreeze G Temperaturanzeige H Anzeige Gefrierraum I Alarmanzeige J Funktion ChildLock K Funktion DrinksChill L Funktion DYNAMICAIR 4 2 Einschalten des Geräts 1 Stecken Sie den Netzstecker in die Netzst...

Page 33: ...de bis die Kühlraumanzeige erscheint Die Anzeige OFF des Kühlschranks und die Kühlraumanzeige blinken Die Kühlschrank Temperaturanzeige zeigt Striche an 2 Drücken Sie OK zur Bestätigung Die Anzeige OFF des Kühlschranks erscheint und der Kühlschrank wird ausgeschaltet 4 7 Funktion FastCool Wenn Sie zum Beispiel nach einem Einkauf größere Mengen warmer Lebensmittel in den Kühlschrank einlegen möchte...

Page 34: ...lt Diese Vorrichtung schaltet sich bei Bedarf automatisch ein und lässt sich auch manuell aktivieren Einschalten der Funktion 1 Drücken Sie die Mode Taste bis das entsprechende Symbol angezeigt wird Die DYNAMICAIR Anzeige blinkt 2 Drücken Sie die OK Taste zur Bestätigung Die DYNAMICAIR Anzeige wird angezeigt Wiederholen Sie zum Ausschalten der Funktion den Vorgang bis die DYNAMICAIR Anzeige erlisc...

Page 35: ... beliebige Taste Der Signalton wird ausgeschaltet 2 Die Temperaturanzeige des Gefriergeräts zeigt die höchste erreichte Temperatur ein paar Sekunden lang an danach zeigt das Display wieder die eingestellte Temperatur an Die Alarmanzeige blinkt so lange bis die normalen Bedingungen wiederhergestellt sind Wenn Sie keine Taste drücken schaltet sich der Ton nach etwa einer Stunde automatisch ab um nic...

Page 36: ...keitsregulierung In die Glasablage ist eine Vorrichtung mit über einen Schieber verstellbaren Schlitzen integriert die die Feuchtigkeitsregelung in den Gemüseschubladen ermöglicht Die Position des Feuchtigkeitsreglers hängt von der Art und der Menge des Obstes und Gemüses ab Schlitze geschlossen Für eine kleine Menge an Obst und Gemüse empfohlen So bleibt der Feuchtigkeitsgehalt im Obst und Gemüse...

Page 37: ... nach einer Zeit in der das Gerät nicht benutzt wurde mindestens 3 Stunden lang mit eingeschalteter Funktion FastFreeze laufen bevor Sie Lebensmittel in das Fach legen Die Gefrierschubladen sorgen dafür dass das gewünschte Lebensmittelpaket schnell und einfach zu finden ist Sollen große Mengen an Lebensmitteln aufbewahrt werden entfernen Sie alle Schubladen aus dem Gerät und legen Sie die Lebensmi...

Page 38: ...de Öffnungen im hinteren Teil des Geräts ermöglichen 6 2 Hinweise zum Einfrieren Schalten Sie die FastFreeze Funktion mindestens 24 Stunden bevor Sie die Lebensmittel in das Gefrierfach hinein legen ein Vor dem Einfrieren verpacken und verschließen Sie frische Lebensmittel in Aluminiumfolie Kunststofffolie oder beutel luftdichte Behälter mit Deckel Teilen Sie die Lebensmittel in kleine Portionen u...

Page 39: ...ie Verpackung aufgequollen oder nass ist wurde das Lebensmittel möglicherweise nicht unter den optimalen Bedingungen gelagert und das Auftauen hat eventuell bereits begonnen Um den Auftauprozess zu minimieren kaufen Sie Tiefkühlware am Ende Ihres Einkaufs und transportieren Sie diese in einer Isoliertasche Legen Sie die tiefgefrorenen Lebensmittel sofort nach der Rückkehr aus dem Laden in das Gefr...

Page 40: ...mer hinter die alten gelegt werden 6 7 Hinweise für die Kühlung von Lebensmitteln Das Fach für frische Lebensmittel ist auf dem Typenschild mit gekennzeichnet Fleisch alle Sorten Wickeln Sie Fleisch in geeignetes Verpackungsmaterial ein und legen Sie es auf die Glasablage über der Gemüseschublade Bewahren Sie Fleisch höchstens 1 2 Tage auf Obst und Gemüse Gründlich reinigen Erde entfernen und in d...

Page 41: ...tfernt Das Tauwasser sammelt sich in einer Auffangrinne und läuft durch eine Abflussöffnung in einen speziellen Behälter an der Rückseite des Geräts über dem Kompressor wo es verdampft Eine regelmäßige Reinigung des Abtauwasser Ablauflochs in der Mitte des Kühlfachkanals ist wichtig um zu verhindern dass das Wasser überläuft und auf die eingelagerten Lebensmittel tropft Benutzen Sie hierfür den Ro...

Page 42: ... Entfernen Sie alle Fächer Behälter und Clips aus der Tür 1 1 2 2 Entfernen Sie die obere Schiene indem Sie sie an der Mitte fassen und anheben 3 Schieben Sie die anderen Schienen nach oben um sie zu entfernen sie bilden ein Teil Setzen Sie die Türausstattung in umgekehrter Reihenfolge wieder ein 7 7 Stillstandszeiten Bei längerem Stillstand des Geräts müssen Sie folgende Vorkehrungen treffen 1 Tr...

Page 43: ...rz em eingeschaltet Siehe Alarm Tür offen oder Alarm Hochtempera tur Die Temperatur im Gerät ist zu hoch Siehe Alarm Tür offen oder Alarm Hochtempera tur Die Tür ist offen Schließen Sie die Tür Der Kompressor arbeitet ständig Die Temperatur ist falsch eingestellt Siehe Kapitel Bedienfeld Es wurden viele Lebens mittel gleichzeitig hineinge legt Warten Sie einige Stunden und prüfen Sie erneut die Te...

Page 44: ...as nächste autorisierte Ser vicezentrum Zu viel Frost und Eis Die Tür ist nicht richtig ge schlossen Siehe Abschnitt Schließen der Tür Die Dichtung ist verzogen oder verschmutzt Siehe Abschnitt Schließen der Tür Die Lebensmittel sind nicht richtig verpackt Verpacken Sie die Lebens mittel besser Die Temperatur ist falsch eingestellt Siehe Kapitel Bedienfeld Das Gerät ist voll mit Le bensmitteln und...

Page 45: ...e Funktion FastCool ist eingeschaltet Schalten Sie die Funktion FastFreeze oder die Funktion FastCool manu ell aus oder warten Sie mit dem Einstellen der Tempe ratur bis die Funktion au tomatisch ausgeschaltet wird Siehe Abschnitt Funktion FastFreeze oder Funktion FastCool Die Temperatur im Gerät ist zu niedrig zu hoch Die Temperatur ist nicht richtig eingestellt Stellen Sie eine höhere niedrigere...

Page 46: ...ierte Ser vicezentrum Das Kühl system hält zwar die Le bensmittel weiterhin kalt doch die Temperaturein stellung ist nicht mehr möglich Wenn die Ratschläge nicht zum gewünschten Ergebnis führen wenden Sie sich an das nächste autorisierte Servicezentrum 8 2 Austauschen der Lampe Das Gerät ist mit einer langlebigen LED Innenbeleuchtung ausgestattet Die Beleuchtung darf nur von einer Fachkraft ausget...

Page 47: ...ne eventuelle EcoDesign Prüfung müssen mit EN 62552 übereinstimmen Die Anforderungen an die Belüftung die Abmessungen der Aussparungen und die Mindestabstände auf der Rückseite müssen den Angaben in diesem Benutzerhandbuch in Kapitel 3 entsprechen Für weitere Informationen einschließlich der Beladungspläne wenden Sie sich bitte an den Hersteller 12 CH GARANTIE Kundendienst Servicestellen Industrie...

Page 48: ...eisung und Betriebsvorschriften unsachgerechter Installation sowie bei Beschädigung durch äussere Einflüsse höhere Gewalt Eingriffe Dritter und Verwendung von Nicht Original Teilen 13 UMWELTTIPPS Recyceln Sie Materialien mit dem Symbol Entsorgen Sie die Verpackung in den entsprechenden Recyclingbehältern Recyceln Sie zum Umwelt und Gesundheitsschutz elektrische und elektronische Geräte Entsorgen S...

Page 49: ......

Page 50: ......

Page 51: ......

Page 52: ...www electrolux com shop 222379635 A 312021 ...

Reviews: