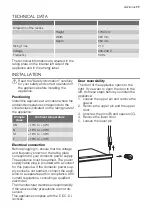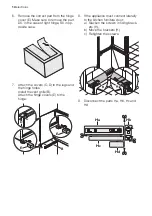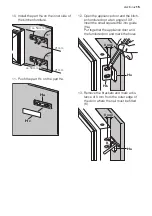
background image

B

C

C

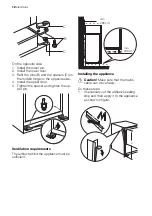
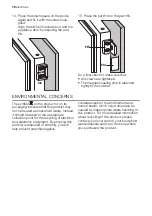
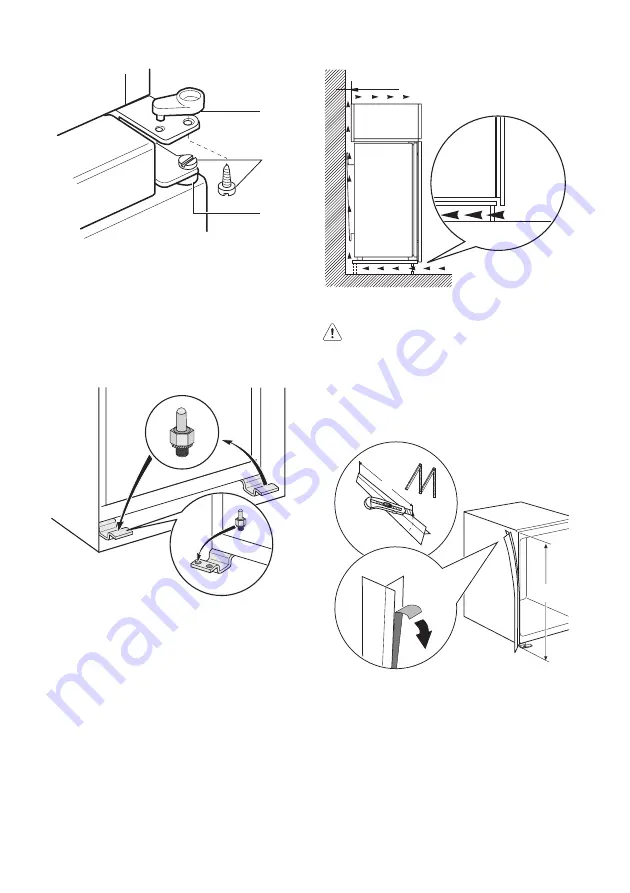
On the opposite side:
1. Install the lower pin.
2. Install the lower door.
3. Refit the pins (B) and the spacers (C) on

the middle hinge on the opposite side.

4. Install the upper door.
5. Tighten the spacer and tighten the up-

per pin.

Ventilation requirements

The airflow behind the appliance must be
sufficient.

min.

200 cm

2

min.

200 cm

2

Installing the appliance

Caution!

 Make sure that the mains

cable can move freely.

Do these steps.
1. If necessary cut the adhesive sealing

strip and then apply it to the appliance
as shown in figure.

x

x

12 

electrolux

Summary of Contents for Juno JCF84181

Page 1: ...user manual benutzerinformation Fridge Freezer Kühl Gefrierschrank JCF84181 ...

Page 2: ...packaging well away from chil dren There is risk of suffocation If you are discarding the appliance pull the plug out of the socket cut the con nection cable as close to the appliance as you can and remove the door to pre vent playing children to suffer electric shock or to close themselves into it If this appliance featuring magnetic door seals is to replace an older appliance having a spring loc...

Page 3: ...Appliance s manufacturers storage rec ommendations should be strictly adhered to Refer to relevant instructions Do not place carbonated or fizzy drinks in the freezer compartment as it creates pressure on the container which may cause it to explode resulting in damage to the appliance Ice lollies can cause frost burns if con sumed straight from the appliance Care and cleaning Before maintenance sw...

Page 4: ... Action Freeze switch Switching on Insert the plug into the wall socket Turn the Temperature Regulator clockwise to a medium setting The Pilot Light will light up Switching off To turn off the appliance turn the Tempera ture Regulator to the O position The Pilot Light will switch off Temperature regulation The temperature is automatically regulated To operate the appliance proceed as fol lows turn...

Page 5: ...alue shown in the technical characteristics chart under rising time the defrosted food must be consumed quickly or cooked immediately and then re frozen after cooling Thawing Deep frozen or frozen food prior to being used can be thawed in the refrigerator compartment or at room temperature de pending on the time available for this opera tion Small pieces may even be cooked still fro zen directly f...

Page 6: ...s in a lower air moisture content in the fruit and vegetable compartments Bottle holder The bottle holder hooked onto one of the internal shelves can be used to store bot tles or cans To remove this holder lift the back of the shelf press and pull it out Slide the holder out and refit the shelf HELPFUL HINTS AND TIPS Hints for energy saving Do not open the door frequently or leave it open longer t...

Page 7: ...ld be add ed during this period only freeze top quality fresh and thor oughly cleaned foodstuffs prepare food in small portions to enable it to be rapidly and completely frozen and to make it possible subsequently to thaw only the quantity required wrap up the food in aluminium foil or pol ythene and make sure that the packages are airtight do not allow fresh unfrozen food to touch food which is a...

Page 8: ... trough into a special contain er at the back of the appliance over the motor compressor where it evaporates It is important to periodically clean the de frost water drain hole in the middle of the refrigerator compartment channel to pre vent the water overflowing and dripping on to the food inside Use the special cleaner provided which you will find already inser ted into the drain hole Defrostin...

Page 9: ... is normal Water flows into the re frigerator compartment The outlet can be clogged up Clean the outlet Products placed in can prevent water from flowing into the col lector Replace the products so that they can not touch the back plate di rectly Water flows onto the floor The melting water outlet flows not into the evaporative tray above the compressor Put the melting water outlet to the evaporat...

Page 10: ...side the freezer Temperature Regulator may be set incorrectly Set a warmer temperature The appliance does not work at all The appli ance does not cool at all Neither cooling nor light ing works The appliance may be switched off Switch on the appliance Plug is not connected to the mains socket properly Connect the mains plug properly Power does not reach the appli ance Try connecting another electr...

Page 11: ...efore plugging in ensure that the voltage and frequency shown on the rating plate correspond to your domestic power supply The appliance must be earthed The power supply cable plug is provided with a contact for this purpose If the domestic power sup ply socket is not earthed connect the appli ance to a separate earth in compliance with current regulations consulting a qualified electrician The ma...

Page 12: ...pper door 5 Tighten the spacer and tighten the up per pin Ventilation requirements The airflow behind the appliance must be sufficient min 200 cm2 min 200 cm2 Installing the appliance Caution Make sure that the mains cable can move freely Do these steps 1 If necessary cut the adhesive sealing strip and then apply it to the appliance as shown in figure x x 12 electrolux ...

Page 13: ...2 against the cupboard on the opposite side of the hinge 1 2 4 Adjust the appliance in the niche Make sure that the distance between the appliance and the cupboard front edge is 44 mm The lower hinge cover in the accesso ries bag makes sure that the distance between the appliance and the kitchen furniture is correct Make sure that the clearance between the appliance and the cupboard is 4 mm Open t...

Page 14: ... covers C D to the lugs and the hinge holes Install the vent grille B Attach the hinge covers E to the hinge B E E D C 8 If the appliance must connect laterally to the kitchen furniture door a Slacken the screws in fixing brack ets H b Move the brackets H c Retighten the screws 9 Disconnect the parts Ha Hb Hc and Hd Ha Hb Hc Hd 14 electrolux ...

Page 15: ... 12 Open the appliance door and the kitch en furniture door at an angle of 90 Insert the small square Hb into guide Ha Put together the appliance door and the furniture door and mark the holes Ha Hb 8 mm 13 Remove the brackets and mark a dis tance of 8 mm from the outer edge of the door where the nail must be fitted K Ha K 8 mm electrolux 15 ...

Page 16: ... indicates that this product may not be treated as household waste Instead it should be taken to the appropriate collection point for the recycling of electrical and electronic equipment By ensuring this product is disposed of correctly you will help prevent potential negative consequences for the environment and human health which could otherwise be caused by inappropriate waste handling of this ...

Page 17: ...ren Mangel an Erfahrung und Kenntnissen einen siche ren Gebrauch des Gerätes ausschließen nur unter Aufsicht oder nach ausreichen der Einweisung durch eine verantwor tungsbewusste Person benutzt werden die sicherstellt dass sie sich der Gefah ren des Gebrauchs bewusst sind Kinder müssen beaufsichtigt werden da mit sie nicht am Gerät herumspielen kön nen Halten Sie das Verpackungsmaterial un beding...

Page 18: ...en oder Kältever brennungen führen kann Das Gerät nicht direkter Sonneneinstrah lung aussetzen Die Leuchtmittel7 in diesem Gerät sind Speziallampen die nur für Haushaltsge räte geeignet sind Sie eignen sich nicht zur Raumbeleuchtung Täglicher Gebrauch Stellen Sie keine heißen Töpfe auf die Kunststoffteile des Gerätes Lagern Sie keine feuergefährlichen Gase oder Flüssigkeiten in dem Gerät Explosi o...

Page 19: ...Kundendienst Sollte die Wartung des Gerätes elektri sche Arbeiten verlangen so dürfen diese nur von einem qualifizierten Elektriker oder einem Elektro Fachmann durchge führt werden Wenden Sie sich für Reparaturen und Wartung nur an Fachkräfte der autorisier ten Kundendienststellen und verlangen Sie stets Original Ersatzteile Umweltschutz Das Gerät enthält im Kältekreis oder in dem Isoliermaterial ...

Page 20: ...n frischer Lebensmittel Das Gefrierfach eignet sich zum Einfrieren von frischen Lebensmitteln und zum Lagern von gefrorenen und tiefgefrorenen Lebens mitteln für einen längeren Zeitraum Für das Einfrieren frischer Lebensmittel ist eine Änderung der mittleren Einstellung nicht erforderlich Möchten Sie den Gefriervorgang beschleu nigen drehen Sie bitte den Temperaturreg ler auf eine höhere Einstellu...

Page 21: ...ärtigen hinaufgelegt werden Positionierung der Türeinsätze Die Türeinsätze können in verschiedener Höhe positioniert werden damit ermögli chen sie das Lagern verschieden großer Lebensmittelpackungen Bitte nehmen Sie diese Einstellungen wie folgt vor Ziehen Sie den Einsatz langsam in in Pfeilrichtung bis er sich herausheben lässt und setzen Sie ihn dann nach Wunsch wieder ein Feuchtigkeitsregulieru...

Page 22: ...ft frei zirkulieren kann Hinweise für die Kühlung Tipps Fleisch alle Sorten wickeln Sie Fleisch in lebensmittelechte Tüten und legen Sie die se auf die Glasablage über der Gemüse schublade Bitte lagern Sie Fleisch aus Sicherheitsgrün den nur einen oder maximal zwei Tage auf diese Weise Gekochte Lebensmittel kalte Gerichte usw diese können abgedeckt auf eine Ab lage gelegt werden Obst und Gemüse bi...

Page 23: ...e diese nicht länger offen als un bedingt notwendig Abgetaute Lebensmittel verderben sehr schnell und eignen sich nicht für ein er neutes Einfrieren Das Haltbarkeitsdatum auf der Tiefkühl kostverpackung sollte nicht überschritten werden REINIGUNG UND PFLEGE Vorsicht Ziehen Sie bitte vor jeder Reinigungsarbeit immer den Netzstecker aus der Steckdose Der Kältekreis des Gerätes enthält Kohlenwasserst...

Page 24: ...e Lüfterregelung sorgt für den Ventilatorantrieb Stillstandzeiten Bei längerem Stillstand des Gerätes müs sen Sie folgendermaßen vorgehen trennen Sie das Gerät von der Netz versorgung entnehmen Sie alle Lebensmittel tauen Sie das Gerät ab10 Reinigen Sie das Gerät und alle Zubehörteile lassen Sie die Türen offen angelehnt um das Entstehen unangenehmer Gerüche zu vermeiden Möchten Sie bei einer läng...

Page 25: ...t auf den Bo den Das Tauwasser läuft nicht in die Verdampferschale über dem Kompressor Setzen Sie den Tauwasserablauf auf die Verdampferschale Die Lampe funktioniert nicht Die Lampe ist im Standby Mo dus Öffnen und schließen Sie die Tür Die Lampe ist defekt Siehe hierzu Austauschen der Lampe Es ist zu warm im Kühl schrank Der Temperaturregler kann falsch eingestellt sein Stellen Sie eine niedriger...

Page 26: ...Das Gerät funktioniert überhaupt nicht Das Ge rät kühlt nicht Weder die Kühlung noch die Be leuchtung funktionieren Das Gerät kann ausgeschaltet worden sein Schalten Sie das Gerät ein Der Stecker ist nicht richtig in die Steckdose gesteckt Stecken Sie den Netzstecker kor rekt in die Steckdose Das Gerät bekommt keinen Strom Versuchen Sie ein anderes elekt risches Gerät an die Steckdose anzuschließe...

Page 27: ...ausanschlusses mit den auf dem Typenschild angegebenen An schlusswerten übereinstimmen Das Gerät muss geerdet sein Zu diesem Zweck ist die Netzkabelsteckdose mit ei nem Schutzkontakt ausgestattet Falls die Steckdose Ihres Hausanschlusses nicht ge erdet sein sollte lassen Sie das Gerät bitte gemäß den geltenden Vorschriften erden und fragen Sie dafür einen qualifizierten Elektriker Der Hersteller ü...

Page 28: ...egenüber liegenden Seite an 4 Bringen Sie die obere Tür an 5 Legen Sie das Distanzstück ein und zie hen Sie den oberen Scharnierstift fest Anforderungen an die Belüftung Die Luftzirkulation hinter dem Gerät muss ausreichend groß sein min 200 cm2 min 200 cm2 Montage des Geräts Vorsicht Achten Sie darauf dass sich das Netzkabel des Geräts frei bewegen lässt Führen Sie diese Schritte aus 28 electrolu...

Page 29: ...auf Bringen Sie die Abdeckungen A und A1 im Beipack am mittleren Scharnier an A1 A 3 Setzen Sie das Gerät in die Einbauni sche Schieben Sie das Gerät in Pfeilrichtung 1 bis die obere Lückenblende am Kü chenmöbel anliegt Schieben Sie das Gerät auf der den Scharnieren gegenüberliegenden Seite in Pfeilrichtung 2 so weit wie möglich gegen die Seitenwand des Küchenmö bels 1 2 electrolux 29 ...

Page 30: ... mm beträgt Öffnen Sie die Tür Stecken Sie die un tere Scharnierabdeckung auf 44mm 4mm 5 Befestigen Sie das Gerät mit 4 Schrau ben in der Einbaunische I 6 Entfernen Sie das entsprechende Teil aus der Scharnierabdeckung E Ach ten Sie darauf im Falle eines rechten Scharniers Teil DX bzw bei einem ge genüberliegenden Scharnier Teil SX zu entfernen 7 Setzen Sie die beiliegenden Abdeck kappen C D in di...

Page 31: ...n in den Haltewinkeln H b Verschieben Sie die Haltewinkel H c Ziehen Sie die Schrauben wieder an 9 Trennen Sie die Teile Ha Hb Hc und Hd ab Ha Hb Hc Hd 10 Montieren Sie Teil Ha an der Innenseite des Küchenmöbels ca 50 mm ca 50 mm 21 mm 90 90 21 mm 11 Drücken Sie Teil Hc auf Teil Ha Ha Hc electrolux 31 ...

Page 32: ...ls des Führungsstücks Hb aus Hb 15 Drücken Sie Teil Hd auf Teil Hb Hb Hd Führen Sie eine Endkontrolle durch um si cherzustellen dass Alle Schrauben fest angezogen sind Der magnetische Dichtungsstreifen fest am Gerät anliegt HINWEISE ZUM UMWELTSCHUTZ Das Symbol auf dem Produkt oder seiner Verpackung weist darauf hin dass dieses Produkt nicht als normaler Haushaltsabfall zu behandeln ist sondern an ...

Page 33: ...Produkts erhalten Sie von Ihrem Rathaus Ihrer Müllabfuhr oder dem Geschäft in dem Sie das Produkt gekauft haben electrolux 33 ...

Page 34: ...34 electrolux ...

Page 35: ...electrolux 35 ...

Page 36: ...222334757 A 492010 www electrolux com shop ...

Reviews: