background image

17

ENGLISH

1. 

  SAFETY INFORMATION

Read the instructions with care before installing and 

operating the appliance. The manufacturer is not 

responsible for injuries and damage caused by improper 

installation and use of the appliance. Always keep the 

instructions at hand for future reference.

1.1 

Safety of children and vulnerable people

 •This appliance can be used by children aged 8 years 

and older and adults with limited physical, sensory or 

mental abilities or lack of experience or knowledge 

concerning use of the equipment, only if supervised or 

instructed on the use of the appliance and only if they 

understand the risks involved. 

 •Do not allow children to play with the appliance. 

 •Keep packaging materials out of the reach of children. 

 •Cleaning and maintenance operations should not be 

performed by unsupervised children.

1.2 

General safety warnings

 •The appliance is designed for domestic use and similar 

purposes, for example:

- in country houses, shop kitchens, offices and other 

work environments;

- by guests at hotels, motels, bed and breakfasts and 

in other residential environments.

 • Use the appliance only to preserve foods.

 •Check that the ventilation openings of the appliance 

and in the recessed structure are not obstructed.

 •

 Do not use mechanical devices or other artificial 

means not recommended by the manufacturer for the 

de-icing.

 •Do not damage the refrigeration circuit.

 •Do not use electrical appliances inside the food 

storage components.

Summary of Contents for KBB5T

Page 1: ...battitore di temperatura Istruzioni per l uso 16 EN Blast chiller Operating instructions 30 DE Schockfroster Bedienungsanleitungen 44 FR Cellule de refroidissement Mode d emploi 58 NL Koelkast Instructies voor het gebruik ...

Page 2: ...stration Acquistare accessori materiali di consumo e ricambi originali per la vostra apparecchiatura www electrolux com shop SERVIZIO CLIENTI E MANUTENZIONE Consigliamo sempre l impiego di ricambi originali Quando si contatta l Assistenza accertarsi di disporre dei seguenti dati Le informazioni si trovano sulla targhetta di identificazione Modello numero dell apparecchio PNC numero di serie Avvert...

Page 3: ...l uso dell apparecchiatura e se hanno compreso i rischi coinvolti Non consentire ai bambini di giocare con l apparecchiatura Tenere i materiali di imballaggio al di fuori della portata dei bambini La pulizia e gli interventi di manutenzione non devono essere eseguiti dai bambini senza supervisione 1 2 Avvertenze di sicurezza generali L apparecchiatura è destinata all uso domestico ed usi simili ad...

Page 4: ...amento dell apparecchiatura dato che è molto pesante Indossare sempre guanti di sicurezza Assicurarsi che l aria possa circolare liberamente attorno all apparecchiatura Attendere almeno 4 ore prima di collegare l apparecchiatura all alimentazione Questo serve a consentire all olio di fluire nuovamente nel compressore Non installare l apparecchiatura in prossimità di radiatori fornelli forni o pian...

Page 5: ...recchiatura Non conservare gas e liquidi infiammabili nell apparecchiatura Non appoggiare o tenere liquidi o materiali infiammabili né oggetti facilmente incendiabili sull apparecchiatura al suo interno o nelle immediate vicinanze Non toccare il compressore o il condensatore Sono incandescenti 2 4 Manutenzione e pulizia ATTENZIONE Rischio di lesioni o danni all apparecchiatura Prima di eseguire qu...

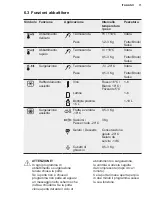
Page 6: ...lazione 18 C degli alimenti Gli alimenti crudi e cotti trattati in questo modo conservano inalterate le loro qualità organolettiche preservandone il gusto e la freschezza Alla fine di ogni ciclo selezionato l apparecchiatura passa automaticamente alla fase di mantenimento mantenendo il prodotto alla temperatura preimpostata per un massimo di 24 ore 1 2 3 4 5 6 3 1 Accessori Ripiano a filo x2 Spugn...

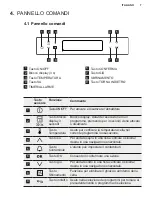
Page 7: ...ne attivato o disattivato 3 Tasto Temperatura Usato per verificare la temperatura cella nel corrente programma in esecuzione 4 Tasto su Per andare sopra in una lista verticale o sinistra destra in una navigazione orizzontale 5 Tasto Contaminuti L utente può impostare il contaminuti 6 Tasto OK Consente di confermare una azione 7 Tasto giù Per andare sotto in una lista verticale o sinistra destra in...

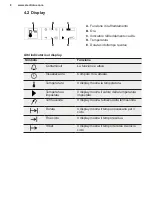
Page 8: ...a ora Compare l ora attuale Temperatura Il display mostra la temperatura Temperatura impostata Il display mostra il valore della temperatura impostata Termosonda Il display mostra l utilizzo della termosonda Durata Il display mostra il tempo necessario per il ciclo Fine ciclo Il display mostra il tempo residuo Timer Il display mostra il tempo decorso da inizio ciclo A B C E D Altri indicatori sul ...

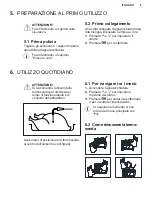
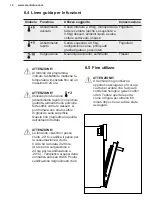
Page 9: ... 1 Premere e per impostare il valore 2 Premere per confermare 6 UTILIZZO QUOTIDIANO ATTENZIONE Si raccomanda l utilizzo della termosonda per ottimizzare i tempi di funzionamento ed i consumi dell abbattitore Assicurarsi di posizionare la termosonda al centro dell alimento vedi figura 6 1 Per navigare tra i menù 1 Accendere l apparecchiatura 2 Premere e per impostare l opzione del menù 3 Premere pe...

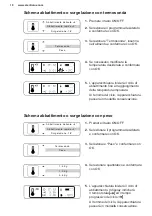
Page 10: ...azione con peso Abbattimento delicato 5 Abbattimento rapido 3 Surgelazione 18 1 5 Kg 0 5 Kg 1 0 Kg 4 Selezionare quantitativo e confermare con OK Peso Termosonda 4 Se necessario modificare la temperatura desiderata e confermare con OK Abbattimento delicato 5 Abbattimento rapido 3 Surgelazione 18 1 Premere il tasto ON OFF 2 Selezionare il programma desiderato e confermare con OK Peso Termosonda 3 S...

Page 11: ...tiglie plastica 1 5 L 1 10 L Surgelazione assistita Frutta e verdura 18 C 0 5 3 Kg Sashimi Pesce crudo 20 C 3 Kg Gelato Desserts Conservazione gelato 20 C Gelato da servire 14 C Cubetti di ghiaccio 0 5 3 Kg ATTENZIONE In ogni programma di abbattimento o surgelazione tenere chiusa la porta Se la porta non è chiusa il programma non parte ed appare un messaggio nello schermo che invita a chiuderla Se...

Page 12: ...ONE Utilizzando la funzione abbattimento rapido con piccole quantità alimenti mono porzione fette sottili verdure dessert si può formare uno strato sottile di ghiaccio sulla superficie Questo non pregiudica la qualità dell alimento trattato ATTENZIONE La funzione sashimi pesce crudo 20 C sanifica il pesce per la consumazione a crudo Il ciclo ha la durata di 28 ore 4 ore per la surgelazione e 24 or...

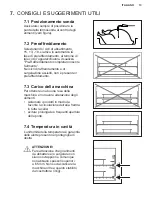
Page 13: ... assistiti non è presente il preraffreddamento 7 3 Carico della macchina Per ottenere una buona resa della macchina e non avere alterazione degli alimenti sistemare i prodotti in modo da favorire la circolazione dell aria fredda in tutta la cella evitare prolungate e frequenti aperture delle porte 7 4 Temperatura in cavità L uniformità della temperatura è garantita dalle alette presenti nel portag...

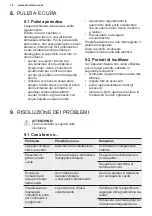
Page 14: ... Dopo la pulizia ricollegare l apparecchiatura alla rete elettrica 8 2 Periodi di inutilizzo Se l apparecchiatura non viene utilizzata per un lungo periodo adottare le seguenti precauzioni scollegare l apparecchiatura dalla rete elettrica togliere tutti gli accessori pulire l apparecchiatura e tutti gli accessori lasciare la porta aperta per evitare la formazione di odori sgradevoli 9 RISOLUZIONE ...

Page 15: ...l assistenza per la sostituzione L apparecchiatura richiede di inserire la termosonda con la termosonda già inserita Rottura della termosonda Contattare l assistenza tecnica A porte aperte i led sono spenti Funzione de ice attivata Attendere la fine del programma Rottura luci led Contattare l assistenza tecnica Le luci non funzionano Rottura luci led Contattare l assistenza tecnica 10 CONSIDERAZIO...

Page 16: ... Buy accessories consumables and genuine spare parts for your appliance www electrolux com shop CUSTOMER SERVICE AND MAINTENANCE We always recommend the use of original spare parts When contacting the Service Centre make sure you have the following details at hand The information can be found on the data plate Model appliance number PNC and serial number Caution Warning Important Safety informatio...

Page 17: ...sks involved Do not allow children to play with the appliance Keep packaging materials out of the reach of children Cleaning and maintenance operations should not be performed by unsupervised children 1 2 General safety warnings The appliance is designed for domestic use and similar purposes for example in country houses shop kitchens offices and other work environments by guests at hotels motels ...

Page 18: ...ake sure that air can circulate freely around the appliance Wait at least 4 hours before connecting the appliance to the mains This allows the oil to flow back into the compressor Do not install the appliance near heaters stoves ovens and hobs The back of the appliance must rest against the wall with duct Do not install the appliance in an area exposed to direct sunlight Do not install this applia...

Page 19: ...objects on the plastic parts of the appliance Do not store flammable liquids and gas in the appliance Do not put or keep liquids or flammable materials or highly flammable objects on inside or near the appliance Do not touch the compressor or condenser These are hot 2 4 Maintenance and clea ning WARNING Risk of injury or damage to the appliance Before performing maintenance always switch off and u...

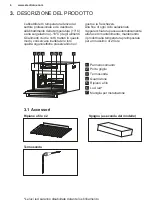
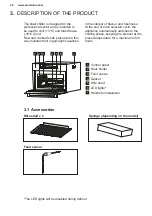
Page 20: ...alities in the interest of flavour and freshness At the end of each selected cycle the appliance automatically switches to the holding phase keeping the product at the preset temperature for a maximum of 24 hours 3 1 Accessories Wire shelf x 2 Sponge depending on the model Food sensor 1 Control panel 2 Rack holder 3 Food sensor 4 Gasket 5 Wire shelf 6 LED lights Handle for installation 1 2 3 4 5 6...

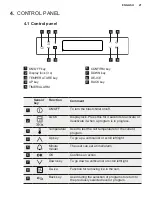
Page 21: ...s for 3 seconds to activate or deactivate it when a program is in progress 3 Temperature Used to test the cell temperature for the current program 4 Up key To go up a vertical list or scroll left right 5 Minute minder The user can set a timer alarm 6 OK Confirms an action 7 Down key To go down a vertical list or scroll left right 8 De ice Function for removing ice in the cell 9 Back key Used durin...

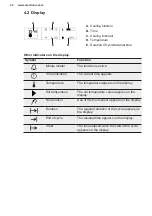
Page 22: ...pears Temperature The temperature appears on the display Set temperature The set temperature value appears on the display Food sensor Use of the food sensor appears on the display Duration The required duration of the cycle appears on the display End of cycle The residual time appears on the display Timer The time elapsed since the start of the cycle appears on the display A B C E D Other indicato...

Page 23: ...language and time 1 Press and to set the value 2 Press to confirm 6 DAILY USE WARNING It is advisable to use the food sensor to optimise the operating times and consumption of the blast chiller Make sure to insert the food sensor in the middle of the food see figure 6 1 Browsing the menus 1 Switch on the appliance 2 Press and to set the option in the menu 3 Press to go to the sub menu or accept th...

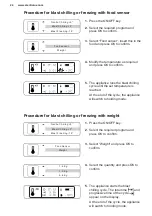
Page 24: ...ast chilling or freezing with weight HQWOH KLOOLQJ r ODVW KLOOLQJ r ODVW UHH LQJ r 1 5 Kg 0 5 Kg 1 0 Kg 4 Select the quantity and press OK to confirm HLJKW RRG VHQVRU 4 Modify the temperature as required and press OK to confirm HQWOH KLOOLQJ r ODVW KLOOLQJ r ODVW UHH LQJ r 1 Press the ON OFF key 2 Select the required program and press OK to confirm HLJKW RRG 6HQVRU 3 Select Weight and press OK to ...

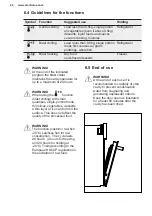
Page 25: ...plastic bottle 1 10 L Assisted freezing Fruit vegetables 18 C 0 5 3 Kg Sashimi Raw fish 20 C 3 Kg Ice cream Desserts Blast freezing of ice cream 20 C Ice cream ready to serve 14 C Ice cubes 0 5 3 Kg WARNING Keep the door closed during every blast chilling or freezing program If the door is not closed the program does not start and a message appears on the screen prompting you to close it If the do...

Page 26: ...of 24 hours WARNING When using the function blast chilling with small quantities single portion foods thin slices vegetables desserts a thin layer of ice can form on the surface This does not affect the quality of the processed food WARNING The function sashimi raw fish 20 C sanitises fish for raw consumption The cycle lasts 28 hours 4 hours for freezing and 24 hours for holding at 20 C Timing acc...

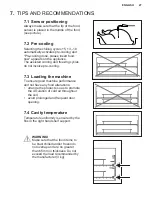
Page 27: ...ng cycles do not involve pre cooling 7 3 Loading the machine To ensure good machine performance and not have any food alterations arrange the products so as to promote the circulation of cold air throughout the cell avoid prolonged and frequent door opening 7 4 Cavity temperature Temperature uniformity is ensured by the fins in the right hand shelf support WARNING Make sure that the food items to ...

Page 28: ...efrigeration system After cleaning plug the appliance back into the mains 8 2 Periods of inactivity If the appliance is not to be used for a long period adopt the following precautions unplug the appliance remove all the accessories clean the appliance and all the accessories leave the door open to prevent the formation of unpleasant odours 9 TROUBLESHOOTING WARNING Refer to the chapters on safety...

Page 29: ...Centre to request a replacement The appliance prompts the user to insert the food sensor when it is in fact already inserted Broken food sensor Contact the technical Service Centre The lights do not work LED light failure Contact the technical support service The LEDs are switched off with the doors open De ice function active Wait for the end of the program LED light failure Contact the technical...

Page 30: ... erhalten www electrolux com productregistration Zubehörteile Verbrauchsmaterial und Original Ersatzteile für Ihr Gerät kaufen www electrolux com shop KUNDENDIENST UND WARTUNG Wir empfehlen stets den Einsatz von Original Ersatzteilen Beim Kontaktieren der Kundendienststelle ist stets sicherzustellen über die folgenden Daten zu verfügen Die Informationen sind auf dem Kennschild angegeben Modell Ger...

Page 31: ...Verwendung des Geräts entsprechend angelernt wurden und die damit verbundenen Risiken verstanden haben Achtgeben dass Kinder nicht mit dem Gerät spielen Das Verpackungsmaterial muss stets außer der Reichweite von Kindern sein Reinigungs und Wartungseingriffe dürfen nie von Kindern ohne Beaufsichtigung ausgeführt werden 1 2 Allgemeine Sicherheitshinweise Das Gerät ist für die Verwendung im Haushalt...

Page 32: ...lten Beim Verstellen des Geräts Achtsamkeit anwenden da es sehr schwer ist Immer Sicherheitshandschuhe anlegen Sicherstellen dass die Luft unbehindert um das Gerät zirkulieren kann Mindestens 4 Stunden warten bevor das Gerät an die Stromversorgung angeschlossen wird Dies damit das Öl neuerdings in den Verdichter fließen kann Das Gerät nicht in der Nähe von Heizkörpern Herden Öfen oder Kochfeldern ...

Page 33: ...stikteile des Gerätes legen Gas und entflammbare Flüssigkeiten dürfen nicht im Gerät aufbewahrt werden Entflammbare Flüssigkeiten oder Materialien leicht entzündbare Gegenstände dürfen nicht auf dem Gerät im Gerät oder in unmittelbarer Nähe des Geräts abgestellt oder gehalten werden Den Verdichter oder den Kondensator nicht berühren Sie sind glühend heiß 2 4 Wartung und Reinigung ACHTUNG Risiko vo...

Page 34: ... organoleptische Qualität und bleiben schmackhaft und frisch Nach Abschluss jedes gewählten Programms schaltet das Gerät automatisch auf die Erhaltung um und hält das Produkt höchstens 24 Stunden lang auf der vorgegebenen Temperatur 3 1 Zubehör Gitterrost für 2 Schwamm je nach Modell Kerntemperatursensor 1 Schalttafel 2 Gitterrosthalterung 3 Kerntemperatursensor 4 Dichtung 5 Gitterrost 6 LED Leuch...

Page 35: ... die Temperatur der Zelle im gerade ausgeführten Programm zu überprüfen 4 Taste Pfeil nach oben Um eine vertikale Lister nach oben zu scrollen oder zur Links Rechtsverschiebung bei einer horizontalen Navigation 5 Kurzzeit Wecker Der Benutzer kann den Timer Alarm einstellen 6 OK Dient zur Bestätigung einer Handlung 7 Taste Pfeil nach unten Um eine vertikale Lister nach unten zu scrollen oder zur Li...

Page 36: ...splay wird die Temperatur angezeigt Zieltemperatur Am Display wird die Zieltemperatur angezeigt Kerntemperatursensor Am Display wird die Benutzung des Kerntemperatursensors gezeigt Dauer Am Display wird die für das Programm benötigte Zeit angezeigt Ende des Programms Am Display wird die restliche Zeit angezeigt Timer Am Display wird die Zeit angezeigt die ab Beginn des Programms vergangen ist A B ...

Page 37: ... und um den Wert einzustellen 2 Druck auf zum Bestätigen 6 TÄGLICHE BENUTZUNG ACHTUNG Es wird empfohlen den Kerntemperatursensor zu verwenden um die Betriebszeiten und den Verbrauch der Schockfroster zu optimieren Darauf achten dass der Kerntemperatursensor in die Mitte des Gerichts positioniert wird siehe Abbildung 6 1 Zur Navigation in den Menüs 1 Gerät einschalten 2 Druck auf und um die Option ...

Page 38: ...es Einfrieren mit Gewicht 6FKRQHQGHV KOHQ r 6FKQHOOHV KOH r 6FKQHOOHV LQIULHUHQ r 1 5 Kg 0 5 Kg 1 0 Kg 4 Menge wählen und mit OK bestätigen HZLFKW HUQWHPSHUDWXUVHQVRU 4 Sofern erforderlich die Temperatur ändern und mit OK bestätigen 6FKRQHQGHV KOHQ r 6FKQHOOHV KOH r 6FKQHOOHV LQIULHUHQ r 1 Die Taste ON OFF betätigen 2 Das gewünschte Programm wählen und mit OK bestätigen HZLFKW HUQWHPSHUDWXUVHQVRU ...

Page 39: ...n 1 5 L 1 10 L Gefrierassistent Obst und Gemüse 18 C 0 5 3 Kg Sashimi Roher Fisch 20 C 3 Kg Eiscreme Desserts Schnelles Einfrieren Eiscreme 20 C Eiscreme servierfertig 14 C Eiswürfel 0 5 3 Kg ACHTUNG Während des Ablaufs eines Programms zum Kühlen oder schnellen Einfrieren muss die Tür stets geschlossen sein Bei offenstehender Tür startet das Programm nicht und am Bildschirm wird eine Meldung einge...

Page 40: ...unktion schnelles Kühlen kann sich bei kleinen Mengen Einzelportionen dünnen Scheiben Gemüse und Desserts eine dünne Eisschicht auf der Oberfläche bilden Dies hat keinen Einfluss auf die Qualität der behandelten Lebensmittel ACHTUNG Mit der Funktion Sashimi roher Fisch 20 C werden Parasiten in dem für rohen Verzehr vorgesehenem Fisch abgetötet Der Zyklus hat eine Dauer von 28 Stunden 4 Stunden für...

Page 41: ...Kühl und Gefrierassistent fällt das Vorkühlen aus 7 3 Beladen der Maschine Für eine gute Wirksamkeit der Maschine und Speisen ohne Beeinträchtigung der Qualität Die Produkte so anordnen dass die Luft in der Zelle überall zirkulieren kann längeres und oftmaliges Öffnen der Türen vermeiden 7 4 Temperatur im Innenraum Die Rippen im rechten Gitterrosthalter gewährleisten ein gleichmäßiges ACHTUNG Dara...

Page 42: ...arauf achten dass der Kältekreis nicht beschädigt wird Nach Abschluss der Reinigungsarbeiten das Gerät an das Stromnetz anschließen 8 2 Stillstandzeiten Falls das Gerät über eine längere Zeit nicht verwendet wird sind folgende Vorsichtsmaßnahmen zu treffen Das Gerät vom Stromnetz abschließen sämtliche Zubehörteile entfernen das Gerät und alle Zubehörteile reinigen die Tür offen lassen um zu vermei...

Page 43: ... Gerät erfragt die Einfügung des Kerntemperatursensors wenn der Kerntemperatursensor bereits eingefügt ist Bruch des Kerntemperatursensors Technischen Kundendienst kontaktieren Die Lampen funktionieren nicht Die LED Leuchten sind defekt Technischen Kundendienst kontaktieren Die LED Leuchten sind bei geöffneten Türen ausgeschaltet De Ice Funktion aktiviert Das Ende des Programms abwarten Die LED Le...

Page 44: ... matériels de consommation et des pièces de rechange originales pour votre appareil www electrolux com shop SERVICE CLIENTS ET ENTRETIEN Nous conseillons toujours l emploi de pièces de rechange originales Lorsqu on contacte l Assistance s assurer de disposer des données suivantes Les informations se trouvent sur la plaque d identification Modèle numéro de l appareil PNC numéro de série Mise en gar...

Page 45: ...et s ils ont compris les risques qu il implique Ne pas permettre aux enfants de jouer avec l appareil Conserver les emballages hors de portée des enfants Le nettoyage et les interventions d entretien ne doivent pas être effectués par des enfants sans supervision 1 2 Mises en garde de sécurité générales L appareil est destiné à une utilisation domestique et à des utilisations similaires par exemple...

Page 46: ...ment de l appareil vu qu il est très lourd Porter toujours des gants de sécurité S assurer que l air puisse circuler librement autour de l appareil Attendre au moins 4 heures avant de relier l appareil à l alimentation Cela permet à l huile de couler à nouveau dans le compresseur Ne pas installer l appareil à proximité de radiateurs réchauds fours ou plans de cuisson La surface arrière de l appare...

Page 47: ...es en plastique de l appareil Ne pas conserver de gaz ni de liquides inflammables dans l appareil Ne pas poser ni tenir de liquides ou matériaux inflammables ou d objets facilement inflammables sur l appareil à l intérieur de celui ci ou à proximité Ne pas toucher le compresseur ou condenseur Ils sont incandescents 2 4 Entretien et nettoyage ATTENTION Risque de lésions ou dommages à l appareil Ava...

Page 48: ...naltérées en préservant le goût et la fraîcheur À la fin de chaque cycle sélectionné l appareil passe automatiquement à la phase de maintien en maintenant le produit à la température pré configurée pendant un maximum de 24 heures 3 1 Accessoires Étagère x2 Éponge selon le modèle Sonde à viande Les lumières LED seront désactivées pendant le dégivrage 1 Tableau de commande 2 Porte grilles 3 Sonde à ...

Page 49: ...econdes il est activé ou désactivé 3 Température Utilisée pour vérifier la température de la cellule dans le programme en cours d exécution 4 Touche en haut Pour aller en haut dans une liste verticale ou gauche droite dans une navigation horizontale 5 Minuteur L utilisateur peut configurer time alarme 6 OK Permet de confirmer une action 7 Touche en bas Pour aller en bas dans une liste verticale ou...

Page 50: ... L heure actuelle apparaît Température L écran montre la température Température configurée L écran montre la valeur de la température configurée Sonde à viande L écran montre l utilisation de la Sonde à viande Durée L écran montre le temps nécessaire pour le cycle Fin du cycle L écran montre le temps résiduel Timer L écran montre le temps écoulé depuis le début du cycle A B C E D Autres indicateu...

Page 51: ...figurer la valeur 2 Presser pour confirmer 6 UTILISATION QUOTIDIENNE ATTENTION Il est recommandé d utiliser la Sonde à viande pour optimiser les temps de fonctionnement et les consommations de la cellule de refroidissement S assurer de positionner la Sonde à viande au centre de l aliment voir la figure 6 1 Pour naviguer dans les menus 1 Allumer l appareil 2 Presser et pour configurer l option du m...

Page 52: ...e refroidissement ou surgélation avec le poids 5HIURLGLVVHPHQW GRX r 5HIURLGLVVPHQW UDSLGH r 6XUJªODWLRQ r 1 5 Kg 0 5 Kg 1 0 Kg 4 Sélectionner la quantité et confirmer avec OK 3RLGV 6RQGH YLDQGH 4 Si nécessaire modifier la température souhaitée et confirmer avec OK 5HIURLGLVVHPHQW GRX r 5HIURLGLVVPHQW UDSLGH r 6XUJªODWLRQ r 1 Presser la touche ON OFF 2 Sélectionner le programme souhaité et confirm...

Page 53: ... Canettes 1 6 Bouteilles plastique 1 5 L 1 10 L Surgélation assistée Fruits et légumes 18 C 0 5 3 Kg Sashimi Poisson cru 20 C 3 Kg Glace Desserts Surgélation glace 20 C Crèmes glacées prête à servir 14 C Glaçons 0 5 3 Kg ATTENTION Dans chaque programme de refroidissement ou de surgélation maintenir la porte fermée Si la porte n est pas fermée le programme ne part pas et un message invitant à la fe...

Page 54: ...N En utilisant la fonction refroidissement rapide avec de petites quantités des aliments une portion des tranches fines légumes des desserts il est possible qu une fine couche de givre se forme sur la surface Cela ne compromet pas la qualité de l aliment traité ATTENTION La fonction sashimi poisson cru 20 C assainit le poisson pour la consommation crue Le cycle dure 28 heures 4 heures pour la surg...

Page 55: ...pas présent le pré refroidissement 7 3 Chargement de la machine Pour obtenir un bon rendement de la machine et ne pas avoir d altération des aliments installer les produits de façon à favoriser la circulation de l air froid dans toute la cellule éviter les ouvertures prolongées et fréquentes des portes 7 4 Température dans la cavité L uniformité de la température est garantie par les ailettes prés...

Page 56: ...ion de ne pas endommager le système réfrigérant Après le nettoyage rebrancher l appareil au réseau électrique 8 2 Périodes d inutilisation Si l appareil n est pas utilisé pendant une longue période adopter les précautions suivantes débrancher l appareil du réseau électrique enlever tous les accessoires nettoyer l appareil et tous les accessoires laisser la porte ouverte pour éviter la formation d ...

Page 57: ...t appeler l assistance pour la substitution L appareil demande d introduire la Sonde à viande avec la Sonde à viande déjà introduite Rupture de la Sonde à viande Contacter l assistance technique Les lumières ne fonctionnent pas Rupture des LED d éclairage Contacter l assistance technique Avec les portes ouvertes les LED sont éteintes Fonction de ice activée Attendre la fin du programme Rupture des...

Page 58: ...m productregistration Koop accessoires verbruiksmaterialen en originele reserveonderdelen voor uw apparatuur www electrolux com shop KLANTENDIENST EN ONDERHOUD Wij raden aan altijd originele reserveonderdelen te gebruiken Wanneer u contact opneemt met het erkende servicecentrum vragen wij u de volgende gegevens bij de hand te houden Model nummer van het apparaat PNC serienummer Waarschuwing Let op...

Page 59: ... gebruik van de apparatuur en de bijbehorende risico s begrepen hebben Laat kinderen niet met de apparatuur spelen Houd het verpakkingsmateriaal buiten het bereik van kinderen De reiniging en de onderhoudsingrepen mogen niet zonder toezicht door kinderen uitgevoerd worden 1 2 Algemene waarschuwingen in het kader van de veiligheid De apparatuur is bestemd voor huishoudelijk gebruik en gelijkaardig ...

Page 60: ...n de apparatuur omdat die erg zwaar is Draag altijd veiligheidshandschoenen Controleer of de lucht rondom de apparatuur onbelemmerd kan circuleren Wacht minstens 4 uur alvorens de apparatuur op het voedingsnet aan te sluiten Dit dient ervoor om de olie in staat te stellen opnieuw in de compressor te stromen Installeer de apparatuur niet in de nabijheid van radiators fornuizen ovens of kookplaten H...

Page 61: ... van de apparatuur Bewaar geen ontvlambare gassen en vloeistoffen in de apparatuur Plaats of bewaar geen ontvlambare vloeistoffen of materialen noch gemakkelijk brandbare voorwerpen op of in de apparatuur of in de onmiddellijke nabijheid ervan Raak de compressor of de condensor niet aan Ze zijn gloeiend heet 2 4 Onderhoud en reiniging LET OP Risico op letsel of beschadiging van de apparatuur Schak...

Page 62: ...oleptische kenmerken van de rauwe en gekookte levensmiddelen die op deze wijze behandeld worden blijven intact en behouden de smaak en de versheid Aan het einde van iedere geselecteerde cyclus gaat de apparatuur automatisch over naar de fase van handhaving waarbij het product gedurende maximaal 24 uur op de van tevoren ingestelde temperatuur gehad aafd blijft 1 2 3 4 5 6 3 1 Accessoires Rooster 2 ...

Page 63: ...gedeactiveerd 3 Temperatuur Gebruikt om de binnentemperatuur te controleren in het programma dat op dat moment in uitvoering is 4 Toets omhoog Om bovenaan een verticale lijst te gaan staan of links rechts in een horizontale navigatie 5 Kookwekker De gebruiker kan een timer alarm instellen 6 OK Maakt het mogelijk een actie te bevestigen 7 Toets omlaag Om onderaan een verticale lijst te gaan staan o...

Page 64: ...et display toont de temperatuur Ingestelde temperatuur Het display toont de waarde van de ingestelde temperatuur Kerntemperatuursensor Het display toont het gebruik van de kerntemperatuursonde Duur Het display toont de tijd die nodig is voor de cyclus Einde cyclus Het display toont de resterende tijd Timer Het display toont de tijd die sinds het begin van de cyclus verstreken is A B C E D Andere i...

Page 65: ...n te stellen 2 Druk op om te bevestigen 6 DAGELIJKS GEBRUIK LET OP Het wordt aanbevolen de kerntemperatuursensor te gebruiken om de tijden van werking en het verbruik van de snelkoeler te optimaliseren Zorg ervoor dat de kerntemperatuursensor wordt geplaatst in het midden van het levensmiddel zie afbeelding 6 1 Tussen de menu s navigeren 1 Schakel de apparatuur in 2 Druk op en om de optie van het ...

Page 66: ...oelen of invriezen met gewicht RHOHQ r 6QHO NRHOHQ r 6QHO YULH HQ r 1 5 Kg 0 5 Kg 1 0 Kg 4 Selecteer de hoeveelheid en bevestig met OK HZLFKW HUQWHPSHUDWXXUVHQVRU 4 Wijzig indien nodig de gewenste temperatuur en bevestig met OK RHOHQ r 6QHO NRHOHQ r 6QHO YULH HQ r 1 Druk op de toets ON OFF 2 Selecteer het gewenste programma en bevestig met OK HZLFKW HUQWHPSHUDWXXUVHQVRU 3 Selecteer Gewicht en beve...

Page 67: ...kjes 1 6 Plastieke flessen 1 5 L 1 10 L Geassisteerd invriezen Fruit en groene 18 C 0 5 3 Kg Sashimi Rauwe vis 20 C 3 Kg IJs desserts Invriezen ijs 20 C Roomijs gebruiksklaar 14 C IJs blokjes 0 5 3 Kg LET OP Tijdens ieder koel of invriesprogramma moet de deur gesloten blijven Als de deur niet gesloten is gaat het programma niet van start en verschijnt een bericht op het scherm waarmee u uitgenodig...

Page 68: ... gebruiken met kleine hoeveelheden levensmiddelen enkele portie dunne plakken groente dessert kan zich een dunne ijslaag op het oppervlak vormen Dit heeft geen invloed op de kwaliteit van het behandelde levensmiddel LET OP De functie sashimi rauwe vis 20 C maakt de vis geschikt voor rauwe consumptie De cyclus duurt 28 uur 4 uur voor het invriezen en 24 uur voor het handhaven van de temperatuur op ...

Page 69: ...een voorkoeling aanwezig 7 3 Lading van de machine Om een goed rendement van de machine te verkrijgen en geen verslechtering van de levensmiddelen plaats de producten zodanig dat de circulatie van koude lucht in de gehele cel bevorderd wordt vermijd het langdurig en veelvuldig openen van de deur 7 4 Temperatuur in binnenruimte De uniformiteit van de temperatuur wordt gegarandeerd door de koelvinne...

Page 70: ... Let op dat het koelsysteem niet beschadigd wordt Sluit het apparaat na de reiniging aan op het elektriciteitsnet 8 2 Periodes van onbruik Als het apparaat lange tijd niet gebruikt wordt tref dan de volgende voorzorgsmaatregelen sluit het apparaat af van het elektriciteitsnet neem alle accessoires weg reinig het apparaat en alle accessoires laat de deur open om te voorkomen dat onaangename geuren ...

Page 71: ...oduct De apparatuur vraagt om de kerntemperatuur sonde aan te brengen terwijl deze al aangebracht is De kerntemperatuursonde is kapot Neem contact op met de technische assistentie De lampjes functioneren niet Led lampjes defect Neem contact op met de technische assistentie Functie ontijzen geactiveerd Wacht tot het programma is beëindigd De led lampjes branden niet als de deuren open zijn Led lamp...

Page 72: ...electrolux com shop 450MD101 ...

Reviews: