background image

 electrolux 

29

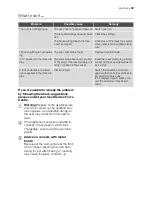
What to do if

If you are unable to remedy the problem 
by following the above suggestions, 
please contact your local Service Force 
Centre.

1

Warning!

 Repairs to the appliance are 

only to be carried out by qualified serv-
ice engineers. Considerable danger to 
the user may result from improper re-
pairs. 

3

If the appliance has been operated in-
correctly, the engineer's visit will be 
chargeable, even during the warranty 
period.

3

Advice on cookers with metal 
fronts:

Because of the cold surface at the front 
of the cooker, opening the oven door 
during (or just after) baking or roasting 
may cause the glass to steam up.

Problem

Possible cause

Remedy

The oven is not heating up

The oven has not been switched on

Switch oven on

The required settings have not been 
set

Check the settings

The house wiring fuse (in the fuse 
box) has tripped

Check fuse. If the fuses trip several 
times, please call a qualified electri-
cian

The oven lighting is not operat-
ing

The oven light bulb is faulty

Replace oven light bulb

“F11” appears in the clock dis-
play.

The meat probe has short circuited 
or the plug of the meat probe is not 
firmly in position in the socket

Insert the meat probe plug into the 
socket on the oven side wall as far 
as it will go

A fault code that is not listed 
above appears in the clock dis-
play

Electronic fault

Switch the appliance off and on 
again via the house fuse or the safe-
ty switch in the fuse box.
If it is displayed again, please con-
tact the Customer Care Depart-
ment

Summary of Contents for Kitchenette oven Profi-Steam EB SL7

Page 1: ...user manual Oven EB SL7 ...

Page 2: ...f 29 Installation Instructions 30 Disposal 32 Service 34 Electrolux Thinking of you Share more of our thinking at www electrolux com 5 Subject to change without notice The following symbols are used in this user manual 1Important information concerning your personal safety and information on how to avoid damaging the appliance 3General information and tips 2Environmental information ...

Page 3: ...r mixture may ensue In this case be careful when opening the door Do not handle any sources of heat sparks or naked flames when doing so 3 Information on acrylamides According to the latest scientific knowl edge intensive browning of food espe cially in products containing starch can constitute a health risk due to acryla mides Therefore we recommend cook ing at the lowest possible temperatures an...

Page 4: ... the Appliance General Overview 3 The oven switches off after 2 minutes if no function is selected and is changed at the oven nothing Heated drawer Oven displays and Touch Control sensor fields Door handle Water drawer Oven door ...

Page 5: ...t Meat core temperature Symbol Display Examples Function Countdown timer 4 30 The countdown timer is active Time 10 00 Indicates the current time set Duration 1 00 Indicates the period of time required for the cooking process End Time 14 05 Indicates the time at which the cooking process is com pleted End time is calculated when Meatprobe inserted Delay start 0 45 Indicates the time from which the...

Page 6: ... except for countdown timer To confirm To switch appliance on or off To switch drawer heater on or off To switch the internal oven light on or off Use this function to illuminate the oven interior e g for cleaning Select time functions additional functions and Meatprobe To set values e g temperature time weight degree of cooking To activate value Press once Present symbol flashes Press twice Value...

Page 7: ... tray For baking and roasting or use as a pan to collect fat Meat probe For determining exactly how far joints of meat are cooked Top heat and heating elements Oven lighting Oven shelf runners removable Oven levels Oven lighting Rear wall heating element Fat filter Steam generator Steam rosette Fan Meat probe socket Oven shelf runners removable Bottom heat not visible ...

Page 8: ...trast and the brightness are set according to the language set see sec tion Setting language Setting the clock After you have set the contrast and the brightness the message Set Time of Day is displayed 4 Using or set the hour of the current time 5 Confirm with 6 Using or set the minutes of the cur rent time 7 Confirm with The appliance is now ready to use 3 The time only has to be set if the appl...

Page 9: ... Gratins Side Dishes Combi Steaming Convenience Specials Heating Functions Fan Cooking Moist Fan Cooking Conventional Cooking Pizza Setting Turbo Grill Economy Grill Dual Grill Bottom Heat Slow Cook Regenerating Quarter Steam Heat Half Steam Heat Full Steam My Programmes 1 My Program 2 My Program Edit Programme Name Cleaning Menu Steam Cleaning Cleaning Assistant ...

Page 10: ...unction 3 Cooling fan The fan switches on automatically in or der to keep the appliance s surfaces cool When the oven is switched off the fan continues to run to cool the appli ance down then switches itself off auto matically Heat indicator Heating up indicator When an oven function has been switched on the bar that keeps getting longer indi cates how far the oven has heated up Fast heating indic...

Page 11: ...e bottom on the right and left hand edge Always insert insertable components so that this indentation is at the back of the oven interior This indentation is also im portant for preventing the insertable components from tipping Inserting the baking tray or roasting pan Push the baking tray or roasting pan between the guide bars of the selected oven level Inserting the oven shelf Insert the oven sh...

Page 12: ...emperature cook time for the respective dish Inserting the fat filter Hold the fat filter by the grip and insert the two mounts downwards into the opening on the rear wall of the oven fan opening Taking out the fat filter Hold the fat filter by the grip and unhook it Category Dish Pork Veal Roast Pork Veal Knuckle Pork Ossobuco Pork Knuckle Stuffed Veal Breast Pork Shoulder Meat Loaf Roast Veal Be...

Page 13: ...ke Ring Cake Swedish Cake Savarin Cake Biscuit Brownies Cheese Cake Muffins Fruit Cake Sweet Tart Streusel Cake Carrot Cake Rich Yeast Plait Almond Cake Yeast Plait Fruit Tart Desserts Flan Caramel Cherry Pie Coconut Pudding Plum Dumpling Cappuccino Cake Pizza Pie Bread Pizza Cheese Pastry Onion Tart White Bread Quiche Lorraine Farme Bread Goatscheese Flan Russian Cake Cheese Flan Casseroles Grati...

Page 14: ...ight Automatic 4 Confirm with 5 Using or set the weight of the food The setting changes in 0 2 kg steps The automatic programme is started As soon as the automatic programme has finished an audible signal sounds 6 Press any key to switch off the signal 3 If the suggested weight is not changed within approx 5 seconds the pro gramme starts automatically The weight can be altered at any time Side Dis...

Page 15: ...at the Meatprobe is pushed into the meat and into the socket at the beginning of the cooking process and that it is not re moved during the cooking process 1 Warning The Meatprobe is hot There is a risk of being burned when removing the plug and the tip of the meat probe Assisted Cooking with Recipe Automatic All settings are fixed and cannot be changed Example 1 Using or select the menu option As...

Page 16: ...n when using Conventional Moist Fan Cooking For energy saving baking and cooking of mainly dry bakery items as well as for baking in tins on one level Conventional Cooking For baking and roasting on one oven level Pizza Setting For baking on one oven level dishes that require more intensive browning and a crispy base Set the oven temperatures 20 40 C lower than when using Conventional Turbo Grill ...

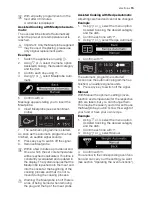
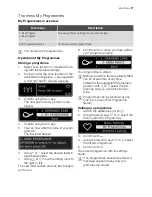
Page 17: ...changed and so on 8 Confirm with when you have written your programme name Your programme is stored 3 Memory positions that are already filled can be overwritten at any time Instead of the suggested free memory position with or select the pro gramme that you would like to over write 3 Programmes can be renamed at any time in the menu Edit Programme Name Calling up a programme 1 Switch the applianc...

Page 18: ...et Go function is not displayed in the Select options win dow Heat Hold On Heat Hold function is displayed in the Select options win dow and can be activated Off Heat Hold function is not displayed in the Select options window Time Extension On Off Switch Time Extension function on or off Display Contrast 1 10 Set display contrast in steps Display Brightness 1 10 Set display brightness in steps Se...

Page 19: ... is now switched on To start Set Go 1 Press any key except Selected oven function starts As soon as the oven function is com pleted a signal sounds 2 Press any key to switch off the signal 3 While the selected oven function with is operating Set Go the Key Lock is ac tive see section Key Lock 3 Set Go can be activated or deactivated in the Basic Settings menu Heat Hold The function Heat Hold keeps...

Page 20: ... signal sounds This function has no effect on the operation of the oven 1 Press key repeatedly until the Minute Minder window appears Using or key set the desired countdown max 2 hours 30 minutes 2 Confirm with or wait 5 seconds The last menu option visited and the re maining time are displayed When the time has counted down to 10 a short signal sounds When the time has elapsed an acoustic sig nal...

Page 21: ...ith or wait 5 seconds 7 The selected oven function is displayed with the cooking time and switch off time set for a few seconds A message is displayed when the pro gramme starts Key Lock The key lock protects all functions set from accidental changes To switch on Key Lock 1 Select oven function 2 Press key repeatedly until the Key Lock window appears 3 Confirm with The Key Lock is now activated To...

Page 22: ... centre of the meat 3 Insert the plug of the Meatprobe as far as it will go into the socket on the side wall of the oven The window Meatprobe is displayed 4 Within 5 seconds using or set the desired core temperature 5 Confirm set core temperature with 6 Select oven function The menu for the oven function is displayed 7 If necessary set oven temperature 3 Within a few minutes a provisional end time...

Page 23: ... the cooking time and the heating up time of approx 2 minutes settings of less than 10 minutes have little effect Steam will also escape when the door is opened Full Steam 1 Water approx 650 ml is not poured di rectly into the steam generator but into the water drawer in the control panel The water supply lasts for approx 30 minutes 2 Switch the appliance on with 3 Use or to select the Oven functi...

Page 24: ...uring agents and abrasive sponges Oven interior Clean the appliance after each use In this way dirt is easier to clean off and is not al lowed to burn on 1 When the oven door is opened the oven light switches itself on automatically 2 After every use wipe the oven with a so lution of washing up liquid and allow to dry 3 Remove stubborn dirt with special oven cleaners 1 Important if using an oven c...

Page 25: ...tor Press the sponge firmly Remove the sponge and squeeze out the water To completely dry the oven leave the oven door open for around 1 hour Side Rails To clean the sides of the oven the left and right side rails can be removed Taking out the side rails 1 Loosen the screw 2 Pull the rails sidewards 1 3 Lift the rails off the side attachments 2 3 To remove replace the side rails open the cover on ...

Page 26: ...e steam generation system through the water drawer using clean water 100 200 ml 4 Soak up remaining water from the steam generator with the sponge and wipe dry 5 Leave the oven door open to let the oven dry out completely Oven Light 1 Danger of electrocution Before re placing the oven light bulb Switch off the oven Take the fuses out of the fuse box or switch off 3 To protect the oven light bulb a...

Page 27: ...230V 300 C heat resistant oven light bulb 5 Put the metal frame and seal back in place insert screws and tighten 6 Replace the side rails Oven door For easier cleaning of the oven interior the oven door of your appliance can be taken off its hinges Removing the oven door from its hinges 1 Open the oven door as far as it will go 2 Undo the clamping levers A on both door hinges fully 3 Close the ove...

Page 28: ...order to prevent scratches Hanging the oven door back on its hinges 1 From the handle side take hold of the oven door with a hand on each side and hold at an angle of approx 45 Position the recesses on the bottom of the oven door on the hinges on the ov en Let the door slide down as far as it will go 2 Open the oven door as far as it will go 3 Fold up the clamping levers A on both door hinges back...

Page 29: ...se Remedy The oven is not heating up The oven has not been switched on Switch oven on The required settings have not been set Check the settings The house wiring fuse in the fuse box has tripped Check fuse If the fuses trip several times please call a qualified electri cian The oven lighting is not operat ing The oven light bulb is faulty Replace oven light bulb F11 appears in the clock dis play T...

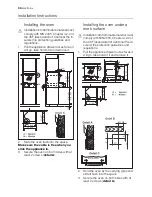
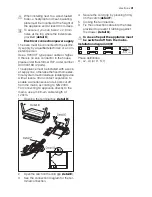
Page 30: ...Make sure the cable is free when you slide the appliance in 3 Secure the oven on both sides with at least 2 screws detail A Installing the oven under a work surface 1 Installation into flammable material must comply with NIN 2005 Chapter 4 2 2 of the VKF Association of Cantonal Fire In surers fire protection guidelines and regulations 1 Pull the appliance drawer out as far as it will go take hold ...

Page 31: ...alled with a sock et supply line otherwise the fixed home elec trical system must include an isolating device with at least a 3mm contact separation to enable a simultaneous and all pole cut off from the mains according to NIN 2000 For connecting to appliance directly to the mains use a minimum cable length of 120cm 1 Opening the terminal box detail D 2 Open the catch on the cord grip detail E 3 S...

Page 32: ...lp pre vent potential negative consequences for the environment and human health which could otherwise be caused by in appropriate waste handling of this prod uct For more detailed information about recycling of this product please contact your local city office your household waste disposal service or the shop where you purchased the product 3 Where should you take your old ma chines You can retu...

Page 33: ...u consommateur documenté au moyen d une facture d un bon de garantie ou d un justifi catif d achat Notre garantie couvre les frais de mains d œuvres et de déplacement ainsi que les pièc es de rechange Les conditions de garantie ne sont pas valables en cas d intervention d un tiers non autorisé de l emploi de pièces de rechange non originales d erreurs de maniement ou d installation dues à l inobse...

Page 34: ...ease contact the Customer Care Department or one of our service partners In order to be able to assist you quickly we require the following information Model description Product number PNC Serial number S No for numbers see rating plate Type of fault Any error messages displayed by the appliance So that you have the necessary reference numbers from your appliance at hand we recommend that you writ...

Page 35: ......

Page 36: ...www electrolux com www electrolux ch 315 904 403 P 070109 05 ...

Reviews: