background image

When the function operates, you cannot

change the heat setting.
The function does not stop the timer

functions.

To activate the function: touch  . 

comes on.

To deactivate the function: touch  .

The previous heat setting comes on.

4.10 Lock

You can lock the control panel while

cooking zones operate. It prevents an

accidental change of the heat setting.
Set the heat setting first.

To activate the function: touch  . 

comes on for 4 seconds. The Timer stays

on.

To deactivate the function: touch  .

The previous heat setting comes on.

When you deactivate the

hob, you also deactivate this

function.

4.11 The Child Safety Device

This function prevents an accidental

operation of the hob.
To activate the function: activate the
hob with  . Do not set the heat setting.
Touch   for 4 seconds.   comes on.
Deactivate the hob with  .
To deactivate the function: activate the
hob with  . Do not set the heat setting.
Touch   for 4 seconds.   comes on.
Deactivate the hob with  .
To override the function for only one
cooking time:
 activate the hob with  .

 comes on. Touch   for 4 seconds. 

Set the heat setting in 10 seconds.

You can operate the hob. When you
deactivate the hob with   the function

operates again.

4.12 OffSound Control

(Deactivating and activating the

sounds)

Deactivate the hob. Touch   for 3

seconds. The display comes on and
goes out. Touch   for 3 seconds.   or

 comes on. Touch   of the timer to

choose one of the following:

 - the sounds are off

 - the sounds are on

To confirm your selection wait until the

hob deactivates automatically.

When the function is set to   you can

hear the sounds only when:
• you touch 

• Minute Minder comes down

• Count Down Timer comes down

• you put something on the control

panel.

4.13 Power limitation

Originally the hob is at its highest

possible power level.
To decrease or increase the power

level:
1. 
Deactivate the hob.
2. Touch   for 3 seconds. The display

comes on and goes off.

3. Touch   for 3 seconds.   or 

comes on.

4. Touch  . P0 comes on.
5. Touch   /   of the Timer to set the

power level.

Power levels
Refer to “Technical information” chapter.
• P0 — 7200 W

• P1 — 1500 W

• P2 — 2000 W

• P3 — 2500 W

• P4 — 3000 W

• P5 — 3500 W

• P6 — 4000 W

• P7 — 4500 W

• P8 — 5000 W

• P9 — 6000 W

ENGLISH

11

Summary of Contents for KTI8500BE

Page 1: ...KTI8500BE EN Hob User Manual ...

Page 2: ... brochures trouble shooter service information www electrolux com webselfservice Register your product for better service www registerelectrolux com Buy Accessories Consumables and Original spare parts for your appliance www electrolux com shop CUSTOMER CARE AND SERVICE Always use original spare parts When contacting our Authorised Service Centre ensure that you have the following data available M...

Page 3: ...n it cools down Accessible parts are hot If the appliance has a child safety device this should be activated Children shall not carry out cleaning and user maintenance of the appliance without supervision Children aged 3 years and under must be kept away from this appliance when it is in operation at all times 1 2 General Safety WARNING The appliance and its accessible parts become hot during use ...

Page 4: ...orporated in the appliance The use of inappropriate guards can cause accidents 2 SAFETY INSTRUCTIONS 2 1 Installation WARNING Only a qualified person must install this appliance Remove all the packaging Do not install or use a damaged appliance Follow the installation instruction supplied with the appliance Keep the minimum distance from the other appliances and units Always take care when moving ...

Page 5: ...nect the mains plug to the mains socket only at the end of the installation Make sure that there is access to the mains plug after the installation If the mains socket is loose do not connect the mains plug Do not pull the mains cable to disconnect the appliance Always pull the mains plug Use only correct isolation devices line protecting cut outs fuses screw type fuses removed from the holder ear...

Page 6: ...damaged bottom can cause scratches on the glass glass ceramic Always lift these objects up when you have to move them on the cooking surface This appliance is for cooking purposes only It must not be used for other purposes for example room heating 2 4 Care and cleaning Clean regularly the appliance to prevent the deterioration of the surface material Deactivate the appliance and let it cool down ...

Page 7: ... tell which functions operate Sen sor field Function Comment 1 ON OFF To activate and deactivate the hob 2 Lock The Child Safety Device To lock unlock the control panel 3 STOP GO To activate and deactivate the function 4 Bridge To activate and deactivate the function 5 Heat setting display To show the heat setting 6 Timer indicators of cook ing zones To show for which zone you set the time 7 Timer...

Page 8: ...ontrol 3 step Residual heat indicator continue cook ing keep warm residual heat Lock The Child Safety Device function operates Incorrect or too small cookware or no cookware on the cooking zone Automatic Switch Off function operates 3 4 OptiHeat Control 3 step Residual heat indicator WARNING There is a risk of burns from residual heat The indicator shows the level of the residual heat The inductio...

Page 9: ... hours 4 7 5 hours 8 9 4 hours 10 14 1 5 hour 4 3 The heat setting To set or change the heat setting Touch the control bar at the correct heat setting or move your finger along the control bar until you reach the correct heat setting 4 4 Cooking zone indication The horizontal line shows the maximum size of the cookware max Refer to Technical information chapter 4 5 Bridge function The function ope...

Page 10: ...ctivate the function set the cooking zone with and touch The remaining time counts back to 00 The indicator of the cooking zone goes out When the time comes to an end the sound operates and 00 flashes The cooking zone deactivates To stop the sound touch CountUp Timer The count up timer You can use this function to monitor how long the cooking zone operates To set the cooking zone touch again and a...

Page 11: ...or only one cooking time activate the hob with comes on Touch for 4 seconds Set the heat setting in 10 seconds You can operate the hob When you deactivate the hob with the function operates again 4 12 OffSound Control Deactivating and activating the sounds Deactivate the hob Touch for 3 seconds The display comes on and goes out Touch for 3 seconds or comes on Touch of the timer to choose one of th...

Page 12: ...er limitation function to 4 5 kW or less power of the hob is divided between all cooking zones When you set the Power limitation function to more than 4 5 kW power of the hob is divided between two cooking zones in a pair 5 HINTS AND TIPS WARNING Refer to Safety chapters 5 1 Cookware For induction cooking zones a strong electro magnetic field creates the heat in the cookware very quickly Use the i...

Page 13: ...me depends on the heat setting level and the length of the cooking operation 5 4 Examples of cooking applications The relation between the heat setting and the cooking zone consumption of power is not linear When you increase the heat setting it is not proportional to the increase of the cooking zone consumption of power It means that the cooking zone with the medium heat setting uses less than a ...

Page 14: ...emove immediately melted plastic plastic foil sugar and food with sugar If not the dirt can cause damage to the hob Take care to avoid burns Put the special scraper on the glass surface at an acute angle and move the blade on the surface Remove when the hob is sufficiently cool limescale rings water rings fat stains shiny metallic discoloration Clean the hob with a moist cloth and non abrasive det...

Page 15: ...ld Remove the object from the sensor field Residual heat indicator does not come on The zone is not hot be cause it operated only for a short time If the zone operated suffi ciently long to be hot speak to an Authorised Service Centre Automatic Heat Up func tion does not operate The zone is hot Let the zone become suffi ciently cool The highest heat setting is set The highest heat setting has the ...

Page 16: ...ction for the zones operate Deactivate the hob Re move the hot cookware After approximately 30 seconds activate the zone again If the cookware was the problem the error mes sage goes out Residual heat indicator can stay on Let the cookware become sufficiently cool Check if your cookware is compati ble with the hob Refer to Hints and tips chapter 7 2 If you cannot find a solution If you cannot find...

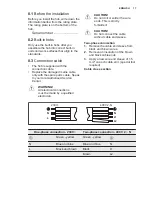
Page 17: ... local Authorised Service Center WARNING All electrical connections must be made by a qualified electrician CAUTION Do not drill or solder the wire ends This is strictly forbidden CAUTION Do not connect the cable without cable end sleeve Two phase connection 1 Remove the cable end sleeve from black and brown wires 2 Remove an insulation of the brown and black cable ends 3 Apply a new wire end slee...

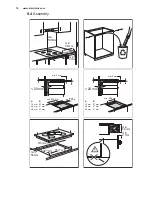
Page 18: ...m min 2mm min 2 mm A B A 12 mm 28 mm 38 mm B 57 mm 41 mm 31 mm min 30 mm min 500 mm 20 mm 20 mm min 2 mm A B A 12 mm 28 mm 38 mm B 57 mm 41 mm 31 mm min 500 mm R 5mm min 55mm 490 1 mm 750 1mm min 38 mm min 2 mm www electrolux com 18 ...

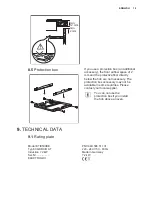
Page 19: ...ob are not necessary The protection box accessory may not be available in some countries Please contact your local supplier You can not use the protection box if you install the hob above an oven 9 TECHNICAL DATA 9 1 Rating plate Model KTI8500BE PNC 949 596 511 01 Typ 60 GBD CB AT 220 240 V 50 60 Hz Induction 7 2 kW Made in Germany Ser Nr 7 2 kW ELECTROLUX ENGLISH 19 ...

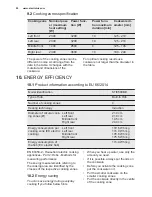
Page 20: ...r of circular cook ing zones Ø Left front Left rear Middle front Right rear 21 0 cm 21 0 cm 14 5 cm 24 0 cm Energy consumption per cooking zone EC electric cooking Left front Left rear Middle front Right rear 172 6 Wh kg 174 9 Wh kg 176 6 Wh kg 175 5 Wh kg Energy consumption of the hob EC electric hob 174 9 Wh kg EN 60350 2 Household electric cooking appliances Part 2 Hobs Methods for measuring pe...

Page 21: ...the packaging in applicable containers to recycle it Help protect the environment and human health and to recycle waste of electrical and electronic appliances Do not dispose appliances marked with the symbol with the household waste Return the product to your local recycling facility or contact your municipal office ENGLISH 21 ...

Page 22: ...www electrolux com 22 ...

Page 23: ...ENGLISH 23 ...

Page 24: ...www electrolux com shop 867331120 A 162016 ...

Reviews: