background image

3. PRODUCT DESCRIPTION

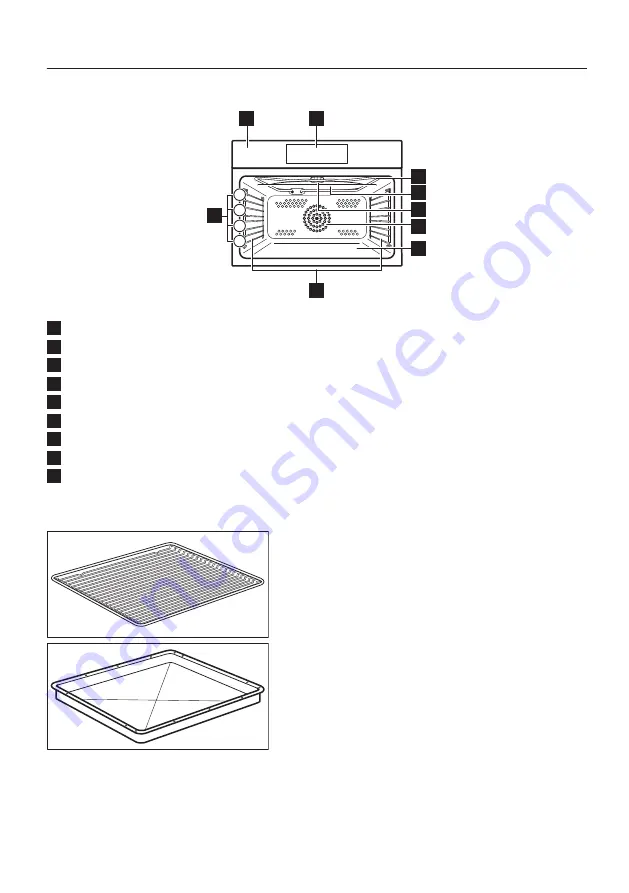
3.1 General overview

1

2

9

4

3

1

2

3

7

6

4

5

8

1

Control panel

2

Display

3

Heating element

4

Microwave generator

5

Lamp

6

Fan

7

Glass base, removable

8

Shelf support, removable

9

Shelf positions

3.2 Accessories

Wire shelf

For cookware, cake tins, roasts.

Baking tray

For cakes and biscuits.

11/48

Summary of Contents for KVLAE00WT

Page 1: ...Forquickaccessto manuals how to guides supportand more through ourphoto registrationvisit electrolux com register Get the most out of your appliance KVLAE00WT EN Microwave combi oven User Manual ...

Page 2: ...es trouble shooter service information www electrolux com webselfservice Register your product for better service www registerelectrolux com Buy Accessories Consumables and Original spare parts for your appliance www electrolux com shop CUSTOMER CARE AND SERVICE Always use original spare parts When contacting our Authorised Service Centre ensure that you have the following data available Model PNC...

Page 3: ...ces 16 6 DAILY USE 17 6 1 How to set Heating Functions 17 6 2 How to use Microwave Quick Start 17 6 3 How to set Assisted Cooking 18 6 4 Heating Functions 19 7 CLOCK FUNCTIONS 22 7 1 Clock functions description 22 7 2 How to set Clock functions 22 8 HOW TO USE ACCESSORIES 26 8 1 Inserting accessories 26 9 ADDITIONAL FUNCTIONS 27 9 1 Automatic Switch off 27 9 2 Cooling fan 27 10 HINTS AND TIPS 28 1...

Page 4: ...2 3 Service data 37 13 TECHNICAL DATA 38 13 1 Technical data 38 14 ENERGY EFFICIENCY 39 14 1 Energy saving 39 15 MENU STRUCTURE 40 15 1 Menu 40 15 2 Submenu for Options 40 15 3 Submenu for Connections 41 15 4 Submenu for Setup 41 15 5 Submenu for Service 41 16 IT S EASY 42 17 TAKE A SHORTCUT 44 4 48 CONTENTS ...

Page 5: ...rs of age and persons with very extensive and complex disabilities shall be kept away from the appliance unless continuously supervised Children of less than 3 years of age should be kept away from the appliance unless continuously supervised Do not let children play with the appliance and mobile devices with My Electrolux Keep all packaging away from children and dispose of it appropriately Keep ...

Page 6: ...mpty Metal parts inside the cavity can create electric arcing Metallic containers for food and beverages are not allowed during microwave cooking This requirement is not applicable if the manufacturer specifies size and shape of metallic containers suitable for microwave cooking If the door or door seals are damaged the appliance must not be operated until it has been repaired by a qualified perso...

Page 7: ...by food jars shall be stirred or shaken and the temperature checked before consumption in order to avoid burns Eggs in their shell and whole hard boiled eggs should not be heated in the appliance since they may explode even after microwave heating has ended The appliance should be cleaned regularly and any food deposits removed Failure to maintain the appliance in a clean condition could lead to d...

Page 8: ...sure not to cause damage to the mains plug and to the mains cable Should the mains cable need to be replaced this must be carried out by our Authorised Service Centre Do not let mains cables touch or come near the appliance door or the niche below the appliance especially when it operates or the door is hot The shock protection of live and insulated parts must be fastened in such a way that it can...

Page 9: ...oration of the enamel or stainless steel has no effect on the performance of the appliance Use a deep pan for moist cakes Fruit juices cause stains that can be permanent This appliance is for cooking purposes only It must not be used for other purposes for example room heating Always cook with the oven door closed If the appliance is installed behind a furniture panel e g a door make sure the door...

Page 10: ... electric shock The type of light bulb or halogen lamp used for this appliance is for household appliances only Do not use it for house lighting Before replacing the lamp disconnect the appliance from the power supply Only use lamps with the same specifications 2 6 Service To repair the appliance contact the Authorised Service Centre Use original spare parts only 2 7 Disposal WARNING Risk of injur...

Page 11: ...2 3 7 6 4 5 8 1 Control panel 2 Display 3 Heating element 4 Microwave generator 5 Lamp 6 Fan 7 Glass base removable 8 Shelf support removable 9 Shelf positions 3 2 Accessories Wire shelf For cookware cake tins roasts Baking tray For cakes and biscuits 11 48 ...

Page 12: ...finger tip Slide fingertip over the surface without losing contact Touch the surface for 3 sec onds 4 2 Display Conventional cooking After turning on the display shows main screen with heating functions and default temperature 13 00 If you do not use the oven for 2 minutes the display goes to standby STOP 29sec 1000 W 5 sec 10 sec 30 sec Microwave When you cook the display shows the set functions ...

Page 13: ...firm the selection set ting or to go one level back in the menu To go one level back in the menu undo last ac tion To turn the options on and off Sound alarm function indicators when the set time of cooking ends the signal sounds The function is on STOP The function is on Cooking stops automati cally Sound Alarm is off Timer indicators To set the function Start Set Time To cancel the setting The t...

Page 14: ...y indicators Door function indicators The oven door is locked Wi Fi indicators the oven can be connected to Wi Fi Wi Fi connection is turned on Wi Fi connection is turned off 14 48 HOW TO TURN OVEN ON AND OFF ...

Page 15: ... message after the first connection You have to set Language Display Brightness Buzzer Volume Time of Day 5 3 Wireless connection To connect the oven you need Wireless network with the Internet connection Step 1 Turn on the oven Step 2 Press Menu Settings Connections Step 3 Slide or press to turn on Wi Fi Step 4 Choose wireless network with the Internet connection The oven wireless module will sta...

Page 16: ...ng MIT OpenSSL SSLEAY ISC Apache 2 0 and others Check the full copy of the licence in Basic Settings Service Licence You can download the source code of the open source software by following the hyperlink present on the product web page Look for the oven model and Wi Fi Module Software version on http electrolux opensoftwarere pository com inside NIUX folder 16 48 BEFORE FIRST USE ...

Page 17: ...ing functions press Step 3 Press Display goes into the temperature settings 170 C 5 C 5 C 210 C 170 C 70 C OK Step 4 Move the finger on the slider to set the temperature Step 5 Press Step 6 Press Step 7 Press to turn off the heating function Step 8 Turn off the oven Take a shortcut 6 2 How to use Microwave Quick Start Step 1 Press and hold on the display The microwave will run for 30 seconds 17 48...

Page 18: ...n be switched on with Microwave Quick Start any time The only exception ECO Mode 6 3 How to set Assisted Cooking Every dish in this submenu has a recommended function and temperature Temperature and time can be adjusted manually according to the user s preference The degree to which a dish is cooked Rare or Less Medium Well Done or More Step 1 Press Step 2 Press to enter Assisted Cooking Step 3 Ch...

Page 19: ...tions at the same time and to dry food Set the temperature 20 40 C lower than for Conventional Cooking Frozen Foods To make convenience food e g french fries potato wedges or spring rolls crispy Conventional Cooking To bake and roast food on one shelf position Pizza Function To bake pizza To make intensive browning and a crispy bottom Bottom Heat To bake cakes with crispy bottom and to preserve fo...

Page 20: ...ing and keeps the dough elastic Au Gratin For dishes such as lasagna or potato gratin To make gratins and to brown Slow Cooking To prepare tender succulent roasts Keep Warm To keep food warm Bread Baking Use this function to prepare bread and bread rolls with a very good professional like result in terms of crispiness colour and crust gloss Microwave Oven Functions Heating function Application Def...

Page 21: ... Fan Cooking MW To bake on one shelf position Function with MW boost Conventional Cooking MW To bake and roast food on one shelf position Function with MW boost Grill MW To grill thin pieces of food and to toast bread Function with MW boost Turbo Grilling MW To roast large pieces of meat on one level To make gratins and to brown Function with MW boost 21 48 DAILY USE ...

Page 22: ...mum is 23 h 59 min This function has no ef fect on the operation of the oven Start Criteria End Action and Delay of cooking are not available for microwave functions 7 2 How to set Clock functions How to set the clock Step 1 Press on the display Step 2 Press Settings Setup Time of Day Step 3 Slide and press to set the clock How to set cooking time Step 1 Choose an oven function and set the tempera...

Page 23: ... cri teria Comment The timer starts when you turn it on The timer starts after closing the door The timer starts when cooking starts The timer starts when the set temperature is reached End ac tion Comment When the set cooking time ends the signal sounds STOP When the set cooking time ends the signal sounds Cooking stops automatically When the set cooking time ends the display shows message withou...

Page 24: ...tep 4 Press Set Start Time Step 5 Move the left dot to the preferred value Step 6 Press How to set extra time When 10 of cooking time is left and the food seems not to be ready you can extend cooking time You can also change the oven function Step 1 Press the preferred time icon to extend cooking time Step 2 Also press preferred oven function to change it What if it s better to change extra time I...

Page 25: ...ess How to change timer settings Step 1 Move the dot on the slider or use shortcuts to change the timer value Step 2 Press or press to reset changes You can change the set time during cooking at any time How to cancel set timer Step 1 Press Step 2 Press to cancel set timer Step 3 Press Take a shortcut 25 48 CLOCK FUNCTIONS ...

Page 26: ... also anti tip devices The high rim around the shelf prevents cookware from slipping of the shelf Wire shelf Push the shelf between the guide bars of the shelf support and make sure that the feet point down Baking tray Push the baking tray between the guide bars of the shelf support Wire shelf and baking tray to gether Push the baking tray between the guide bars of the shelf support and the wire s...

Page 27: ... h 30 115 12 5 120 195 8 5 200 245 5 5 250 1 5 C h 30 115 12 5 120 195 8 5 200 230 5 5 The Automatic Switch off does not work with the functions Light Duration End Time 9 2 Cooling fan When the oven operates the cooling fan turns on automatically to keep the surfaces of the oven cool If you turn off the oven the cooling fan can continue to operate until the oven cools down 27 48 ...

Page 28: ...cook food without a cover Do not overcook the dishes by setting the power and time too high The food can dry out burn or cause fire Do not use the oven to cook eggs or snails in their shells because they can burst Pierce the yolk of fried egg before reheating it Pierce food with skin or peel with a fork several times before cooking Cut vegetables into similar sized pieces Stir liquid dishes from t...

Page 29: ...c container specification before use X Cardboard paper X X Clingfilm X X Roasting film with microwave safe closure please always check the film specification before use X Roasting dishes made of metal e g enamel cast iron X X X Baking tins black lacquer or silicon coated please always check the baking tins specification before use X X X Baking tray X X X Wire shelf X X Cookware for microwave use e...

Page 30: ...and heat ing frozen meals 300 Watt 400 Watt Melting cheese chocolate butter Simmering rice Heating baby food Cooking Heating delicate food Continuing cooking 100 Watt 200 Watt Defrosting Defrosting bread Defrosting fruits and cakes Defrosting cheese cream butter Defrosting meat fish 10 5 Cooking tables for test institutes Information for test institutes Tests according to IEC 60705 30 48 HINTS AND...

Page 31: ... Custard 500 1 Bottom 18 Meat de frosting 200 0 5 Bottom 7 8 Turn the meat upside down halfway through the cooking time Tests according to IEC 60705 MICROWAVE COMBI FUNCTION Use the wire shelf W C min Cake 0 7 kg Conven tional Cook ing MW 100 200 2 23 27 Turn container around by 1 4 halfway through the cooking time Potato gratin 1 1 kg True Fan Cooking MW 300 180 2 38 42 Turn container around by 1...

Page 32: ... COMBI FUNCTION Use the wire shelf W C min Chicken 1 1 kg Turbo Grill ing MW 400 230 1 35 40 Put the meat in round glass con tainer and turn it upside down half way through the cooking time 32 48 HINTS AND TIPS ...

Page 33: ...esiduals and fat Accessories Clean all accessories after each use and let them dry Use a soft cloth with warm water and a cleaning agent Do not clean the accessories in a dishwash er Do not clean the non stick accessories using aggressive agents sharp edged objects or in a dishwasher 11 2 How to remove Shelf supports Before maintenance make sure that the oven is cold There is a risk of burns To cl...

Page 34: ...CAUTION Always hold the halogen lamp with a cloth to prevent grease residue from burning on the lamp The top lamp Step 1 Turn the lamp glass cover to remove it Step 2 Clean the glass cover Step 3 Remove the metal ring and clean the glass cover Step 4 Replace the lamp with a suitable 300 C heat resistant lamp Step 5 Attach the metal ring to the glass cover Step 6 Install the glass cover 34 48 CARE ...

Page 35: ... to set Clock functions The door is not closed correctly Fully close the door The fuse is blown Make sure the fuse is the cause of the prob lem If the problem recurs contact a qualified electrician The oven Child Lock is on Refer to Menu chapter Submenu for Op tions Components need to be replaced Description Remedy The lamp is burnt out Replace the lamp for details refer to Care and Cleaning chapt...

Page 36: ...description Action F240 F439 the touch fields on the display do not work properly Clean the surface of the display Make sure there is no dirt on the touch fields F601 there is a problem with Wi Fi signal Check your network connection Refer to Before first use chapter Wireless con nection F604 the first connection to Wi Fi failed Turn the oven off and on and try again Refer to Before first use chap...

Page 37: ... errors occurs the rest of the oven functions will continue to work as usually 12 3 Service data If you cannot find a solution to the problem yourself contact your dealer or an Authorised Service Centre The necessary data for the service centre is on the rating plate The rating plate is on the front frame of the oven cavity Do not remove the rating plate from the oven cavity We recommend that you ...

Page 38: ...13 TECHNICAL DATA 13 1 Technical data Voltage 220 240 V Frequency 50 Hz 38 48 ...

Page 39: ...on or End Time selection is activated and the cooking time is longer than 30 minutes the heating elements automatically turn off earlier in some oven functions The fan and lamp continue to operate When you turn off the oven the display shows the residual heat You can use that heat to keep the food warm When the cooking duration is longer than 30 minutes reduce the oven temperature to minimum 3 10 ...

Page 40: ...r Options Submenu Application Light To turn the lamp on and off Lamp Icon Visible Lamp icon appears on the screen Fast Heat Up Shortens heat up time Note that it is available only for some of the oven functions Child Lock Prevents accidental activation of the oven When the option is on the text Child Lock appears on the display when you turn on the oven To enable the oven use choose the code lette...

Page 41: ...the displayed time indication Key Tones Turns the tone of the touch fields on and off It is not possi ble to switch off the tone of the ON OFF and STOP Alarm Error Tones Turns the alarm tones on and off Buzzer Volume Regulates the volume of key tones and signals Display Brightness Regulates the display brightness 15 5 Submenu for Service Submenu Description Demo mode Activation deactivation code 2...

Page 42: ...ep 3 Step 4 Step 5 Step 6 Press to turn on the oven Press chos en function Press to go in the tem perature set tings Move the fin ger on the slider to set the tempera ture Press to con firm Press to start cooking Get to know how to cook quickly Use Automatic Programmes to prepare a dish quickly with default settings Assisted Cooking Step 1 Step 2 Step 3 Press Press Assisted Cooking Choose the dish...

Page 43: ... the cooking function 10 Finish assist Use 10 Finish assist to add extra time or change cooking function when 10 of the cooking time is left Extra time Press preferred extra time 1 min 5 min 10 min Change function Press preferred function 43 48 IT S EASY ...

Page 44: ...l shortcuts You can also find them in the dedicated chapters in the user manual Wireless connection How to set Oven Functions How to set Assisted Cooking How to set cooking time 70 C How to delay start and end of cooking How to cancel set timer 44 48 ...

Page 45: ...tainers to recycle it Help protect the environment and human health by recycling waste of electrical and electronic appliances Do not dispose of appliances marked with the symbol with the household waste Return the product to your local recycling facility or contact your municipal office 45 48 ...

Page 46: ...46 48 ...

Page 47: ...47 48 ...

Page 48: ...www electrolux com shop 867352415 B 212019 ...

Reviews: