75
EN - Instruction on mounting and use
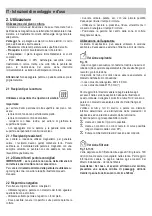
2. Use
Using the hob
The induction cooking system is based on the physical
phenomenon of magnetic induction. The main characteristic of
this system is the direct transfer of energy from the generator
to the pot.
Advantages:
When compared to electric hobs, your induction hob is:
- Safer:
lower temperature on the glass surface.
- Faster:
shorter food heating times.
- More accurate:
the hob immediately reacts to your
commands
- More efficient:
90% of the absorbed energy is transformed
into heat. Moreover, once the pot is removed from the hob,
heat transmission is immediately interrupted, avoiding
unnecessary heat losses.
Attention!
User should not put hot or warm pot and pans on
metal grille.
2.1 Cooking containers
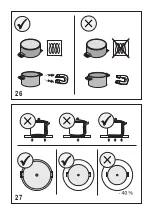
Use only pots bearing the symbol
Important:
to avoid permanent damage to the hob surface, do not use:
- containers with less than perfectly flat bottoms.
- metal containers with enamelled bottoms.
- containers with a rough base, to avoid scratching the hob
surface.
- never place hot pots and pans on the surface of the hob's
control panel
2.1.1 Pre-existing containers
Induction cooking uses magnetism to generate heat.
Containers must therefore contain iron. Check if the pot
material is magnetic using a magnet. Pots are not suitable if
they are not magnetically detectable.
2.1.2 Recommended pan bottom diameters
IMPORTANT: if the pots are not correctly sized, the
cooking zones will not turn on
For details of the minimum pot diameter that needs to be used
on each zone, see the illustrated part of this manual.
2.2 Energy saving
Recommendations for best results:
- Use pots and pans with a bottom diameter equal to that of
the cooking zone.
- Use only pots and pans with flat bottoms.
- Where possible, keep the lid on pots during cooking
- Cook vegetables, potatoes, etc. with a minimal amount of
water to reduce cooking time.
- Use a pressure cooker, as it further reduces the energy
consumption and cooking time
- Place the pot in the centre of the cooking zone outlined on
the hob.
Using the extractor fan
The extraction system can be used in two versions: external
extraction and evacuation or as a filter with internal
recirculation.
Extraction version
Fig. 19
The fumes are evacuated towards the outside through a
series of pipes (bought separately) fastened to the supplied
connecting flange.
The diameter of the exhaust pipe must be equivalent to the
diameter of the connecting ring:
- for rectangular outlets 222 x 89 mm
- for circular outlets Ø 150 mm (*)
For more information, see the page relative to the extraction
version in the illustrated part of this manual. Connect the
product to wall-mounted exhaust pipes and holes with a
diameter equivalent to the air outlet (connecting flange).
Using wall-mounted exhaust pipes and holes with a smaller
diameter may reduce the efficiency of extraction and
drastically increase noise levels.
All responsibility in this regard is therefore denied.
Keep duct as short as possible.
Use ducting with the least possible number of curves
(maximum angle: 90°).
Avoid drastic changes in the ducting diameter.
Filtration version
Fig.16-17-18
The extracted air will be filtered in special grease filters and
odour filters before being sent back into the room. For more
information, see the page relating to accessories in the
installation manual - Filter version.
Warning: If the outlet is inside the cabinet, create an air
vent through the plinth panel measuring at least 120cm
2
.
Summary of Contents for LIC744I
Page 39: ......
Page 40: ...V1 V2 V3 ...
Page 41: ...1x 1x 2 8 m 1x 1x 1x 1x 1x 1x 2x 4x 1x 1x 1x 1x 1x T10 1x T20 ...
Page 42: ...1 2 5A 3 L N OFF ON KIT WINDOW KIT WINDOW N L A B A B 1 1 2 3 ...
Page 43: ...2 515mm 50mm A B 40mm 40mm 720mm 250mm 500mm ...
Page 44: ...3 R6mm 560mm 722mm 490mm 517mm 20mm 60mm 25mm 60mm inst A inst B 490mm 560mm ...
Page 45: ...4 a 245mm 600mm 515mm 565mm 470mm 60mm 107mm 35mm 800mm V1 ...
Page 50: ...11 inst A ...
Page 51: ...6 5mm 12 inst B ...
Page 52: ...13 inst B ...
Page 53: ...14 L 650mm T1 T1 L L L 650mm 750mm ...
Page 54: ...16 15 V1 1 2 ...
Page 55: ...17 335mm 33mm R 10mm 1 2 V1 60mm L3 900mm L3 600mm L3 600mm L3 900mm L3 ...
Page 56: ...18 1 18 V1 X 18 5mm 3x 2x 2x 1 X 2 3 x ...
Page 57: ...18 2 V1 1x X 18 5mm 22 5mm X H H 2x 2x 1 3 x 2 ...
Page 58: ...19 V2 V3 ...
Page 59: ...2x ON 21 20 1 2 ...
Page 60: ...22 3 4 5 6 ...
Page 61: ...24 23 FRONT FRONT ...
Page 63: ...27 26 ...
Page 167: ......
Page 168: ...LIB017 A Ed ...


