78
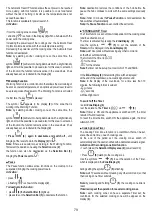
USING THE HOB
Before you begin, it is important to know:
All functions of this cooktop are designed to comply with the most
stringent safety regulations.
For this reason:
• Some functions will not be activated, or will be automatically
deactivated, in the absence of pots on the burners or when they
are poorly positioned.
• In other cases the activated functions will be automatically
deactivated after a few seconds, if the specific function requires a
further setting that has not been selected (e.g.:
“Turn the cooktop
on”
without
“Selecting the cooking zone”
and the
“Operating
temperature”,
or the
“Lock Function”
or the
“Timer”
function).
Caution!
In the case (for example) of prolonged use, the
cooking zone may not immediately shut down because it is in the
cooling phase; the “ ” symbol will appear on the cooking zone
display, to indicate the execution of this phase.
Wait for the display to turn off before approaching the cooking zone.
Cooking zone display
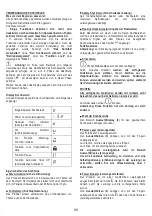
The following is shown on the cooking zone displays:
Cooking zone on
Power Level
… -
Residual Heat Indicator
Pot Detector
Warming Function active
Lock function active
Pause function
Automatic Heat UP function
Hob characteristics
Safe Activation
The product is activated only in the presence of pots on the cooking
zone: the heating process does not start or is interrupted if there are
no pots, or if these are removed.
Pot Detector
The product automatically detects the presence of pots on the
cooking zones.
Safety Shut Down
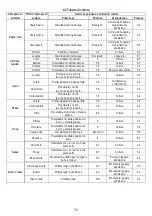
For safety reasons, each cooking zone has a maximum operating
time, which depends on the maximum power level set.
Residual Heat Indicator
When one or more cooking zones shut down, the presence of
residual heat is indicated by a visual signal on the corresponding
zone display, by way of the “ ” symbol.
Operation
Note:
Before activating any functions, the desired zone must be
activated
Switch-on
Press (touch) briefly
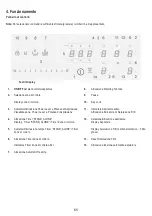
(1)
hob/extractor;
continuing to press
, all the available functions will become visible
for a few moments, e
, after which
only the main ones will remain
active; the others can be used, and will be activated,
subsequently, during use of the device.
IMPORTANT:
all the available functions will be illuminated with light intensity,
which will become more intense only when they are activated.
Press
again to turn off
Note: This function has priority over the others.
Selecting the cooking zones
Press (touch) briefly the
Selection/Display (2)
area corresponding to
the desired cooking area.
Power Level
The hob features 9 power levels
Touch and slide your fingers along the
Selection bar (3):
to the right to increase the level of power;
to the left to decrease the level of power.
The power level set will be displayed in the Selection/Display
area (2)
In order to reach a constant cooking power and avoid power
self-regulation (power increase-decrease), use a heat setting
higher than 7.
Power Booster
The product features a supplementary power level (after level ),
which remains active for 5 minutes, after which the temperature
returns to the previously set value.
Touch and slide with your fingers along the
Selection bar (3)
(above
the level ) and activate the Power Booster
The Power Booster level is indicated in the Selection / Display area
(2)
with the symbol” ”
Note:
the front cooking zones do not have a timed booster; to
deactivate the Power Booster, in these areas, touch and slide with
the fingers along the
Selection bar (3)
to decrease the power level.
Key Lock
The Key Lock allows cooktop settings to be blocked, thus preventing
accidental tampering, leaving set functions active.
Activation:
• press
(10)
Repeat the operation to deactivate
.
Note:
if any other function is pressed during the active Key Lock, the
symbol
, will flash to indicate that the function is in use and must
be deactivated if necessary in order to use the hob.
Automatic Heat UP
Summary of Contents for LIC744I
Page 39: ......
Page 40: ...V1 V2 V3 ...
Page 41: ...1x 1x 2 8 m 1x 1x 1x 1x 1x 1x 2x 4x 1x 1x 1x 1x 1x T10 1x T20 ...
Page 42: ...1 2 5A 3 L N OFF ON KIT WINDOW KIT WINDOW N L A B A B 1 1 2 3 ...
Page 43: ...2 515mm 50mm A B 40mm 40mm 720mm 250mm 500mm ...
Page 44: ...3 R6mm 560mm 722mm 490mm 517mm 20mm 60mm 25mm 60mm inst A inst B 490mm 560mm ...
Page 45: ...4 a 245mm 600mm 515mm 565mm 470mm 60mm 107mm 35mm 800mm V1 ...
Page 50: ...11 inst A ...
Page 51: ...6 5mm 12 inst B ...
Page 52: ...13 inst B ...
Page 53: ...14 L 650mm T1 T1 L L L 650mm 750mm ...
Page 54: ...16 15 V1 1 2 ...
Page 55: ...17 335mm 33mm R 10mm 1 2 V1 60mm L3 900mm L3 600mm L3 600mm L3 900mm L3 ...
Page 56: ...18 1 18 V1 X 18 5mm 3x 2x 2x 1 X 2 3 x ...
Page 57: ...18 2 V1 1x X 18 5mm 22 5mm X H H 2x 2x 1 3 x 2 ...
Page 58: ...19 V2 V3 ...
Page 59: ...2x ON 21 20 1 2 ...
Page 60: ...22 3 4 5 6 ...
Page 61: ...24 23 FRONT FRONT ...
Page 63: ...27 26 ...
Page 167: ......
Page 168: ...LIB017 A Ed ...


