background image

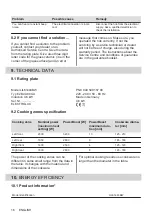
Problem

Possible cause

Remedy

You can hear a constant beep

noise.

The electrical connection is incor‐

rect.

Disconnect the hob from the electrical

supply. Ask a qualified electrician to

check the installation.

8.2 If you cannot find a solution...

If you cannot find a solution to the problem

yourself, contact your dealer or an

Authorised Service Centre. Give the data

from the rating plate. Give also three digit

letter code for the glass ceramic (it is in the

corner of the glass surface) and an error

message that comes on. Make sure, you

operated the hob correctly. If not the

servicing by a service technician or dealer

will not be free of charge, also during the

warranty period. The instructions about the

Service Centre and conditions of guarantee

are in the guarantee booklet.

9. TECHNICAL DATA

9.1 Rating plate

Model LIL61443BW

PNC 949 599 157 00

Typ 62 B4A 00 AA

220 - 240 V 50 - 60 Hz

Induction 4.6 kW

Made in Germany

Ser.Nr. .................

4.6 kW

ELECTROLUX


9.2 Cooking zones specification

Cooking zone

Nominal power

(maximum heat

setting) [W]

PowerBoost [W] PowerBoost

maximum dura‐

tion [min]

Cookware diame‐

ter [mm]

Left front

2300

3200

10

125 - 210

Left rear

1800

2800

8

145 - 180

Right front

1400

2500

4

125 - 145

Right rear

1800

2800

8

145 - 180

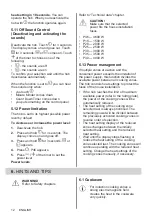
The power of the cooking zones can be

different in some small range from the data in

the table. It changes with the material and

dimensions of the cookware.

For optimal cooking results use cookware no

larger than the diameter in the table.

10. ENERGY EFFICIENCY

10.1 Product information*

Model identification

LIL61443BW

16

ENGLISH

Summary of Contents for LIL61443BW

Page 1: ... User Manual Hob EN 2 Notice d utilisation Table de cuisson FR 18 Benutzerinformation Kochfeld DE 36 Istruzioni per l uso Piano cottura IT 54 Manual de instrucciones Placa de cocción ES 72 electrolux com register ...

Page 2: ...ww electrolux com shop CUSTOMER CARE AND SERVICE Always use original spare parts When contacting our Authorised Service Centre ensure that you have the following data available Model PNC Serial Number The information can be found on the rating plate Warning Caution Safety information General information and tips Environmental information Subject to change without notice CONTENTS 1 SAFETY INFORMATI...

Page 3: ...ildren play with the appliance Keep all packaging away from children and dispose of it appropriately WARNING Keep children and pets away from the appliance when it operates or when it cools down Accessible parts become hot during use If the appliance has a child safety device it should be activated Children shall not carry out cleaning and user maintenance of the appliance without supervision 1 2 ...

Page 4: ...e Authorised Service Centre If the supply cord is damaged it must be replaced by the manufacturer an authorized Service or similarly qualified persons in order to avoid a hazard WARNING Use only hob guards designed by the manufacturer of the cooking appliance or indicated by the manufacturer of the appliance in the instructions for use as suitable or hob guards incorporated in the appliance The us...

Page 5: ...ge to the mains plug if applicable or to the mains cable Contact our Authorised Service Centre or an electrician to change a damaged mains cable The shock protection of live and insulated parts must be fastened in such a way that it cannot be removed without tools Connect the mains plug to the mains socket only at the end of the installation Make sure that there is access to the mains plug after t...

Page 6: ...r purposes for example room heating 2 4 Care and cleaning Clean the appliance regularly to prevent the deterioration of the surface material Switch off the appliance and let it cool down before cleaning Do not use water spray and steam to clean the appliance Clean the appliance with a moist soft cloth Use only neutral detergents Do not use abrasive products abrasive cleaning pads solvents or metal...

Page 7: ...qualified electrician WARNING All electrical connections must be made by a qualified electrician CAUTION Do not drill or solder the wire ends It is forbidden CAUTION Do not connect the cable without cable end sleeve 3 4 Assembly If you install the hob under a hood please see the installation instructions of the hood for the minimum distance between the appliances min 50mm min 500mm If the applianc...

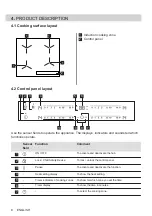
Page 8: ...ounds tell which functions operate Sensor field Function Comment 1 ON OFF To activate and deactivate the hob 2 Lock Child Safety Device To lock unlock the control panel 3 Pause To activate and deactivate the function 4 Heat setting display To show the heat setting 5 Timer indicators of cooking zones To show for which zone you set the time 6 Timer display To show the time in minutes 7 To select the...

Page 9: ...ookware or no cookware on the cooking zone Automatic Switch Off operates 4 4 OptiHeat Control 3 step Residual heat indicator WARNING There is a risk of burns from residual heat The indicators show the level of the residual heat for the cooking zones you are currently using The indicators may also come on for the neighbouring cooking zones even if you are not using them The induction cooking zones ...

Page 10: ...tom of the cookware automatically 5 5 Automatic Heat Up Activate this function to get a desired heat setting in a shorter time When it is on the zone operates on the highest setting in the beginning and then continues to cook at the desired heating setting To activate the function the cooking zone must be cold To activate the function for a cooking zone touch comes on Immediately touch a desired h...

Page 11: ...ion touch and then touch or of the timer to set the time When the time finishes an acoustic signal sounds and 00 flashes To stop the sound touch The function has no effect on the operation of the cooking zones 5 8 Pause This function sets all cooking zones that operate to the lowest heat setting When the function operates all other symbols on the control panels are locked The function does not sto...

Page 12: ...ation fuses P46 4600 W P15 1500 W P20 2000 W P25 2500 W P30 3000 W P35 3500 W P40 4000 W 5 13 Power management If multiple zones are active and the consumed power exceeds the limitation of the power supply this function divides the available power between all cooking zones The hob controls heat settings to protect the fuses of the house installation If the hob reaches the limit of maximum availabl...

Page 13: ...on If you can hear crack noise cookware is made of different materials a sandwich construction whistle sound you use a cooking zone with a high power level and the cookware is made of different materials a sandwich construction humming you use a high power level clicking electric switching occurs hissing buzzing the fan operates The noises are normal and do not indicate any malfunction 6 3 Öko Tim...

Page 14: ...aner suitable for the surface of the hob Use a special scraper for the glass 7 2 Cleaning the hob Remove immediately melted plastic plastic foil sugar and food with sugar otherwise the dirt can cause damage to the hob Take care to avoid burns Use a special hob scraper on the glass surface at an acute angle and move the blade on the surface Remove when the hob is sufficiently cool limescale rings w...

Page 15: ...Service Centre Automatic Heat Up does not op erate The zone is hot Let the zone become sufficiently cool The highest heat setting is set The highest heat setting has the same power as the function The heat setting changes be tween two levels Power management operates Refer to Daily use The sensor fields become hot The cookware is too large or you put it too near to the controls Put large cookware ...

Page 16: ...od The instructions about the Service Centre and conditions of guarantee are in the guarantee booklet 9 TECHNICAL DATA 9 1 Rating plate Model LIL61443BW PNC 949 599 157 00 Typ 62 B4A 00 AA 220 240 V 50 60 Hz Induction 4 6 kW Made in Germany Ser Nr 4 6 kW ELECTROLUX 9 2 Cooking zones specification Cooking zone Nominal power maximum heat setting W PowerBoost W PowerBoost maximum dura tion min Cookwa...

Page 17: ...10 2 Energy saving You can save energy during everyday cooking if you follow below hints When you heat up water use only the amount you need If it is possible always put the lids on the cookware Before you activate the cooking zone put the cookware on it Put the smaller cookware on the smaller cooking zones Put the cookware directly in the centre of the cooking zone Use the residual heat to keep t...

Page 18: ...E À LA CLIENTÈLE N utilisez que des pièces de rechange d origine Avant de contacter notre centre de service agréé assurez vous de disposer des informations suivantes Modèle PNC numéro de série Ces informations figurent sur la plaque signalétique Avertissement Consignes de sécurité Informations générales et conseils Informations environnementales Sous réserve de modifications TABLE DES MATIÈRES 1 I...

Page 19: ... à l écart de l appareil à moins d être surveillés en permanence Ne laissez pas les enfants jouer avec l appareil Ne laissez pas les emballages à la portée des enfants et jetez les convenablement AVERTISSEMENT Tenez les enfants et les animaux éloignés de l appareil lorsqu il est en cours de fonctionnement ou lorsqu il refroidit Les parties accessibles deviennent chaudes en cours d utilisation Si l...

Page 20: ...r l appareil Après utilisation éteignez toujours la zone de cuisson à l aide de la manette de commande correspondante et ne vous fiez pas à la détection des récipients Si la surface vitrocéramique en verre est fissurée éteignez l appareil et débranchez le Si l appareil est branché à l alimentation secteur directement en utilisant une boîte de jonction retirez le fusible pour déconnecter l appareil...

Page 21: ...ISSEMENT Risque d incendie ou d électrocution Tous les raccordements électriques doivent être effectués par un électricien qualifié L appareil doit être relié à la terre Avant toute intervention assurez vous que l appareil est débranché Assurez vous que les paramètres figurant sur la plaque signalétique correspondent aux données électriques nominale de l alimentation secteur Assurez vous que l app...

Page 22: ...onctionnement Lorsque vous versez un aliment dans de l huile chaude elle peut éclabousser AVERTISSEMENT Risque d incendie et d explosion Les graisses et l huile chaudes peuvent dégager des vapeurs inflammables Tenez les flammes ou les objets chauds éloignés des graisses et de l huile lorsque vous vous en servez pour cuisiner Les vapeurs dégagées par l huile très chaude peuvent provoquer une combus...

Page 23: ...mentation au ras de l appareil et mettez le au rebut 3 INSTALLATION AVERTISSEMENT Reportez vous aux chapitres concernant la sécurité 3 1 Avant l installation Avant d installer la table de cuisson notez les informations de la plaque signalétique ci dessous La plaque signalétique se trouve au bas de la table de cuisson Numéro de série 3 2 Tables de cuisson intégrées Les tables de cuisson encastrable...

Page 24: ...un tiroir la ventilation de la table de cuisson peut chauffer les éléments rangés dans le tiroir durant la cuisson min 12 min 60 min 28 www youtube com electrolux www youtube com aeg How to install your Electrolux Induction Hob Worktop installation 24 FRANÇAIS ...

Page 25: ...onctions activées Touche sensiti ve Fonction Commentaire 1 MARCHE ARRÊT Pour allumer et éteindre la table de cuisson 2 Touches Verrouil Dispositif de sécurité enfant Pour verrouiller ou déverrouiller le bandeau de com mande 3 Pause Pour activer et désactiver la fonction 4 Indicateur du niveau de cuisson Pour indiquer le niveau de cuisson 5 Voyants du minuteur des zones de cuisson Pour indiquer la ...

Page 26: ...uis son maintien au chaud chaleur résiduelle Touches Verrouil Dispositif de sécurité enfant est activée Le récipient est inapproprié ou trop petit ou bien il n y a pas de récipient sur la zone de cuisson Arrêt automatique est activé 4 4 OptiHeat Control indicateur de chaleur résiduelle en 3 étapes AVERTISSEMENT Il y a risque de brûlures par la chaleur résiduelle Les voyants indiquent le niveau de ...

Page 27: ... de cuisson s éteint Niveau de cuisson La table de cuisson s éteint au bout de 1 3 6 heures 4 7 5 heures 8 9 4 heures 10 14 1 5 heure 5 3 Niveau de cuisson Pour régler ou modifier le niveau de cuisson Appuyez sur le niveau de cuisson souhaité sur le bandeau de sélection ou déplacez votre doigt sur le bandeau de sélection jusqu à atteindre le niveau de cuisson souhaité 5 4 Utilisation des zones de ...

Page 28: ...gnal sonore appuyez sur CountUp Timer Cette fonction permet de vérifier la durée de fonctionnement de la zone de cuisson sélectionnée Pour sélectionner la zone de cuisson appuyez sur à plusieurs reprises jusqu à ce que l indicateur d une zone de cuisson apparaisse Pour activer la fonction appuyez sur la touche du minuteur apparaît Lorsque le voyant de la zone de cuisson commence à clignoter le min...

Page 29: ...ondes Réglez le niveau de cuisson dans les 10 secondes qui suivent Vous pouvez utiliser la table de cuisson Lorsque vous éteignez la table de cuisson avec la fonction est de nouveau activée 5 11 OffSound Control Activation et désactivation des signaux sonores Éteignez la table de cuisson Appuyez sur pendant 3 secondes L affichage s allume puis s éteint Appuyez sur pendant 3 secondes ou apparaît Ap...

Page 30: ... le récipient Utilisez les zones de cuisson à induction avec un récipient de cuisson adapté Le fond du récipient de cuisson doit être aussi plat et épais que possible Assurez vous que le fond du récipient est propre avant de le placer sur la surface de la table de cuisson Afin d éviter les rayures ne faites pas glisser et ne frottez pas le récipient sur la surface vitrocéramique Matériaux des réci...

Page 31: ...de cuisson moyen utilise moins de la moitié de sa puissance Les données du tableau sont fournies à titre indicatif uniquement Niveau de cuisson Utilisation Durée min Conseils 1 Conserver les aliments cuits au chaud au besoin Placez un couvercle sur le récipient 1 3 Sauce hollandaise faire fondre beur re chocolat gélatine 5 25 Mélangez de temps en temps 1 3 Solidifier omelettes œufs cocotte 10 40 C...

Page 32: ... la surface vitrée et faites glisser la lame du racloir pour enlever les salissures Une fois que la table de cuisson a suffisamment refroidi enlevez traces de calcaire et d eau projections de graisse décolorations métalliques luisantes Nettoyez la table de cuisson à l aide d un chiffon humide et d un détergent non abrasif Après le nettoyage séchez la table de cuisson à l aide d un chiffon doux Pou...

Page 33: ... après vente agréé Montée en température automati que ne fonctionne pas La zone est chaude Laissez la zone refroidir suffisamment Le niveau de cuisson le plus élevé est réglé Le niveau de cuisson le plus élevé est identique à la puissance de la fonction Le niveau de cuisson oscille en tre deux niveaux Gestion alimentation est activé Reportez vous au chapitre Utilisation quotidienne Les touches sen...

Page 34: ... située dans un des coins de la surface en verre et le message d erreur qui s affiche Assurez vous d utiliser correctement l appareil En cas d erreur de manipulation de la part de l utilisateur le déplacement du technicien du service après vente ou du vendeur pourra être facturé même en cours de garantie Les instructions relatives au service après vente et aux conditions de garantie figurent dans ...

Page 35: ...Partie 2 Tables de cuisson méthodes de mesure des performances 10 2 Économie d énergie Vous pouvez économiser de l énergie au quotidien en suivant les conseils suivants Si vous faites chauffer de l eau ne faites chauffer que la quantité dont vous avez réellement besoin Si possible couvrez toujours les récipients de cuisson avec un couvercle pendant la cuisson Activez toujours la zone de cuisson ap...

Page 36: ...aterial und Original Ersatzteile für Ihr Gerät zu kaufen www electrolux com shop KUNDENDIENST UND SERVICE Verwenden Sie immer Original Ersatzteile Halten Sie folgende Angaben bereit wenn Sie sich an einen autorisierten Kundendienst wenden Modell PNC Seriennummer Die Daten finden Sie auf dem Typenschild Warnungs Sicherheitshinweise Allgemeine Informationen und Empfehlungen Informationen zum Umwelts...

Page 37: ... ferngehalten werden wenn sie nicht ständig beaufsichtigt werden Halten Sie Kinder unter 3 Jahren vom Gerät fern wenn sie nicht ständig beaufsichtigt werden Kinder dürfen nicht mit dem Gerät spielen Halten Sie sämtliches Verpackungsmaterial von Kindern fern und entsorgen Sie es ordnungsgemäß WARNUNG Halten Sie Kinder und Haustiere während des Betriebs oder der Abkühlphase vom Gerät fern Die zugäng...

Page 38: ... es in den Einbauschrank gesetzt wird Reinigen Sie das Gerät nicht mit einem Dampfstrahlreiniger Schalten Sie die Kochzone nach dem Gebrauch ab und verlassen Sie sich nicht auf die Topferkennung Hat die Glaskeramik Glasoberfläche einen Sprung schalten Sie das Gerät aus und nehmen Sie es vom Stromnetz Falls das Gerät direkt mit dem Stromnetz verbunden ist und nicht getrennt werden kann nehmen Sie d...

Page 39: ...ens 2 cm zwischen dem Geräteboden und den Teilen die in der Schublade gelagert sind ein Entfernen Sie Trennplatten die im Küchenmöbel unter dem Gerät installiert sind 2 2 Elektrischer Anschluss WARNUNG Brand und Stromschlaggefahr Alle elektrischen Anschlüsse sind von einem geprüften Elektriker vorzunehmen Das Gerät muss geerdet sein Vor der Durchführung jeglicher Arbeiten muss das Gerät von der el...

Page 40: ... mit Wasser in Kontakt gekommen ist Benutzen Sie das Gerät nicht als Arbeits oder Abstellfläche Hat die Geräteoberfläche einen Sprung trennen Sie das Gerät umgehend von der Spannungsversorgung Dies dient zur Vermeidung eines Stromschlags Benutzer mit einem Herzschrittmacher müssen einen Mindestabstand von 30 cm zu den Induktionskochzonen einhalten wenn das Gerät in Betrieb ist Wenn Sie Nahrungsmit...

Page 41: ...htung geeignet 2 6 Entsorgung WARNUNG Verletzungs und Erstickungsgefahr Für Informationen zur ordnungsgemäßen Entsorgung des Geräts wenden Sie sich an die zuständige kommunale Behörde vor Ort Trennen Sie das Gerät von der Stromversorgung Schneiden Sie das Netzkabel in der Nähe des Geräts ab und entsorgen Sie es 3 MONTAGE WARNUNG Siehe Kapitel Sicherheitshinweise 3 1 Vor der Montage Notieren Sie vo...

Page 42: ... 500mm Ist das Gerät über einer Schublade installiert kann die Kochfeldbelüftung die in der Schublade aufbewahrten Gegenstände während des Garvorgangs erwärmen min 12 min 60 min 28 www youtube com electrolux www youtube com aeg How to install your Electrolux Induction Hob Worktop installation 4 GERÄTEBESCHREIBUNG 4 1 Anordnung der Kochflächen 1 1 2 1 1 1 Induktionskochzone 2 Bedienfeld 42 DEUTSCH ...

Page 43: ...chalten der Funktion 4 Kochstufenanzeige Zeigt die Kochstufe an 5 Kochzonen Anzeigen des Timers Zeigt an für welche Kochzone die Zeit eingestellt wur de 6 Timer Anzeige Zeigt die Zeit in Minuten an 7 Auswählen der Kochzone 8 Erhöhen oder Verringern der Zeit 9 PowerBoost Einschalten der Funktion 10 Einstellskala Einstellen der Kochstufe 4 3 Anzeige der Kochstufen Display Beschreibung Die Kochzone i...

Page 44: ... das Kochfeld ein oder auszuschalten 5 2 Automatische Abschaltung Mit dieser Funktion wird das Kochfeld in folgenden Fällen automatisch ausgeschaltet Alle Kochzonen sind ausgeschaltet Nach dem Einschalten des Kochfelds wird keine Kochstufe gewählt Das Bedienfeld ist mehr als 10 Sekunden mit verschütteten Lebensmitteln oder einem Gegenstand bedeckt Topf Tuch usw Ein akustisches Signal ertönt und da...

Page 45: ...zone automatisch wieder auf die höchste Kochstufe um Siehe Kapitel Technische Daten Einschalten der Funktion für eine Kochzone Berühren Sie leuchtet auf Ausschalten der Funktion Ändern Sie die Kochstufe 5 7 Timer Countdown Timer Sie können diese Funktion verwenden um die Dauer eines einzelnen Kochvorgangs einzustellen Stellen Sie zuerst die Kochstufe für die Kochzone und erst danach die Funktion e...

Page 46: ...egelt Die Funktion unterbricht nicht die Timer Funktionen Berühren Sie zum Einschalten der Funktion leuchtet Die Kochstufe verringert sich auf 1 Berühren Sie zum Ausschalten der Funktion Es erscheint die vorherige Kochstufe 5 9 Verriegelung Sie können das Bedienfeld sperren wenn Kochzonen eingeschaltet sind So wird verhindert dass die Kochstufe versehentlich geändert wird Stellen Sie zuerst die Ko...

Page 47: ...uf dass die gewählte Leistungsstufe für die Sicherungen in der Hausinstallation geeignet ist P46 4600 W P15 1500 W P20 2000 W P25 2500 W P30 3000 W P35 3500 W P40 4000 W 5 13 Power Management Sind mehrere Zonen eingeschaltet und die verbrauchte Leistung überschreitet die Begrenzung der Stromversorgung teilt diese Funktion die verfügbare Leistung zwischen allen Kochzonen auf Das Kochfeld steuert di...

Page 48: ... in der Nähe des Bedienfelds zu halten Dies könnte sich auf die Funktionsweise des Bedienfelds auswirken oder die Kochfeldfunktionen versehentlich aktivieren Siehe hierzu Technische Daten 6 2 Betriebsgeräusche Es gibt verschiedene Betriebsgeräusche Knacken Das Kochgeschirr besteht aus unterschiedlichen Materialien Sandwichkonstruktion Pfeifen Sie haben die Kochzone auf eine hohe Stufe geschaltet u...

Page 49: ...chaltet 7 REINIGUNG UND PFLEGE WARNUNG Siehe Kapitel Sicherheitshinweise 7 1 Allgemeine Informationen Reinigen Sie das Kochfeld nach jedem Gebrauch Verwenden Sie stets Kochgeschirr mit sauberen Böden Kratzer oder dunkle Flecken auf der Oberfläche beeinträchtigen die Funktionsfähigkeit des Kochfelds nicht Verwenden Sie einen Spezialreiniger zur Reinigung der Kochfeldoberfläche Verwenden Sie einen s...

Page 50: ...n das Kochfeld ausgeschal tet ist ertönt ein akustisches Sig nal Sie haben etwas auf ein oder meh rere Sensorfelder gestellt Entfernen Sie den Gegenstand von den Sensorfeldern Das Kochfeld wird ausgeschaltet Sie haben etwas auf das Sensorfeld gestellt Entfernen Sie den Gegenstand von dem Sensorfeld Die Restwärmeanzeige funktio niert nicht Die Kochzone ist nicht heiß da sie nur kurze Zeit in Betrie...

Page 51: ... konstanter Piepton zu hören Unsachgemäßer elektrischer An schluss Trennen Sie das Kochfeld von der Stromversorgung Wenden Sie sich an eine Elektrofachkraft zur Überprüfung der Installation 8 2 Wenn Sie das Problem nicht lösen können Wenn Sie das Problem nicht selbst lösen können wenden Sie sich an Ihren Händler oder einen autorisierten Kundendienst Geben Sie die Daten die Sie auf dem Typenschild ...

Page 52: ...ten links Vorne rechts Hinten rechts 21 0 cm 18 0 cm 14 5 cm 18 0 cm Energieverbrauch pro Kochfeld EC electric cooking Vorne links Hinten links Vorne rechts Hinten rechts 177 0 Wh kg 175 3 Wh kg 180 2 Wh kg 174 6 Wh kg Energieverbrauch des Kochfelds EC electric hob 176 8 Wh kg Für die Europäische Union gemäß EU 66 2014 Für Weißrussland gemäß STB 2477 2017 Anhang A Für die Ukraine gemäß 742 2019 EN...

Page 53: ... den entsprechenden Recyclingbehältern Recyceln Sie zum Umwelt und Gesundheitsschutz elektrische und elektronische Geräte Entsorgen Sie Geräte mit diesem Symbol nicht mit dem Hausmüll Bringen Sie das Gerät zu Ihrer örtlichen Sammelstelle oder wenden Sie sich an Ihr Gemeindeamt DEUTSCH 53 ...

Page 54: ... E ASSISTENZA TECNICA Consigliamo sempre l impiego di ricambi originali Quando si contatta il nostro Centro di Assistenza Autorizzato accertarsi di avere a disposizione i dati seguenti Modello numero dell apparecchio PNC numero di serie Le informazioni sono riportate sulla targhetta identificativa Avvertenza Attenzione Importanti Informazioni per la sicurezza Informazioni generali e suggerimenti I...

Page 55: ...ambini al di sotto dei 3 anni se non costantemente supervisionati Non consentire ai bambini di giocare con l apparecchiatura Tenere gli imballaggi lontano dai bambini e smaltirli in modo adeguato AVVERTENZA Tenere i bambini e gli animali domestici lontano dall apparecchiatura durante il funzionamento o raffreddamento Alcune parti accessibili diventano calde durante l uso Se l apparecchiatura ha un...

Page 56: ...ruttura a incasso Non usare una pulitrice a vapore per pulire l apparecchiatura Dopo l uso spegnere l elemento utilizzato mediante la corrispondente manopola senza considerare quanto indicato dal rilevatore di utensili Se la superficie di vetroceramica vetro presenta delle crepe spegnere l apparecchiatura e scollegarla dalla presa di corrente Qualora l apparecchiatura sia collegata direttamente al...

Page 57: ...rte inferiore dell apparecchiatura e le componenti conservate nel cassetto Togliere gli eventuali pannelli separatori installati nel mobiletto sotto all apparecchiatura 2 2 Collegamento elettrico AVVERTENZA Rischio di incendio e scossa elettrica Tutti i collegamenti elettrici devono essere realizzati da un elettricista qualificato L apparecchiatura deve disporre di una messa a terra Prima di quals...

Page 58: ...tura presenta delle incrinature scollegare immediatamente l apparecchiatura dall alimentazione per evitare scosse elettriche I portatori di pacemaker devono mantenere una distanza di almeno 30 cm dalle zone di cottura a induzione quando l apparecchiatura è in funzione Un alimento immerso nell olio molto caldo può provocare degli schizzi AVVERTENZA Pericolo di incendio ed esplosioni Grassi e olio c...

Page 59: ...a spina dall alimentazione elettrica Tagliare il cavo elettrico dell apparecchiatura e smaltirlo 3 INSTALLAZIONE AVVERTENZA Fare riferimento ai capitoli sulla sicurezza 3 1 Prima dell installazione Prima di installare il piano di cottura annotare l informazione riportata di seguito presente sulla targhetta dei dati La targhetta dei dati è applicata sul lato inferiore del piano di cottura Numero di...

Page 60: ...assetto la ventilazione del piano cottura può riscaldare gli articoli all interno del cassetto durante il processo di cottura min 12 min 60 min 28 www youtube com electrolux www youtube com aeg How to install your Electrolux Induction Hob Worktop installation 60 ITALIANO ...

Page 61: ...ici mostrano quali funzioni sono attive Tasto senso re Funzione Commento 1 ON OFF Per attivare e disattivare il piano di cottura 2 Blocco Dispositivo di sicurezza bambini Per bloccare sbloccare il pannello dei comandi 3 Sospendi Per attivare e disattivare la funzione 4 Display livello di potenza Per mostrare il livello di potenza 5 Spie del timer delle zone di cottura Indica per quale zona è impos...

Page 62: ...ppo piccola oppure manca la pentola sulla zona di cottura Spegnimento automatico è attiva 4 4 OptiHeat Control indicatore di calore residuo su 3 livelli AVVERTENZA Il calore residuo può essere causa di ustioni Gli indicatori mostrano il livello del calore residuo per le zone cottura attualmente in uso Le spie si potrebbero accendere anche per le zone cottura vicine anche se non sono in uso Le zone...

Page 63: ... controllo fino a raggiungere il livello necessario 5 4 Utilizzo delle zone di cottura Posizionare le pentole al centro della zona selezionata Le zone di cottura a induzione si adattano automaticamente alle dimensioni del fondo della pentola 5 5 Riscaldamento automatico Attivare questa funzione per ottenere un impostazione di calore desiderata in meno tempo Quando è accesa la zona funziona sull im...

Page 64: ...po è in funziona la zona di cottura sfiorare per impostare la zona di cottura La spia della zona di cottura inizia a lampeggiare Il display mostra per quanto tempo è rimasta in funzione la zona Per disattivare la funzione sfiorare quindi sfiorare o La spia della zona di cottura scompare Contaminuti Si può utilizzare questa funzione quando il piano di cottura è attivo e le zone di cottura non sono ...

Page 65: ...va automaticamente Quando la funzione è impostata su i segnali acustici saranno udibili soltanto quando si sfiora Contaminuti diminuisce Timer diminuisce si appoggia un oggetto sul pannello dei comandi 5 12 Limitazione potenza Il piano cottura è impostato sul livello di potenza massimo possibile per impostazione predefinita Per ridurre o aumentare il livello di potenza 1 Disattivare il piano cottu...

Page 66: ...ura a induzione impostata sul livello di cottura massimo una calamita si attacca al fondo della pentola Dimensioni delle pentole Le zone di cottura a induzione si adattano automaticamente alle dimensioni del fondo della pentola L efficienza della zona di cottura dipende dal diametro delle pentole Una pentola con un diametro inferiore alla zona più piccola riceve solo una parte della potenza genera...

Page 67: ... Usare al max l di acqua per 750 g di patate 7 9 Bollire grandi quantità di alimenti stu fati e zuppe 60 150 Fino a 3 l di liquido più gli ingredienti 9 12 Frittura delicata cotolette cordon bleu costolette polpette salsicce fegato uova frittelle krapfen secondo necessità Girare a metà tempo 12 13 Frittura frittelle di patate lombate bi stecche 5 15 Girare a metà tempo 14 Portare a ebollizione l a...

Page 68: ...ui il fusibile continui a saltare rivolgersi ad un elettricista qualificato Non è stato impostato il livello di ca lore entro 10 secondi Accendere nuovamente il piano cottu ra e impostare il livello di calore in me no di 10 secondi Sono stati toccati 2 o più tasti senso re contemporaneamente Toccare solo un tasto sensore Sospendi è in funzione Consultare la sezione Utilizzo quoti diano C è acqua o...

Page 69: ...iano cottu ra dopo 30 secondi Se si accende nuovamente scollegare il piano cottu ra dall alimentazione elettrica Dopo 30 secondi collegare nuovamente il piano cottura In caso di ricomparsa dell ano malia rivolgersi a un Centro di assi stenza autorizzato Si sente un bip costante Il collegamento elettrico non è cor retto Scollegare il piano cottura dalla rete elettrica Consultare un elettricista qua...

Page 70: ...ENERGETICA 10 1 Informazioni sul prodotto Identificazione modello LIL61443BW Tipo di piano cottura Piano cottura a incasso Numero di zone di cottura 4 Tecnologia di riscaldamento Induzione Diametro delle zone di cottura circolari Ø Anteriore sinistra Posteriore sinistra Anteriore destra Posteriore destra 21 0 cm 18 0 cm 14 5 cm 18 0 cm Consumo di energia per zona di cottura EC electric cooking Ant...

Page 71: ...re le pentole direttamente al centro della zona di cottura Utilizzare il calore residuo per mantenere caldi i cibi o fonderli 11 CONSIDERAZIONI SULL AMBIENTE Riciclare i materiali con il simbolo Buttare l imballaggio negli appositi contenitori per il riciclaggio Aiutare a proteggere l ambiente e la salute umana e a riciclare rifiuti derivanti da apparecchiature elettriche ed elettroniche Non smalt...

Page 72: ...NTE Y SERVICIO Le recomendamos que utilice recambios originales Cuando se ponga en contacto con nuestro Centro de servicio técnico asegúrese de tener los siguientes datos disponibles Modelo código numérico del producto PNC número de serie La información se encuentra en la placa de características Advertencia Precaución Información sobre seguridad Información general y consejos Información relativa...

Page 73: ...n continua Es necesario mantener alejados del aparato a los niños de menos de 3 años salvo que estén bajo supervisión continua No deje que los niños jueguen con el aparato Mantenga todo el material de embalaje fuera del alcance de los niños y deséchelo de forma adecuada ADVERTENCIA Mantenga a los niños y mascotas alejados del aparato cuando esté funcionando o enfriándose Las partes accesibles se c...

Page 74: ...mpotrada No utilice un limpiador a vapor para limpiar el aparato Tras el uso apague la zona de cocción con el mando y no preste atención al detector de tamaño Si la superficie de vitrocerámica cristal está agrietada apague el aparato y desenchúfelo de la red eléctrica Si el aparato está conectado directamente a la red eléctrica mediante una caja de empalmes quite el fusible para desconectarlo de l...

Page 75: ...r cualquier tipo de operación compruebe que el aparato esté desenchufado de la corriente eléctrica Asegúrese de que los parámetros de la placa de características son compatibles con los valores eléctricos del suministro eléctrico Asegúrese de que el aparato está instalado correctamente Un cable de red o enchufe en su caso flojo o inadecuado puede provocar que el terminal se caliente en exceso Util...

Page 76: ...tes pueden generar vapores inflamables Mantenga las llamas u objetos calientes alejados de grasas y aceites cuando cocine con ellos Los vapores que liberan los aceites muy calientes pueden provocar combustiones imprevistas El aceite usado que puede contener restos de alimentos puede provocar incendios a temperaturas más bajas que el aceite que se utiliza por primera vez No coloque productos inflam...

Page 77: ...anote la información siguiente de la placa de características La placa de características está situada en la parte inferior de la placa de cocción Número de serie 3 2 Placas empotradas Las placas de cocción que han de ir integradas en la cocina solo deben utilizarse una vez encastradas en los muebles adecuados y con las encimeras y superficies de trabajo apropiadas 3 3 Cable de conexión La placa s...

Page 78: ...e un cajón la ventilación de la placa puede calentar el contenido del cajón durante el proceso de cocción min 12 min 60 min 28 www youtube com electrolux www youtube com aeg How to install your Electrolux Induction Hob Worktop installation 78 ESPAÑOL ...

Page 79: ...ionamiento Sensor Función Comentario 1 ENCENDIDO APAGADO Para activar y desactivar la placa 2 Bloqueo Dispositivo de seguri dad para niños Para bloquear y desbloquear el panel de control 3 Pausa Para activar y desactivar la función 4 Indicador del nivel de calor Para mostrar el nivel de calor 5 Indicadores de tiempo de las zo nas de cocción Muestra la zona para la que se ha ajustado la hora 6 Indi...

Page 80: ...nadecuado o demasiado pequeño o no se ha colocado ningún reci piente sobre la zona de cocción Desconexión automática está en funcionamiento 4 4 OptiHeat Control indicador de calor residual de 3 pasos ADVERTENCIA Riesgo de quemaduras por calor residual Los indicadores muestran el nivel de calor residual de las zonas de cocción que está usando También pueden iluminarse los indicadores de las zonas d...

Page 81: ...a de control hasta llegar al ajuste de temperatura adecuado 5 4 Uso de las zonas de cocción Coloque el utensilio de cocina en el centro de la zona seleccionada Las zonas de cocción por inducción se adaptan automáticamente al tamaño de la base de los utensilios de cocina 5 5 Calentamiento automático Active esta función para alcanzar el ajuste de calor que desea en menos tiempo Cuando se activa la z...

Page 82: ...currido minutos Para ver el tiempo de funcionamiento de la zona de cocción toque para seleccionar la zona de cocción El indicador de la zona de cocción comienza a parpadear La pantalla muestra cuánto tiempo ha estado funcionado la zona Para desactivar la función toque y después o El indicador de la zona de cocción desaparece Avisador Puede utilizar esta función mientras la placa está activada y la...

Page 83: ... baja el Temporizador de cuenta atrás baja se coloca algo en el panel de control 5 12 Limitación de energía La placa de cocción se ajusta por defecto en su nivel de potencia más alto posible Para reducir o aumentar el nivel de potencia 1 Apague la placa de cocción 2 Mantenga pulsado durante 3 segundos La pantalla se encienda y se apaga 3 Mantenga pulsado durante 3 segundos o aparece 4 Pulse P46 ap...

Page 84: ...cina Las zonas de cocción por inducción se adaptan automáticamente al tamaño de la base de los utensilios de cocina La eficacia de la zona de cocción depende del diámetro del utensilio Un utensilio de cocina con un diámetro inferior al mínimo solo recibe una parte de la potencia generada por la zona de cocción Por razones de seguridad y resultados de cocción óptimos no utilice utensilios de cocina...

Page 85: ...50 g de patatas 7 9 Grandes cantidades de alimentos es tofados y sopas 60 150 Hasta 3 litros de líquido además de los ingredientes 9 12 Freír ligeramente escalopes ternera cordon bleu chuletas hamburgue sas salchichas hígado filetes rusos huevos tortitas rosquillas como esti me nece sario Dele la vuelta a media cocción 12 13 Asado fuerte bolas de patata filetes de lomo filetes 5 15 Dele la vuelta ...

Page 86: ...tidamente consulte a un electricista cualificado No ha ajustado la temperatura antes de que transcurran 10 segundos Vuelva a encender la placa y ajuste el nivel de calor en menos de 10 segun dos Ha pulsado 2 o más sensores al mismo tiempo Toque solo un sensor Pausa está en funcionamiento Consulte Uso diario Hay agua o grasa en el panel de control Limpie el panel de control Se emite una señal acúst...

Page 87: ...a placa de cocción de la red eléctrica Espere 30 segundos antes de volver a conectar la placa Si el problema continúa pón gase en contacto con el Centro de ser vicio técnico Se oye un pitido constante La conexión eléctrica no es correcta Desconecte la placa de cocción de la red eléctrica Pida a un electricista cualificado que compruebe la instala ción 8 2 Si no encuentra una solución Si no logra s...

Page 88: ...ón Diámetro de las zonas de cocción circulares Ø Anterior izquierda Posterior izquierda Anterior derecha Posterior derecha 21 cm 18 cm 14 5 cm 18 cm Consumo energético por zona de cocción EC elec tric cooking Anterior izquierda Posterior izquierda Anterior derecha Posterior derecha 177 0 Wh kg 175 3 Wh kg 180 2 Wh kg 174 6 Wh kg Consumo enegértico de la placa de cocción EC electric hob 176 8 Wh kg...

Page 89: ...EDIOAMBIENTALES Recicle los materiales con el símbolo Coloque el material de embalaje en los contenedores adecuados para su reciclaje Ayude a proteger el medio ambiente y la salud pública así como a reciclar residuos de aparatos eléctricos y electrónicos No deseche los aparatos marcados con el símbolo junto con los residuos domésticos Lleve el producto a su centro de reciclaje local o póngase en c...

Page 90: ...90 ...

Page 91: ...91 ...

Page 92: ...867358638 A 022021 electrolux com ...

Reviews: