background image

7

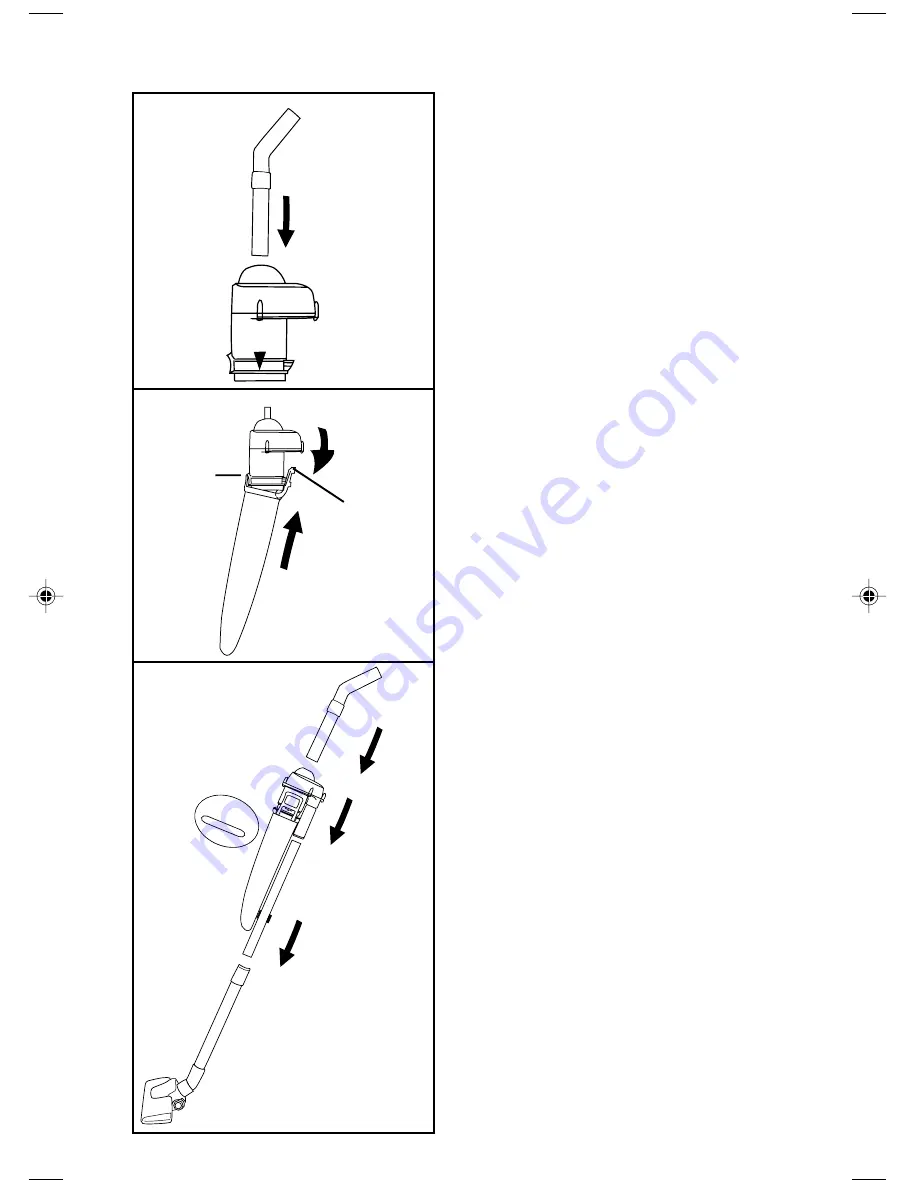
Fig. 2a

Fig. 2b

Handle

Tab &
Slot

Attaching the Cyclonic Bag
Saver onto the vacuum cleaner

Your vacuum cleaner is equipped with two
wands.

Fig. 2a Push the hose nozzle into the top of

the cyclonic housing until it is firmly
in place.

Fig. 2b Attach the cyclonic dust cup onto the

cyclonic housing. Place the slot in the
cyclonic dust cup over the tab on the
cyclonic housing. Then grasp the
handle on the cyclonic dust cup, and
pivot the cyclonic dust cup up and
over the ledge on the cyclonic
housing.

Fig. 3

Push the nozzle at the bottom of the
cyclone unit into the top of one of the
straight wands. Adjust the position of
the cyclone unit. Install the last
straight wand and then push the
assembled wands into the floor tool.

Important Safety Information

- Do not vacuum surfaces which have been

subjected to inflammable solvents.

- Do not pick up any liquid.

- Do not pick up hot ashes which could cause

a fire.

Emptying

Empty the dust compartment of the cassette
after each use or when the dust cup is filled
up to the MAX level, Fig. 3. Detach the dust
cup by following the instructions in Fig. 2b in
reverse.

Empty the contents into a waste container.
To reattach the dust cup again follow the
described steps in Fig. 2b.

Maintenance

The Cyclonic Bag Saver can be washed in
cold or warm water and a mild detergent.
Thoroughly dry the dust compartment with
a soft towel before using it again. If the
cyclone unit clogs, use the vacuum cleaner
to unclog it.

Cyclonic Bag Saver

 (on some models) continued

MAX

MAX

Fig. 3

70183

9/21/05, 10:18 AM

7

Summary of Contents for Mighty Mite series

Page 1: ...ice Information 4 Automatic Motor Shut Off 4 Use 5 Accessories 6 7 Maintaining 8 Dust Bag 8 9 HEPA Filter 9 Problem Solving 10 Guarantee 11 IMPORTANT For any advice and to order dust bags filters and accessories on your cleaner please telephone Customer Care 08706 055055 www electrolux com ...

Page 2: ...n at the bottom of the stairs and take care not to stretch the hose beyond its actual length Always ensure when using your cleaner on the stair treads that you keep one hand firmly on the appliance Dust bags and filters should be changed at regular intervals as stated in your instruction booklet Always use genuine Electrolux dust bags Do not place the air freshener loose inside the dust bag compar...

Page 3: ...h is marked with the letter N or coloured black The wire which is coloured brown must be connected to the terminal which is marked with the letter L or coloured red If using a three pin plug do not make any connection to the terminal marked with the letter E or by the earth symbol or coloured green or green and yellow This cleaner is double insulated and no earth connection is necessary It is in y...

Page 4: ... 08706 055055 Never pick up hot cinders or lighted cigarette ends Make certain that your cleaner does not come into contact with water or any other liquid It is not designed as a wet pick up cleaner and must never be used on damp carpets or wet floors Important in the event of the mains supply cable of this vacuum cleaner requiring replacement we recommend that this be carried out by a Electrolux ...

Page 5: ... on several factors including type of carpet and amount of dirt Connect Hose Rotate Swivel Hook to release cord Plug in Push ON OFF switch A thermostat automatically shuts the motor off if it overheats see Automatic Motor Shut Off on page 4 Swivel Hook On Off Switch Store Tools Crevice Tool Combination Tool HEPA Filter 5 1 2 3 4 5 on some models Important Always store cleaner in a vertical positio...

Page 6: ...r dusting and nozzle for floors and upholstery Bare Floor Brush For any type of hard surface floor May be purchased separately Open the Slip Ring to reduce suction 6 Bare Floor Brush optional 1 2 3 Fig 1a Fig 1 UNPACKING AND ASSEMBLING Unpack and check that all the parts are included The Cyclonic Bag Saver consists of three main parts see Fig 1 1 Cyclonic Housing 2 Cyclone Dust Cup 3 Retaining Cli...

Page 7: ... last straight wand and then push the assembled wands into the floor tool Important Safety Information Do not vacuum surfaces which have been subjected to inflammable solvents Do not pick up any liquid Do not pick up hot ashes which could cause a fire Emptying Empty the dust compartment of the cassette after each use or when the dust cup is filled up to the MAX level Fig 3 Detach the dust cup by f...

Page 8: ...ating at maximum efficiency change the dust bag frequently and clean the filter as needed Some fine particles can restrict airflow very quickly and will decrease performance even before the bag appears to be full For that reason when vacuuming carpet fresheners or cleaners powder plaster dust or similar fine substances the bag and filter may need to be changed more often How to Remove Disposable D...

Page 9: ...r 6 Tuck bag corners under collar 7 Swing bag cover closed and push to latch How to Install HEPA Filter on some models Upper Filter Tabs Check the HEPA filter with each disposable dust bag change Replace twice a year or after every six bag changes Bottom Clips Rear Housing Tabs Bottom Clips Insert upper filter corner tabs firmly under rear housing tabs and pivot filter down until bottom clips on f...

Page 10: ...Push plug securely into outlet Try another outlet Check circuit breaker fuse Make sure power switch is ON Replace paper bag Remove any clogs from hose that restrict airflow then try again Push front cover until it latches firmly Replace paper bag Rotate slip ring on wand until hole is covered Remove any clogs from hose that restrict airflow then try again Check upper housing for blockage See direc...

Page 11: ...s attention during the first year There are certain conditions which may invalidate this guarantee a It is dependent upon the appliance being correctly installed and used in accordance with the Company s instructions under normal domestic conditions within the United Kingdom or the Republic of Ireland b Service at all times must be carried out by an Electrolux Service Representative or authorised ...

Page 12: ...Part No 70183 8 00 Printed in U S A ...

Reviews: