background image

electrolux 

installation manual

7

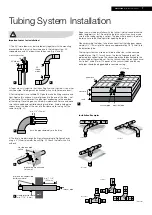
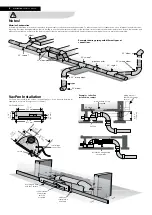
1) The 90° inlet elbow may be installed only together with the mounting 

bracket and the inlet valve. Anywhere else in the tubing system, 90° 

sweep elbows and 45° elbows should be used. (Fig. A and B)

2) Tubes are cut straight so that the cutting line is not slanted. Use a miter 

saw if possible. Cut edges can be finished with a knife (to remove burrs). 

3) For tubing joints, use suitable PVC glue to make the fittings secure and 

tight. Apply a thin and even layer of glue only to the end of the tube – not 

to the sleeve. This will prevent the glue from overflowing to the end face 

of the tubing. Close the glue can carefully immediately after use and make 

sure to have adequate ventilation during installation. Avoid inhaling glue 

vapors. Insert the tube all the way into the sleeve while turning it at the 

same time (Fig. C). 

4) The inlet is made through the fire wall according to Fig.figure E or by 

using a 2” (50mm) diameter fire cuff (Fig. D). Check the inlet with a fire 

authority. 

mounting bracket

90° elbow

90°

sweep 

elbow

A

B

Tubing System Installation

Important notes for installation!

correct

incorrect

incorrect

pipe collars are attached 

to the wall

wire mesh

concrete

sand

vacuum pipe   electrical tube

2” (51 mm)

fire stopping pipe 

collars

E

F

correct

correct

incorrect

D

min. 3/4” (18 mm)

push the pipe completely into the fitting

C

Begin the main tube installation with the farthest inlet valve and place the 

tubes temporarily at first. Do not glue the joints yet until you have made 

sure that the tubing routing is correct. The glue will dry quickly; therefore, 

the joints have to be fitted right after applying the glue. 

When measuring the tubes, take into account that the tube goes appro-

ximately 2/3” (18mm) into the sleeve and approximately 7/8” (20mm) into 

the extension tube. 

The tubing system can also be installed in a floor that will be concrete 

casted later on (Fig. F). In such cases, the low-voltage cable must be 

protected by a conduit pipe. The conduit pipe should be attached to the 

vacuum tube or the casting net. For the vacuum tube, the routing channel 

has to be 2” wide (51mm). The ends of the vacuum tubes and the con-

duit pipes should be plugged before concrete casting.

 vacuum pipe

wall

vacuum pipe

min. 7 7/8”

(200 mm)

protects the combustible 

building material

steel protective sleeve

min. 1/ 16” (2 mm)

wall

Installation Examples

Summary of Contents for Oxygen

Page 1: ...electrolux central vacuum systems Installation manual ...

Page 2: ...ystem Installation Location of the Power Unit 3 Tubing System Design 3 Location of Wall Inlet Valves 3 Typical Installation Examples 3 Installation of Wall Inlets 4 Tubing System Installation 7 VacPan Installation 8 Exhaust Blow Out 9 Electrical Connections 10 ...

Page 3: ... one single inlet val ve The light broken line indicates an alternative installation type In the house of the same size the power unit is in the garage where the utility valve serves as a third inlet valve allowing you to clean your car for example wall valve door Floor valve wall valve In this example the simplest solution is to route the tubing in the attic If the space is cold the main tube sho...

Page 4: ...tallation is shown in the figure on the right A 90 inlet elbow is used in the wall installation to prevent long objects entering into the tubing system protecting it against blockages A 90 steep elbow can be fitted in two different ways In practice the partition wall can be as narrow as 2 3 4 65mm If the thickness of the wall board is more than 1 25mm you can reach the mounting bracket by using an...

Page 5: ...hen installing the inlet valve sink the pipes the inlet elbow and the mounting bracket in the wall so that the highest surface of the mounting bracket is approximately 1 4 5mm deeper than the final inner surface For the tubing system make a 3 1 8 x 3 1 8 80mm x 80mm channel in the brick or concrete wall independent of the final thickness of the wall The tubing installation must be sturdy enough so...

Page 6: ...le is needed Drill a hole for the tube also in the floor of the closet Cut the tube to the proper length and glue it into the rebuilding sleeve Insert the tube into the round hole with the floor sleeve rebuilding sleeve first so that it extends through the outer wall of the closet Mount the inlet valve in the rebuilding sleeve Measure and cut the tube to the proper length so that it reaches with t...

Page 7: ...rtant notes for installation correct incorrect incorrect pipe collars are attached to the wall wire mesh concrete sand vacuum pipe electrical tube 2 51 mm fire stopping pipe collars E F correct correct incorrect D min 3 4 18 mm push the pipe completely into the fitting C Begin the main tube installation with the farthest inlet valve and place the tubes temporarily at first Do not glue the joints y...

Page 8: ...ay be generated To reduce the amount of condensation close all pipe holes and inlet open ings using duct tape during installation Before starting to use the central vacuum system for the first time let the system vacuum and circulate fresh air for a few minutes and make sure that there is no water in the dust container If there is water in the container drain it and continue vacuuming until no mor...

Page 9: ...t Because the exhaust tube must be as short as possible it is recommended to place the power unit as close to an outside wall as possible Shown below are examples indicating how to install the exhaust tube The exhaust muffler can be installed upwards downwards as well as horizontally Min 30cm 12 Min 30cm 12 Min 70cm 27 5 ceiling exterior wall ...

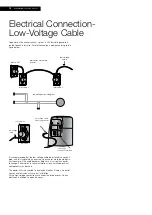
Page 10: ...hidden in cast concrete If the cable becomes defective it is also much easier to change it afterwards In these installations only certified electrical components may be used The power unit is connected to an electrical outlet If there is no outlet nearby an electrician will carry out installation All the high voltage connections are under the turbine cover Only an electrician is allowed to open th...

Page 11: ...really need and want This kind of thoughtful care means innovating with insight Not design for design s sake but design for the user s sake For us thoughtful design means making appliances easier to use and tasks more enjoyable to perform freeing our customers to experience the ultimate 21st century luxury ease of mind Our aim is to make this ease of mind more available to more people in more part...

Reviews: