background image

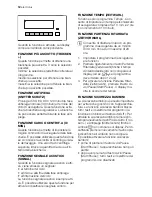
Quando la funzione è attivata, sul display
compare il simbolo corrispondente.

FUNZIONE PIÙ ASCIUTTO (TROCKEN
+)

Questa funzione permette di ottenere una
biancheria più asciutta. 3 sono le selezioni
possibili:
minima: la selezione predefinita correlata al
programma.
media: la selezione per ottenere una bian-
cheria più asciutta.
massima: la selezione per ottenere la bian-
cheria più asciutta possibile.

FUNZIONE ANTIPIEGA
(KNITTERSCHUTZ)

Prolunga di 30, 60, 90 o 120 minuti la fase
antipiega normale (30 minuti) al termine del
ciclo di asciugatura. Questa funzione evita
che la biancheria si sgualcisca. La bianche-
ria può essere estratta durante la fase anti-
piega.

FUNZIONE CARICO CENTRIF. A (U/
MIN.)

Questa funzione permette di impostare le
migliori condizioni di asciugatura della bian-
cheria. È possibile utilizzare questa funzione
se si conosce la velocità di centrifuga inizia-
le del lavaggio. Una velocità di centrifuga
superiore riduce la quantità di acqua all’in-
terno della biancheria.

FUNZIONE SEGNALE ACUSTICO
(SIGNAL)

Quando la funzione segnale acustico è atti-
va, viene emesso un segnale:
• al termine del ciclo
• all'inizio e alla fine della fase antipiega
• all'interruzione del ciclo
La funzione segnale acustico è sempre atti-
va. È possibile utilizzare questa funzione per
attivare o disattivare il segnale sonoro.

FUNZIONE TEMPO (ZEITWAHL)

Funziona solo il programma Tempo . Con-
sente di impostare un tempo personalizzato
di asciugatura compreso tra 10 min. e 2 ore
(con incrementi di 10 minuti).

FUNZIONE PARTENZA RITARDATA
(ZEITVORWAHL)

Consente di ritardare l'inizio di un pro-
gramma di asciugatura da un minimo
di 30 min. fino ad un massimo di 20
ore.

1. Impostare il programma di asciugatura

e le funzioni.

2. Premere ripetutamente il tasto Partenza

Ritardata (Zeitvorwahl) finché il tempo
di ritardo desiderato non compare sul
display (ad es.       se il programma
deve iniziare dopo 12 ore).

3. Per attivare la funzione Partenza Ritar-

data (Zeitvorwahl) , premere il tasto Av-
vio/Pausa (Start/Pause) . Il display mo-
stra lo scorrere del tempo.

FUNZIONE SICUREZZA BAMBINI

La sicurezza bambini può essere impostata
per evitare che giochino con l’apparecchia-
tura. La funzione sicurezza bambini blocca
tutti i tasti e il selettore dei programmi (la
funzione non blocca il tasto Auto/Off ). Per
attivare la sicurezza bambini premere con-
temporaneamente i tasti Più Asciutto (Troc-
ken +) e Antipiega (Knitterschutz) finché il
simbolo   non compare sul display. Per di-
sattivarla premere nuovamente i tasti sopra
indicati finché il simbolo non scompare.
È possibile attivare la funzione sicurezza
bambini:
• prima di premere il tasto Avvio/Pausa

(Start/Pause) ; l'apparecchiatura non può
partire

• dopo aver premuto il tasto Avvio/Pausa

(Start/Pause) ; tutti i tasti e il selettore dei
programmi sono disattivati

12 

electrolux

Summary of Contents for TW SL EP

Page 1: ...istruzioni per l uso user manual Asciugabiancheria Tumble dryer TW SL EP ...

Page 2: ... apparecchiatura impedi scano loro di utilizzarla senza rischi in as senza di una persona responsabile per la loro incolumità Evitare che bambini e animali domestici possano entrare nel cesto Per sicurezza ispezionare il cesto prima dell utilizzo Oggetti come monete spille di sicurezza chiodi viti pietre o altri materiali duri e ta glienti possono danneggiare gravemente l apparecchiatura prestare ...

Page 3: ... al Centro di assistenza Disimballare completamente l apparec chiatura prima dell installazione L inos servanza di tale disposizione può causare gravi danni all apparecchiatura e all abita zione Vedere la relativa sezione del ma nuale di istruzioni Se si rendesse necessaria una modifica all impianto elettrico per l installazione dell apparecchiatura l intervento dovrà essere effettuato da personal...

Page 4: ... dalla presa di corren te Tagliare il cavo di rete e smaltirlo Rimuovere il fermo della porta Ciò evita che i bambini o gli animali domestici resti no chiusi nell apparecchiatura Vi è il ri schio di soffocamento CONSIDERAZIONI AMBIENTALI Il simbolo sul prodotto o sulla confezione indica che il prodotto non deve essere considerato come un normale rifiuto domestico ma deve essere portato nel punto d...

Page 5: ...4 Porta reversibile 5 Filtro principale 6 Far scorrere il tasto per aprire la porta dello scambiatore di calore 7 Fessure per il ricircolo dell aria 8 Piedini regolabili 9 Porta dello scambiatore di calore 10 Coperchio dei filtri dello scambiatore di calore 11 Manopola di blocco 12 Targhetta dei dati electrolux 5 ...

Page 6: ...nitore dell acqua viene scaricato automaticamente Il contenitore dell acqua deve trovarsi all interno dell ap parecchiatura Il tubo installato deve trovarsi ad un altezza tra i 50 cm e un massimo di 1 m da terra Il tubo non deve essere attorcigliato Se pos sibile ridurre la lunghezza del tubo Leggere attentamente le istruzioni fornite con il kit PIEDISTALLO CON CASSETTO Nome prodotto PDSTP10 Dispo...

Page 7: ... di eseguire un asciuga tura sicura all interno dell asciugabianche ria scarpe sportive lana peluche intimo Leggere attentamente le istruzioni fornite con il kit PANNELLO DEI COMANDI 1 2 3 5 6 4 1 Selettore dei programmi 2 Display 3 Tasto Avvio Pausa Start Pause 4 Funzione tasti 5 Spie del programma 6 Tasto On Off con funzione Auto Off DISPLAY electrolux 7 ...

Page 8: ...eria con un panno umido o impostare un programma breve ad es della durata di 30 minuti con un carico di panni umidi Attenzione Il compressore e il relativo sistema all inter no dell asciugabiancheria vengono riempiti con un agente speciale esente da CFC Cloro Fluoro Carburi Il sistema deve es sere a tenuta stagna Un sistema danneg giato può causare perdite e danni all appa recchiatura All inizio d...

Page 9: ... carico di biancheria ridotto si consiglia di utilizzare durate brevi tutte tranne Più Asciutto Trocken e Carico centrif A U Min Extra Rapido Mix Extra Kurz 3 kg Asciugatura di tessuti in cotone e sintetici a basse temperature tutte tranne Tempo Zeit wahl Sintetici Mischgewebe Extra Extra trocken 3 5 kg Asciugatura di tessuti spessi o multistrato ad esempio maglioni biancheria da letto tovaglie tu...

Page 10: ...re o ridurre il grado di umidità resi dua della biancheria è possibile utilizzare la funzione Più Asciutto Trocken Più Asciutto Trocken Segnale Acu stico Signal Tempo Zeit wahl 3 Par tenza Ritarda ta Zeitvor wahl 1 peso massimo dei capi asciutti 2 Ai soli fini normativi Per effettuare un test relativo alle prestazioni utilizzare i programmi standard indicati nel documento EN 61121 Se si rendesse n...

Page 11: ... tra la porta e la guarnizione di gomma ACCENSIONE DELL APPARECCHIATURA Premere il tasto On Off per attivare o di sattivare l apparecchiatura Quando l appa recchiatura è accesa alcune indicazioni vengono visualizzate sul display FUNZIONEAUTO OFF Per ridurre il consumo di energia la funzio ne Auto Off disattiva automaticamente l ap parecchiatura se entro 5 minuti non viene premuto il ta sto Avvio P...

Page 12: ...vare il segnale sonoro FUNZIONE TEMPO ZEITWAHL Funziona solo il programma Tempo Con sente di impostare un tempo personalizzato di asciugatura compreso tra 10 min e 2 ore con incrementi di 10 minuti FUNZIONE PARTENZA RITARDATA ZEITVORWAHL Consente di ritardare l inizio di un pro gramma di asciugatura da un minimo di 30 min fino ad un massimo di 20 ore 1 Impostare il programma di asciugatura e le fu...

Page 13: ...tiratura a vapore Se necessario puli re prima l acqua di condensa ad es con un filtro per caffè per eliminare eventuali residui e pelucchi Mantenere sempre pulite le fessure per il ricircolo dell aria sulla parte inferiore del l apparecchiatura Utilizzare i volumi di carico indicati nel ca pitolo dei programmi Assicurarsi che vi sia un buon ricircolo d aria dove è stata installata l apparec chiatu...

Page 14: ...e del ciclo o quando il contenitore dell ac qua è pieno Quando si usa un dispositivo esterno per svuotare il contenitore la spia può essere spenta Per attivare e disattivare la spia 1 Ruotare il selettore dei programmi sul programma disponibile 2 Premere contemporaneamente 2 tasti vedere le figura e tenerli premuti finché non viene visualizzata la corretta impo stazione il simbolo è spento e la sp...

Page 15: ...Per pulire il filtro principale 1 Aprire la porta 2 Tirare il filtro 3 Aprire il filtro 4 Pulire il filtro con la mano bagnata electrolux 15 ...

Page 16: ...a Il filtro ostruito aumenta la durata del ciclo e causa un consumo di energia maggiore SVUOTARE IL CONTENITORE DELL ACQUA Svuotare il contenitore dell acqua dopo ogni ciclo di asciugatura Se il contenitore dell acqua è pieno il pro gramma si arresta automaticamente e la spia svuotare il contenitore dell acqua si accende Per proseguire con il programma svuotare il contenitore dell acqua e premere ...

Page 17: ...nsa non può essere usata per bere o preparare pietanze L acqua di condensa può essere utiliz zata come acqua distillata per esem pio nel ferro a vapore Tuttavia occorre prima filtrare l acqua di condensa ad esempio con un filtro per caffé per eli minare eventuali residui e pelucchi PULIZIA DEI FILTRI DELLO SCAMBIATORE DI CALORE Se la spia pulire i filtri dello scambiato re di calore è accesa i fil...

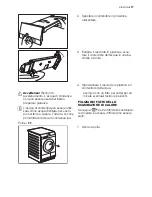
Page 18: ...biatore di calore 3 Ruotare il blocco per sbloccare il co perchio dello scambiatore di calore 4 Abbassare il coperchio dei filtri dello scambiatore di calore 5 Sollevare il filtro principale Mantenere il filtro dello scambiatore di calore ed estrarlo dalla parte inferiore dello scom parto 18 electrolux ...

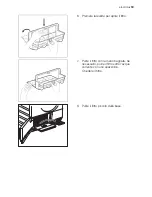
Page 19: ...a levetta per aprire il filtro 7 Pulire il filtro con la mano bagnata Se necessario pulire il filtro sotto l acqua corrente con uno spazzolino Chiudere il filtro 8 Pulire il filtro piccolo dalla base electrolux 19 ...

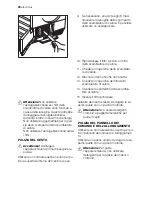
Page 20: ...ltre il consumo di energia Non utilizzare oggetti affilati per la puli zia dello scomparto dello scambiatore di calore Non utilizzare l asciugabiancheria senza i filtri PULIZIA DEL CESTO Avvertenza Scollegare l apparecchiatura prima di eseguire la pulizia Utilizzare un normale sapone neutro per pu lire la superficie interna del cesto e le sca nalature del cesto stesso Asciugare le su perfici pulit...

Page 21: ...rte inferiore dell apparecchiatura È presente dello sporco nella superficie interna del cesto Pulire la superficie interna del cesto Durezza dell acqua troppo elevata Impostare un livello corretto4 La porta non si chiude Il filtro non si blocca in posizione Posizionare correttamente il filtro La biancheria è bloccata tra la porta e la guarnizione Sistemare il carico correttamente nel ce sto Err Er...

Page 22: ...e 2 seguire la descrizione del programma consultare il capitolo PROGRAMMI 3 consultare il capitolo PULIZIA E CURA 4 consultare la sezione DUREZZA DELL ACQUA nel capitolo CONSIGLI E SUGGERIMENTI UTILI 5 Nota Dopo massimo 5 ore il ciclo di asciugatura termina automaticamente consultare la sezione Ciclo di asciugatura completato LAMPADINA INTERNA DEL CESTO Questa apparecchiatura dispone di una lampad...

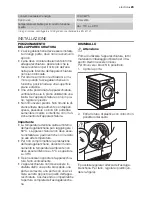
Page 23: ...be aumentare il calore e interferire con il fun zionamento dell apparecchiatura Importante La temperatura dell aria calda all interno dell asciugabiancheria può raggiungere i 60 C L apparecchiatura non deve esse re installata su pavimenti che non resisto no alle alte temperature Per non compromettere la prestazione dell asciugabiancheria durante il funzio namento la temperatura ambiente non deve e...

Page 24: ...arecchiatura ad una presa di terra conformemente alle normative in vigore Verificare che i dati elettrici riportati sulla targhetta del modello corrispondano a quelli dell impianto Utilizzare sempre una presa antishock elettrico correttamente installata Non utilizzare prese multiple e prolunghe Vi è il rischio di incendio Qualora il cavo elettrico debba essere so stituito l intervento dovrà essere...

Page 25: ...he appliance by a person responsible for their safety Make sure that small children and pets do not climb inside the drum To avoid this please check into the drum before using Any objects such as coins safety pins nails screws stones or any other hard sharp material can cause extensive dam age and must not be placed into the ma chine Items such as foam rubber latex foam shower caps waterproof text...

Page 26: ...e relevant section in the user manual Each electrical work necessary to install this appliance must be done by a quali fied electrician or competent person The rear surface of the appliance must be put against the wall If the appliance is installed on the carpet or equivalent adjust the feet Air must flow freely below the appliance After the appliance installation check that it is not squeeze or s...

Page 27: ...appli ance There is a risk of suffocation ENVIRONMENT CONCERNS The symbol on the product or on its packaging indicates that this product may not be treated as household waste Instead it should be taken to the appropriate collection point for the recycling of electrical and electronic equipment By ensuring this product is disposed of correctly you will help prevent potential negative consequences f...

Page 28: ...ontainer 2 Control panel 3 Drum light 4 Load door reversible 5 Primary filter 6 Sliding button to open the heat ex changer door 7 Airflow slots 8 Adjustable feet 9 Heat exchanger door 10 Heat exchanger filters cover 11 Lock knob 12 Rating plate 28 electrolux ...

Page 29: ...tallation the water container is drained automatically The water container must stay in the appliance Installed hose must be on the height from minimum of 50 cm to maximum of 1 m from floor level The hose cannot be in loop If possible decrease the length of the hose Read carefully the instructions supplied with the kit PEDESTAL WITH THE DRAWER Product name PDSTP10 Available from your authorized de...

Page 30: ...e kit CONTROL PANEL 1 2 3 5 6 4 1 Programme dial 2 Display 3 Push button Start Pause 4 The function push buttons 5 Programme indicators 6 Push button On Off with Auto Off function DISPLAY Symbol Description extra dryness level minimum moderate maximum anti crease time default interval 30 min 120 min initial laundry centrifugation 800 1800 rpm default buzzer activated child lock activated time dryi...

Page 31: ...uld be a slightly higher sound level It is because of start of the compressor that is normal for compressor powered applian ces such refrigerators freezers PROGRAMMES Pro grammes Load 1 Properties Available functions Fabric mark Cottons Baumwolle Extra Dry Ex tratrocken 8 kg To dry cotton pieces of clothing Drying level extra dry all except Time Drying Zeitwahl Cupboard Dry Schrank trocken 2 8 kg ...

Page 32: ... socks lingerie with bones or wires all except Time Drying Zeitwahl Iron Dry Bü geltrocken 3 5 kg To dry thin fabrics which are also to be ironed e g knitwear shirts all except Time Drying Zeitwahl Easy Iron Leichtbügeln 1 kg or 5 shirts To dry easy care fabrics such shirts and blou ses for minimum ironing effort The results can be different for to the different types of fabric and its finish Put ...

Page 33: ... Plus Trocken function 3 Only with the drying rack see chapter ACCESSORIES USING THE APPLIANCE PREPARING THE LAUNDRY Important Dry only the laundry applicable to dry in the tumble dryer Make sure if the laundry is applicable to dry in the tumble dryer Do the check of the fabric mark on the clothes Fabric mark Property Applicable to dry in the tumble dryer Applicable to dry in the tumble dryer at s...

Page 34: ... minutes from the programme end Push the Auto Off button to activate the ap pliance SETTING A PROGRAMME Use the programme dial to set the pro gramme The possible time to complete the programme come into view on the display The drying time you see is related to the load of 5 kg for cotton and jeans programmes For the other pro grammes the drying time is related to the recommended loads The drying t...

Page 35: ...rying pro gramme from minimum of 30 minutes to maximum of 20 hours 1 Set the drying programme and func tions 2 Push the Delay Start Zeitvorwahl but ton again and again until the necessary time of the delay come into the view on the display e g if the programme has to start after 12 hours 3 To activate the Delay Start Zeitvorwahl function push the Start Pause button The time to start decreases on t...

Page 36: ...heat exchanger filters when the applicable indicator comes into the view on the control panel Spin good the laundry before drying AVERAGE LAUNDRY WEIGHTS bathrobe 1200 g quilt cover 700 g man s work shirt 600 g man s pyjamas 500 g sheet 500 g tablecloth 250 g man s shirt 200 g night dress 200 g pillow case 200 g towelling towel 200 g blouse 100 g ladies briefs 100 g men s underpants 100 g napkin 1...

Page 37: ...Push at the same time 2 buttons see the illustration and hold down until you see the correct setting the indication is off and the indi cator comes into the view the indication is permanently off the indication is on and the indi cator comes into the view the indication is activated CARE AND CLEANING CLEANING THE PRIMARY FILTER At the end of each cycle the indicator clean the primary filter is on ...

Page 38: ...er without the primary filter or with damaged or blocked filter Important Clean the primary filter after each drying cycle Clogged filter increases the cycle time and causes higher energy consumption DRAINING THE WATER CONTAINER Drain the water container after each drying cycle If the water container is full the programme breaks off automatically and the indicator drain the water container is on T...

Page 39: ...valent receptacle 4 Move plastic connection in and install water container Warning Risk of poisoning The condensed water is not applicable to drink or to prepare food The condensed water can be used as distilled water e g for steam ironing If necessary filter the condensed water e g with a coffee filter to remove pos sible residue and small pieces of fluff CLEANING THE HEAT EXCHANGER FILTERS If th...

Page 40: ...Open the loading door 2 Move the release button on the bottom of the door opening and open the heat exchanger door 3 Turn the blockage to unlock the heat exchanger cover 4 Lower the heat exchanger filters cover 40 electrolux ...

Page 41: ...he heat ex changer filter and pull it out from the bottom compartment 6 Push the hook to open the filter 7 Use a moist hand to clean the filter If necessary clean the filter with warm water using a brush Close the filter electrolux 41 ...

Page 42: ...also increases energy consumption Do not use sharp objects to clean the heat exchanger compartment Do not operate the tumble dryer with out the filters CLEANING THE DRUM Warning Disconnect the appliance before you clean it Use a standard neutral soap detergent to clean the inner surface of the drum and drum ribs Dry the cleaned surfaces with a soft cloth Caution Do not use abrasive materials or st...

Page 43: ...plicable water hardness4 The door does not close The filter not locked in the position Put the filter in the correct position The laundry is locked between the door and the seal Put the load correctly in the drum Err Error on the display You try to change the programme or the function after the start of the cycle Turn the tumble dryer off and on Make the new selection The function you try to activ...

Page 44: ...hen the door is closed Warning Do not look directly into the beam of the lamp Important To replace the internal lamp contact the service centre Disconnect the mains plug from the mains socket before the replacement of the inter nal lamp TECHNICAL INFORMATION height x width x depth 850 x 600 x 600 mm maximal 640 mm drum volume 118 l maximum depth with the load door opened 1090 mm maximum width with...

Page 45: ...than 35 C This can cause unwanted effect on the per formance of the appliance If it is necessary to move the appliance it must be moved vertically The appliance must not be installed be hind a lockable door a sliding door a door with a hinge on the opposite side to that of the appliance in such a way that a full opening of the tumble dryer is restric ted UNPACKING Caution Before use all parts of t...

Page 46: ...es with the power sup ply Always use a correctly installed shock proof socket Do not use multiple plugs and extension cables There is a risk of fire Should the appliance power supply cable need to be replaced this must be carried out by our Service Centre Make sure not to squash or cause dam age to the mains plug and cable behind the appliance Do not pull the mains cable to disconnect the applianc...

Page 47: ...electrolux 47 ...

Page 48: ...136919180 A 392011 www electrolux com shop ...

Reviews: