10
Installation
(DUCTED AND NON-DUCTED HOODS)
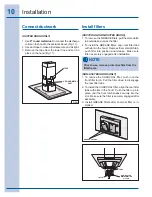
1. To remove the GREASE filters, pull the metal latch
tab outside and unlock the filter.
2. To install the GREASE filters, align rear filter tabs
with slots in the hood. Depress the metal latch tab,
push filter into position and release. Make sure
filter is securely engaged after installation.
(NON-DUCTED HOODS ONLY)
1. To remove the CHARCOAL filter, push in on the
front filter latch. Pull the filter down to disengage
the rear filter tabs.
2. To install the CHARCOAL filter, align the rear filter
tabs with slots in the hood. Push the filter up into
place until the front latch snaps securely into the
slot. Make sure the filter is securely engaged after
assembly.
3. Install GREASE filters after charcoal filter is in-
stalled.
GREASE FILTERS
TABS
LATCH
NON-DUCTED
RECIRCULATION
FILTER
Install filters
NOTE
Prior to use, remove protective film from the
filter frame.
Connect ductwork
6” ROUND METAL
DUCT
TAPE
FIG.11
(DUCTED HOODS ONLY)
1. Use 6" round metal duct to connect the discharge
collar on the hood to the ductwork above (Fig. 11).
2. Use duct tape to make all joints secure and air tight.
3. Remove the tape from the lower flue and set it in
place on the hood (Fig. 11).


