9
Installation
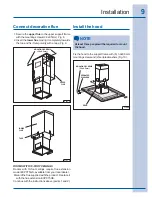
Connect decorative flue
1. Secure the upper flue to the upper support frame
with the mounting screws (3.9x9.5mm). Fig. 8.
2. Insert the lower flue moving it completely towards
the top and fix it temporarily with a tape. Fig. 9.
LOWER
FLUE
UPPER
FLUE
MOUNTING SCREWS
(3.9x9.5mm)
FIG. 8
FIG. 9
TAPE
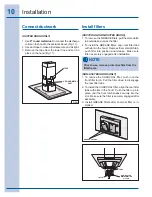
Install the hood
Fix the hood to the support frame with (6) 3.9x9.5mm
mounting screws and (2) serrated washers (Fig. 10).
NOTE
At least three people will be required to mount
the hood.
FIG.10
MOUNTING SCREWS
(3.9x9.5mm)
SERRATED
WASHERS
ROOMS WITH 10-FOOT CEILINGS
Rooms with 10-foot ceilings require flue extension
model EXPC75GS, available from your local dealer.
Discard the flue supplied with the product. Replace it
with the flue extension EXPC75GS.
Continue with the instructions above (points 1 and 2).
REAR


