background image

ENGLISH  41  


PREHEAT DISHES 60°-70°C  

The heating up time is influenced by 

various factors: 


Various factors affect heating times: 


Material and thickness of the 

crockery 


Load quantity  

How the crockery is arranged  

Temperature setting 

It is therefore not possible to give any 

precise heating times. 

However, as a guide, the following 

times are given for the thermostat 

setting 60°C and for uniform heating of 

the crockery: 


Load 

Time (min) 

Crockery for 6 people  30 – 35 

Crockery for 8 people 

30 – 40 

Crockery for 12 people 

35 – 45 


As you use the crockery warmer more 

and more you will learn the best 

settings for your crockery. 

KEEP FOOD WARM 60-70° C  

Heed the following: 

As a principle preheat the device 15 

minutes to ensure the interior space 

has the required temperature Place hot 

food onto the preheated dishes. Tip: 

place those dishes into the device 

while it is being preheated. 

Low temperature cooking 

 80° C 

With the low temperature cooking meat 

can be gently prepared at low 

temperatures over a longer period of 

cooking time.  

The cooking time is dependent on the 

piece of meat’s size. 

Use dishes made of glass, china or 

ceramics. 

Preparation: 


Preheat the device with the dishes at 

80°C for 10 minutes.  


Sear the meat in a pan using fat and 

place it into the heat drawer on the 

preheated dishes. Keep the setting at 

80° C. 


Summary of Contents for WS140

Page 1: ...WS 16 WS 21 WS 140 WS 200 WS 290 FR Chauffe Vaisselle Mode d Emploi 2 IT Scaldastoviglie Instruzioni di uso 13 DE Wärmeschublade Gebrauchsanweisung 35 EN Warming Drawer User Manual 24 ...

Page 2: ...großartige Ergebnisse erzielen werden Willkommen bei Electrolux Besuchen Sie uns auf unserer Website um Anwendungshinweise Prospekte Fehlerbehebungs und Service Informationen zu erhalten www electrolux com Lhr erworbenes Produkt zu registrieren um den besten Service dafür zu gewährleisten www electrolux com productregistration Zubehör Verbrauchsmaterial und Original Ersatzteile für Ihr Gerät zu er...

Page 3: ...uf den letzten Seiten dargestellt Wie folgt vorgehen 1 Stellen Sie das Gerät bis zur Schwadenleiste in den Umbauschrank und richten Sie es aus 2 Achten Sie darauf dass das Gehäuse des Gerätes rechtwinklig ausgerichtet wird 3 Öffnen Sie die Schublade und befestigen Sie das Gerät mit den mitgelieferten Schrauben an den Seitenwänden des Schrankes ELEKTROANSCHLUSS Der Elektroanschluss muss von einem q...

Page 4: ...wortlich gemacht werden die durch Fehler beim Einbau oder Anschluss verursacht werden ACHTUNG Die elektrische Sicherheit des Gerätes ist nur dann gewährleistet wenn es an ein vorschriftsmäßig installiertes Schutzleitersystem angeschlossen wird Der Hersteller kann nicht für Schäden verantwortlich gemacht werden die durch eine fehlende oder unterbrochene Schutzleiterverbindung verursacht werden z B ...

Page 5: ...t nur ohne Aufsicht benutzen wenn Ihnen die Bedienung so erklärt wurde dass sie das Gerät sicher bedienen können Stellen oder setzen Sie sich nicht auf die geöffnete Geschirrschublade Der Teleskopauszug wird beschädigt Die Belastbarkeit der Geschirrschublade beträgt max 25 kg Bewahren Sie keine Kunststoffbehälter oder brennbare Gegenstände im Gerät auf Beim Einschalten können sie schmelzen oder si...

Page 6: ...ktionswähler EIN AUS Schalter Kontrolllampe Griff Antirutschauflage 5 4 3 2 1 WS 200 WS 21 WS 290 WS 16 WS 140 Die Bedienelemente bestehen aus dem Funktionswähler und dem Ein Aus Schalter Sie sind nur sichtbar wenn die Geschirrschublade geöffnet ist ...

Page 7: ...mit einem Pflegemittel geschützt Deshalb kommt es beim ersten Aufheizen vorübergehend zur Geruchsbildung Die Geruchsbildung und eventuell auftretender Dunst vergehen nach kurzer Zeit und weisen nicht auf einen Falschanschluss oder Gerätedefekt hin BEDIENPRINZIP Um die Wärmeschublade zu verwenden verfahren wie folgt Stellen Sie das Geschirr in die Schublade Um die Funktion zu wählen bitte drehen Si...

Page 8: ... Ihren Haushalt SPEISEN WARMHALTEN 60 70 C Heizen Sie das Gerät grundsätzlich 15 Minuten vor um sicherzustellen dass im Innenraum die erfoderliche Temperatur vorliegt Heisse Speisen auf vorgewärmtes Geschirr legen Tipp Dieses Geschirr bereits während des Vorheizens in das Gerät stellen NIEDERTEMPERATURGARE N 80 C Beim Niedertemperaturgaren lässt sich Fleisch bei niedrigen Temperaturen schonend übe...

Page 9: ...k 1 kg Auf allen 4 Seiten je 3 Min 2 2 Std Braten Stotzen 1 kg Auf allen Seiten je 3 Min 2 2 Std Braten Schulter 1 kg Auf allen Seiten je 3 Min 2 Std Schwein Filet ganz 500 600 g Auf allen Seiten je 2 Min 1 Std Karree am Stück 1 kg Auf allen 4 Seiten je 3 Min 2 2 Std Nierenstück 600 1 000g Rundherum 10 15 min 2 3 Std Lamm Gigot mit Keule 2 kg Auf allen Seiten je 4 Min 3 4 Std Gigotsteak aus Keule ...

Page 10: ...eller 8 x 10 cm Suppenteller 12 x 10 cm Suppenteller 1 x 19 cm Servierteller 1 x 19 cm Servierteller 1 x 19 cm Servierteller 1 x 17 cm Servierteller 1 x 17 cm Servierteller 1 x 17 cm Servierteller 1 x 32 cm Fleischteller 2 x 32 cm Fleischteller 2 x 32 cm Fleischteller oder oder oder 20 Teller mit 28 cm 30 Teller mit 28 cm 40 Teller mit 28 cm oder oder oder 80 Espressotassen 120 Espressotassen 160 ...

Page 11: ...ass die Oberflächen schnell wieder schmutzig werden Tragen Sie das Mittel mit einem weichen Tuch flächig und sparsam auf Benutzen Sie bei Wärmeschubladen mit einer Aluminiumvorderseite ein mildes Glasreinigungsmittel und einen weichen fusselfreien Lappen Wischen Sie diese in horizontaler Richtung ab ohne Druck auf die Oberfläche auszuüben INNENRAUM Reinigen Sie nach jeder Nutzung die Innenwände mi...

Page 12: ... Sie ein Gebläsegeräusch hören Falls das Gebläse läuft ist der Heizkörper defekt Falls das Gebläse nicht läuft ist das Gebläse defekt die Sicherung der Hausinstallation ausgelöst hat Temperatur lässt sich nicht mehr regeln Der Temperaturregler ist defekt Beim Einschalten des Gerätes leuchtet der Ein Aus Schalter nicht Die Kontrolllampe des Schalters ist defektl UMWELT UND GESUNDHEITSSCHUTZ Recycel...

Page 13: ...z que chaque utilisation vous apportera satisfaction Bienvenue chez Electrolux Visitez notre site Internet pour Obtenir des conseils d utilisation des brochures de l aide des informations www electrolux com Enregistrer votre produit pour obtenir un meilleur service www electrolux com productregistration Acheter des accessoires consommables et pièces de rechange d origine pour votre appareil www el...

Page 14: ...ez le vers le fond de façon à ce qu il soit bien centré et bord à bord avec l avant du meuble 2 Assurez vous que la structure du chauffe vaisselle est bien à niveau et bien stable sur l étagère 3 Ouvrez le tiroir pour fixer le chauffe vaisselle sur les côtés du meuble avec les vis fournies BRANCHEMENT ÉLECTRIQUE L installation électrique doit être réalisée par un électricien qualifié et respecter ...

Page 15: ...re l accès aux composants électriques ATTENTION N ouvrez jamais la structure de l appareil D éventuels contacts avec les pièces conductrices ou modifications des composants électriques ou mécaniques peuvent constituer un danger pour la sécurité de l utilisateur et perturber le bon fonctionnement de l appareil ATTENTION Les réparations et entretiens tout particulièrement sur les pièces sous tension...

Page 16: ...ger cela endommagerait les rails télescopiques Les récipients et objets synthétiques ou qui prennent facilement feu ne doivent pas être rangés dans le chauffe vaisselle Si l appareil est mis en marche ils peuvent fondre ou brûler Danger d incendie N utilisez pas votre appareil comme chauffage de maison Les hautes températures peuvent mettre le feu à des objets facilement inflammables situés près d...

Page 17: ...ud fait que la vaisselle est chauffée rapidement et uniformément La résistance ainsi que le ventilateur sont protégés par une grille métallique La base du tiroir est équipée d un revêtement antidérapant pour empêcher la vaisselle de glisser quand vous ouvrez ou fermez le tiroir Touche de sélection des fonctions Bouton Marche Arrêt Voyant de contrôle Poignée Revêtement antidérapant 5 4 3 2 1 WS 140...

Page 18: ...oir peut se rouvrir si vous le fermez trop fort Avant de retirer la vaisselle chaude vous devez éteindre le chauffe vaisselle en appuyant de nouveau sur l interrupteur Sélectionner la fonction Vous pouvez sélectionner des températures entre 30 et 80 ºC en tournant le thermostat 70ºC pour certain modèle Ne forcez pas le bouton du thermostat ni vers la gauche de la position 0 ni vers la droite de la...

Page 19: ... appareil dès la période de préchauffage CUISSON A BASSE TEMPERATURE 80 C Cuisson à basse température ce mode de cuisson convient particulièrement bien à la viande qui a besoin de cuir pendant un certain temps à de faibles températures La durée de cuisson est définie en fonction du poids de la viande Utiliser des plats en verre en porcelaine ou en céramique Préparation Chauffer l appareil avec les...

Page 20: ...ue côté 1 heure et 45 minutes à 2 heures Carré 1 kg 3 minutes sur chaque côté 2 heures à 2 heures et 30 minutes Gigot 1 kg 3 minutes sur chaque côté 2 heures à 2 heures et 30 minutes Epaule 1 kg 3 minutes sur chaque côté 2 heures et 30 minutes Porc Filet 500 600 g 2 minutes sur chaque côté 1 heure et 30 minutes Carré de porc 0 6 1 kg 10 à 15 minutes tout autour 2 à 3 heures Agneau Gigot 2 kg 4 min...

Page 21: ...siettes de 24 cm 12 assiettes de 24 cm 6 bols de 10 cm 8 bols de 10 cm 12 bols de 10 cm 1 plat de 19 cm 1 plat de 19 cm 1 plat de 19 cm 1 plat de 17 cm 1 plat de 17 cm 1 plat de 17 cm 1 plat de 32 cm 2 plats de 32 cm 2 plats de 32 cm ou ou ou 20 plats de 28 cm 30 plats de 28 cm 40 plats de 28 cm ou ou ou 80 tasses à café 120 tasses à café 160 tasses à café ou ou ou 40 tasses à thé 60 tasses à thé ...

Page 22: ...es surfaces ne se resalissent rapidement Appliquez une fine couche de produit sur toute la surface avec un chiffon doux Les chauffe vaisselle dont l avant est en aluminium peuvent être nettoyés avec un produit léger pour les vitres et un chiffon doux qui ne laisse pas de fibres Nettoyez dans le sens horizontal sans appuyer car l aluminium est un métal mou qui se raye ou se coupe facilement INTERIE...

Page 23: ...nce qui est en panne si le ventilateur ne fait pas de bruit c est lui qui doit être en panne Les plombs ont sauté ou le tableau électrique a disjoncté La vaisselle est trop chaude Le sélecteur de température ne marche pas correctement La température ne peut plus être paramétrée La fonction de réglage de la température est défectueuse L interrupteur marche arrêt ne s allume pas Le pilote de l inter...

Page 24: ...i risultati Benvenuti in Electrolux Visitate il nostro sito web per ricevere consigli scaricare i nostri opuscoli eliminare eventuali anomalie ottenere informazioni sull assistenza www electrolux com registrare il vostro prodotto e ricevere un servizio migliore www electrolux com productregistration acquistare accessori materiali di consumo e ricambi originali per la vostra apparecchiatura www ele...

Page 25: ...ni Per il montaggio proseguire come indicato 1 sistemare il cassetto nel mobile da incasso fino al listello devia fumane e registrarlo 2 assicurarsi che l involucro del cassetto sia registrato ad angolo retto 3 aprire il cassetto e fissare l involucro alle pareti laterali del mobile con le viti in dotazione ALLACCIAMENTO ELETTRICO L allacciamento elettrico deve essere realizzato da un elettricista...

Page 26: ...lacciamento non a norma dell apparecchio ATTENZIONE La sicurezza elettrica dell apparecchio viene garantita solo se questo viene allacciato a un regolamentare conduttore di messa a terra La casa produttrice non risponde dei danni causati dalla mancanza o dall interruzione del conduttore di messa a terra p e scossa elettrica ATTENZIONE Utilizzare l apparecchio solo dopo che è stato incassato corret...

Page 27: ...olo dopo essere stati adeguatamente istruiti in merito Non appoggiarsi e non sedersi sul cassetto quando è aperto perché altrimenti si potrebbero danneggiare le guide telescopiche La portata massima del cassetto è di 25 kg Non conservare contenitori in plastica oppure oggetti infiammabili nell apparecchio Questi oggetti potrebbero infatti fondersi o incendiarsi quando si accende lo scaldastoviglie...

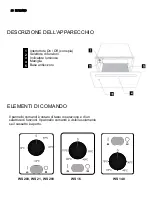
Page 28: ...e On Off con spia Selettore di funzioni Indicatore luminoso Maniglia Base antiscivolo 5 4 3 2 1 WS 200 WS 21 WS 290 WS 16 WS 140 Il pannello comandi è dotato di tasto di selezione e di un selettore di funzioni Il pannello comandi è visibile solamente se il cassetto è aperto ...

Page 29: ...cina sia ben areata Gli elementi in metallo sono stati trattati con un apposito prodotto protettivo Questo prodotto potrebbe essere la causa di cattivi odori al primo riscaldamento del cassetto Questi odori ed eventuali fumane scompaiono velocemente e non sono da attribuire ad un allacciamento non a norma o ad un difetto dell apparecchio PRINCIPIO DI FUNZIONAMENTO Procedere come descritto qui di s...

Page 30: ...Per cominciare preriscaldare il dispositivo per 15 minuti di modo che lo spazio interno raggiunga la temperatura richiesta Collocare l alimento caldo sui piatti preriscaldati Suggerimento collocare i piatti nel dispositivo durante il processo di preriscaldamento COTTURA A BASSA TEMPERATURA A 80 C Utilizzando la modalità di cottura a bassa temperatura è possibile cuocere delicatamente la carne per ...

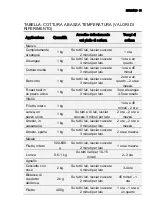
Page 31: ... 3 ore al sangue 4 5 ore rosato Vitello Filetto intero 1 kg 1 ora e 45 minuti 2 ore Lonza un pezzo unico 1 kg Su tutti e 4 i lati lasciar cuocere 3 minuti per lato 2 ore 2 ore e mezza Arrosto in casseruola 1 kg Su tutti i lati lasciar cuocere 3 minuti per lato 2 ore 2 ore e mezza Arrosto spalla 1 kg Su tutti i lati lasciar cuocere 3 minuti per lato 2 ore e mezza Maiale Filetto intero 500 600 g Su ...

Page 32: ...piatti Ø 24 cm 8 x 24 cm Piatti piani 12 x 24 cm Piatti piani 6 scodelle per minestra Ø 10cm 8 x 10 cm Piatti fondi 12 x 10 cm Piatti fondi 1 ciotola Ø 19 cm 1 x 19 cm Piatti portata 1 x 19 cm Piatti portata 1 ciotola Ø 17 cm 1 x 17 cm Piatti portata 1 x 17cm Piatti portata 1 ciotola Ø 32 cm 2 x 32 cm Piatti pizza 2 x 32 cm Piatti pizza o oppure oppure 20 piatti Ø 28 cm 30 piatti con 28 cm 40 piat...

Page 33: ... detergente delicato non abrasivo ed applicarlo con un panno morbido e senza pelucchi Pulire la superficie in senso orizzontale e non facendo pressione VANO INTERNO Pulire il vano interno con un panno umido dopo ogni uso Nel caso dovesse essere particolarmente sporco aggiungere un paio di gocce di detergente all acqua di pulizia Asciugare quindi le superfici con un panno asciutto Evitare che deflu...

Page 34: ...i temperatura è difettoso Quando si aziona l apparecchio la spia dell interruttore on off non si accende La spia di controllo è difettosa SALVAGUARDIA DELL AMBIENTE Riciclare i materiali con il simbolo Buttare l imballaggio negli appositi contenitori per il riciclaggio Aiutare a proteggere l ambiente e la salute umana e a riciclare rifiuti derivanti da apparecchiature elettriche ed elettroniche No...

Page 35: ... with you in mind So whenever you use it you can be safe in the knowledge that you ll get great results every time Welcome to Electrolux Visit our website to Get usage advice brochures trouble shooter service information www electrolux com Register your product for better service www electrolux com productregistration Buy Accessories Consumables and Original spare parts for your appliance www elec...

Page 36: ...Proceed as follows 1 Place the crockery warmer on the shelf and slide it towards the interior of the niche in such a way that it is centred and completely lined up with the front of the unit 2 Check that the crockery warmer s frame is properly levelled and is sitting evenly on the shelf 3 Open the drawer and fix the crockery warmer to the sides of the unit using the screws provided ELECTRICAL CONN...

Page 37: ...t in position Only in this manner can it be guaranteed that users cannot access the electrical components WARNING Never open up the appliance s frame Possible contacts with electrical conducting parts or changes to electrical or mechanical components may represent a danger to users safety and prejudice the correct working of the appliance WARNING Repairs and maintenance especially of parts carryin...

Page 38: ...ppliance safely and how to identify dangerous situations that may arise if the appliance is used in an improper manner Do not sit or hang on the drawer The telescopic runners will be damaged The maximum load capacity of the drawer is 25 kg Do not store synthetic containers or easily inflammable objects inside the crockery warmer When you switch on the appliance such containers and objects may melt...

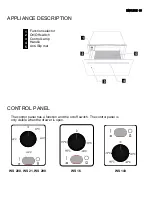
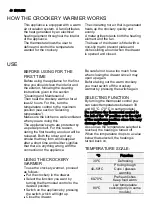
Page 39: ...CONTROL PANEL Function selector On Off switch Control Lamp Handle Anti Slip mat 5 4 3 2 1 WS 200 WS 21 WS 290 WS 16 WS 140 The control panel has a function and the on off switch The control panel is only visible when the drawer is open ...

Page 40: ...during the first heating an odour will be released Both the odour and any smoke that may form will disappear after a short time and neither signifies that there is anything wrong with the connection or the appliance USING THE CROCKERY WARMER To use the crockery warmer proceed as follows Put the crockery in the drawer Select the function you want by turning the thermostat control to the desired pos...

Page 41: ...and more you will learn the best settings for your crockery KEEP FOOD WARM 60 70 C Heed the following As a principle preheat the device 15 minutes to ensure the interior space has the required temperature Place hot food onto the preheated dishes Tip place those dishes into the device while it is being preheated Low temperature cooking 80 C With the low temperature cooking meat can be gently prepar...

Page 42: ...let whole 1kg on all sides on each 2min 1 75 2hrs Loin in one piece 1kg on all 4 sides on each 3min 2 2 5hrs Roast vat 1kg on all sides on each 3min 2 2 5hrs Roast shoulder 1kg on all aides on each 3min 2 5hrs Porc Filet whole 500 600 g on all sides on each 2min 1 5hrs Loin 600 1000g all around 10 15min 2 3hrs Lamb Gigot with haunch 2kg on all sides on each 4min 3 4hrs Gigot steak of the haunch 2k...

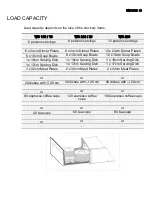
Page 43: ... Bowls 8 x 10cm Soup Bowls 12 x 10cm Soup Bowls 1 x 19cm Serving Dish 1 x 19cm Serving Dish 1 x 19cm Serving Dish 1 x 17cm Serving Dish 1 x 17cm Serving Dish 1 x 17cm Serving Dish 1 x 32cm Meat Plates 2 x 32cm Meat Plates 2 x 32cm Meat Plates or or or 20 dishes with 28 cm 30 dishes with 28 cm 40 dishes with 28 cm or or or 80 espresso coffee cups 120 espresso coffee cups 160 espresso coffee cups or...

Page 44: ... surfaces can be used These products prevent the surfaces becoming dirty again for some time Apply a thin layer of such a product on the surface using a soft cloth On aluminium fronted crockery warmers use a gentle glass cleaning product and a soft cloth that does not release fluff Wipe horizontally without pressing on the surface since aluminium is sensitive to scratches and cuts INTERIOR OF THE ...

Page 45: ...ty of crockery How the crockery is arranged The crockery doesn t heat up at all Check whether You can hear the noise of a fan If the fan is operating then the heating element is broken if the fan is not operating then the fan is broken The switchboard fuses circuit breakers have fused tripped out The crockery is heating up too much The temperature selector is broken The on off switch does not ligh...

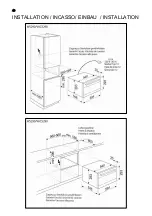
Page 46: ...46 INSTALLATION INCASSO EINBAU INSTALLATION ...

Page 47: ...47 ...

Page 48: ...48 ...

Page 49: ...49 ...

Page 50: ...50 ...

Page 51: ...51 ...

Page 52: ...52 ...

Page 53: ...53 ...

Page 54: ...54 ...

Page 55: ...55 ...

Page 56: ...56 ...

Page 57: ......

Page 58: ......

Page 59: ......

Page 60: ...www electrolux com shop Cód 943411 b ...

Reviews: