background image

PREPARATION  FOR  USE

AC Plug

AC Outlet

Unpacking and Setup


Carefully remove the unit from the display carton and remove all packing material from the unit itself.


Remove any descriptive labels that may be found on either the front or top cabinet of the unit. Do not

   remove any labels located on either the back or bottom cabinet of the unit.


The detachable AC power cord is packed in the carton separately from the unit.  Make  sure  that  the

  AC power cord is not accidentally discarded with the carton or packing material.

  CD  open  compartment  door.  There is  a  white  card in the   CD   compartment which is intended   to 
  prevent   the  CD  pickup from   moving  during   shipment   of   the   product.   Remove  this card from  
  the  CD  compartment before use.

Power Sources

This portable audio system is designed to operate on either AC 120V  60Hz house current or  12V  DC,
using 8   D   batteries (UM-1), not included. Attempting to operate this unit from any other power source
may cause damage to unit, which is not covered by your warranty. 

AC Operation

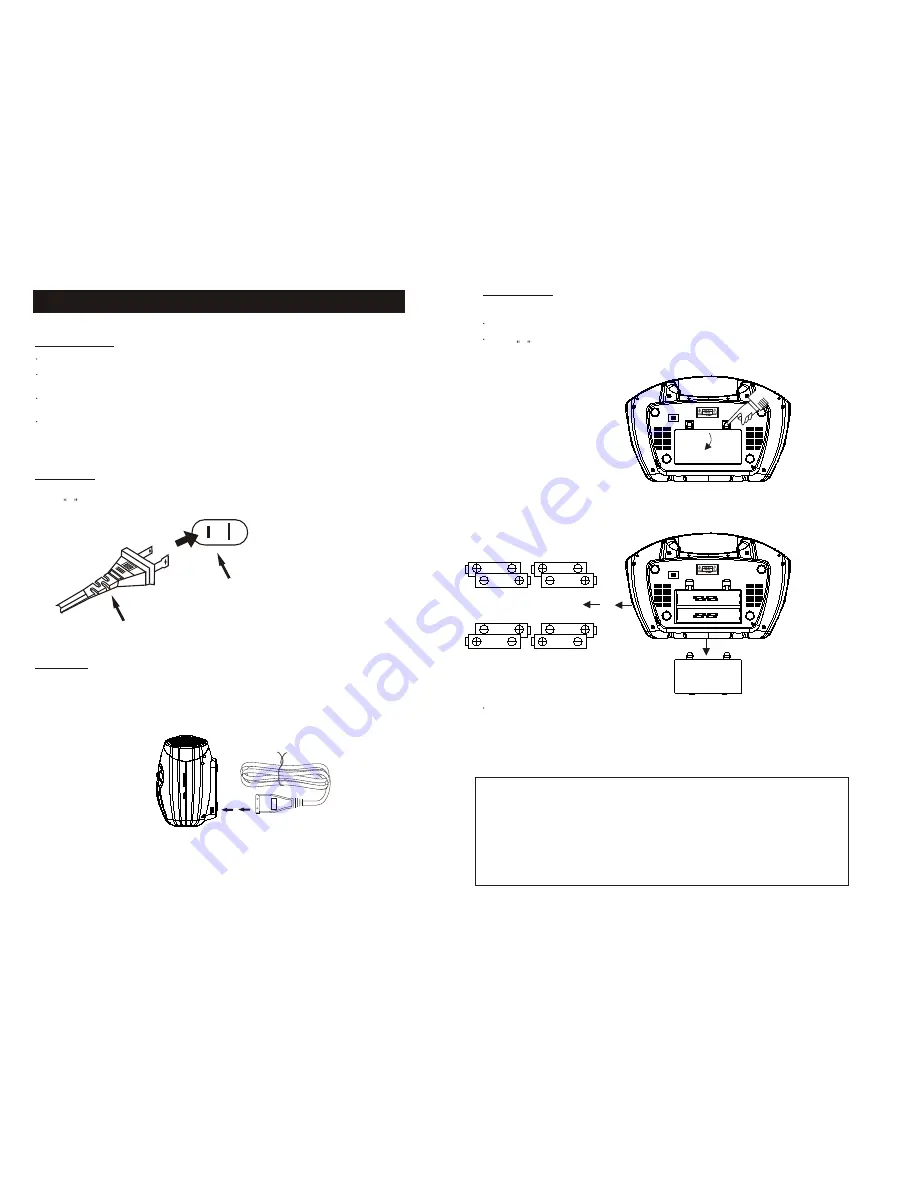
Unwind the AC cord and extend it to its full length, Insert the small end of the AC cord into the AC socket
on the back cabinet of  the unit. Insert the other and of the  AC  cord  into  any convenient AC 120V  60Hz
household outlet .

-2-

Battery Operation

The battery compartment is located on the bottom of the cabinet.

  Remove the battery compartment door by pressing downward on the two tabs as shown in Figure 1
  below.
  Insert 8   D   size (UM-1) batteries into the battery compartment as shown in figure 2 below. Be sure to
  observe the polarity markings which are engraved inside the battery compartment. If the batteries are
  inserted incorrectly,  the unit will not operate.

  Replace the battery compartment door.

NOTE:

 The AC power cord must be disconnected from the AC socket on the back of the unit in order

for the unit to operate on battery power.

Follow these precautions when using batteries in this device.
1. Use only the size and type of batteries specified .
2. Be sure to follow the correct polarity when installing the batteries as indicated in the battery
    compartment.  Reversed batteries may cause damage to the device.
3. Do not mix different types of batteries together (e.g. Alkaline and Carbon-zinc) or old batteries
    with fresh ones.
4. If the device is not to be used for a long period of time, remove the batteries to prevent damage
    or injury from possible battery leakage.
5. Do not try to recharge batteries not intended to be recharged; they can overheat and rupture.
     (Follow battery  manufacturer s  directions.)

BATTERY  PRECAUTIONS

Figure 2

Figure 1

-3-

8XR20 D CELL  UM-1

1.5V

1.5V

1.5V

1.5V

1.5V

1.5V

1.5V

1.5V

8XR20 D CELL  UM-1

1.5V

1.5V

1.5V

1.5V

1.5V

1.5V

1.5V

1.5V

,

Summary of Contents for RCD310E

Page 1: ... 1 PORTABLE CD PLAYER with CASSETTE RECORDER and AM FM STEREO RADIO INSTRUCTION MANUAL RCD 310E ...

Page 2: ...utlet 2 Battery Operation The battery compartment is located on the bottom of the cabinet Remove the battery compartment door by pressing downward on the two tabs as shown in Figure 1 below Insert 8 D size UM 1 batteries into the battery compartment as shown in figure 2 below Be sure to observe the polarity markings which are engraved inside the battery compartment If the batteries are inserted in...

Page 3: ...e controls and switches as described in the manual Before tuning the power switch on for the first time make certain the batteries and power cords are properly installed Store your tapes and CDs in cool area to avoid damage from the heat NOTE The manufacturer is not responsible for any RADIO interference cause by unauthorized modifications to this equipment Such modifications could void the user s...

Page 4: ...sette knob cover then press STOP EJECT button to open the cassette compartment 2 Insert blank cassette tape in the cassette compartment with exposed side facing up 3 Depress PAUSE button 4 Depress RECORD button 5 Select your desired program by setting FUNCTION selector 1 and play the program 6 To start recording press PAUSEbutton again 7 To stop recording press STOP EJECT button The recordinglevel...

Page 5: ...n opening the CD door or switching the FUNCTION Selector to TAPE OFF Skip Search or Buttons Programmed Playback The CD Player in this unit has a 32 track programmable memory which allows you to program up to 32 tracks on any disc for playback in any desired order To program tracks for playback the player must be in the Stop mode If the disc is playing press the Stop button to stop playback and the...

Page 6: ...ssary to maintain good sound reproduction Clean them after every 100hours of use or less if playback has deteriorated Use a cotton swab moistened with head cleaning solution or isopropyl alcohol then wipe dry with another swab NOTE Never use metal objects on or near the tape heads Do not allow and cleaning material to fall into the tape assembly SAFEGUARD AGAINST ACCIDENTAL ERASURE When a new reco...

Page 7: ...TION switch to the RADIO position Retune station try another station or set BAND switch to FM STEREO Change stations Cassette Player No sound Sound distorted Speed varies Will not record Erase prevention tab removed Cover hole with adhesive tape Replace tape or clean tape head Defective taps or dirty tape head FUNCTION switch is not set to the CD position Slide the FUNCTION switch to the CD positi...

Reviews: