background image


Magic Breed Plus User Manual 

5. Getting Started 

The Magic Breed Plus system is comprised of two main 
components: the receiver (base station) and transmitter. The 
transmitter is attached to the mare and sends wireless signals 
to the base station for reporting when it has detected that the 
mare is foaling. 

5.1.  Receiver 

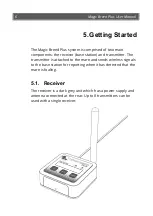
The receiver is a dark grey unit which has a power supply and 
antenna connected at the rear. Up to 8 transmitters can be 
used with a single receiver. 


Summary of Contents for Magic Breed Plus

Page 1: ...User Manual ...

Page 2: ... 2019 Electronic Electrical Solutions Pty Ltd 3 9 Rawlins Circuit Kunda Park QLD 4556 Australia Phone 61 07 5453 4355 email admin eesolutions net au www eesolutions net au Copyright 2019 Electronic Electrical Solutions ...

Page 3: ...tion 2 3 Legal Information 3 4 Principle of Operation 5 5 Getting Started 6 6 Setting Up 8 7 Fitting to the Mare 12 8 User Interface 16 9 Transmitter Pairing 17 10 Operation 20 11 Range and Testing 25 12 Settings 26 13 After Use 27 14 Specifications 28 15 Warranty 29 ...

Page 4: ...and with the release of the Magic Breed Plus now incorporates many electronic advancements from during that time To ensure that you have the best possible experience with your Magic Breed Plus system please ensure that you read through this manual and understand the operation before use This symbol is used to note instructions that must be followed to prevent damage to the Magic Breed Plus system ...

Page 5: ...f the Magic Breed Plus system to detect the foaling event The only way to achieve 100 reliability is to have an awake alert person physically watching the mare 3 2 Regulatory Compliance The Magic Breed Plus system has been designed and tested to comply with Australian regulations regarding Electromagnetic Compatibility and radio transmissions Both the transmitter and receiver comply with the follo...

Page 6: ... without requiring a radiocommunications licence which is important for equipment like the Magic Breed Plus which is intended for operation by unlicensed people If you require more information regarding EMC and radiocommunications legislation please consult the Australian Communications and Media Authority ACMA at www acma gov au or New Zealand Radio Spectrum Management RSM at www rsm govt nz ...

Page 7: ...he transmitter to determine the direction of the ground and therefore it can detect when the mare has laid on its side When the transmitter detects that the mare is in the foaling position is will begin timing and after a short delay it will alert the receiver which will sound an alarm Note however that some mares are very active and will even temporarily lay in the foaling position prior to foali...

Page 8: ... station and transmitter The transmitter is attached to the mare and sends wireless signals to the base station for reporting when it has detected that the mare is foaling 5 1 Receiver The receiver is a dark grey unit which has a power supply and antenna connected at the rear Up to 8 transmitters can be used with a single receiver ...

Page 9: ...ransmitters are battery powered and contain an accelerometer which enables it to sense the orientation of the mare s head Detecting when the mare is laying on its side with its head on the ground is how the transmitter determines if the mare is in a foaling position ...

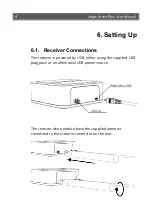
Page 10: ...ing Up 6 1 Receiver Connections The receiver is powered by USB either using the supplied USB plug pack or an alternative USB power source The receiver also needs to have the supplied antenna connected to the screw in connector on the rear ...

Page 11: ...connections can be damaged if treated roughly or dropped Please take care with them and place the receiver in a safe location The antenna supplied may differ slightly from the one shown in the diagrams but operation will be the same Do not use any antenna other than that which was supplied with your unit or otherwise recommended by Electronic Electrical Solutions ...

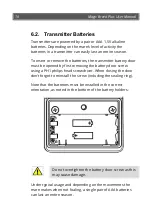
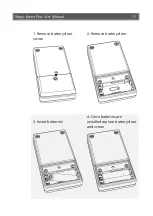
Page 12: ...st be opened by first removing the battery door screw using a PH1 philips head screwdriver When closing the door don t forget to reinstall the screw including the sealing ring Note that the batteries must be installed in the correct orientation as noted in the bottom of the battery holders Do not overtighten the battery door screw as this may cause damage Under typical usage and depending on the m...

Page 13: ...Magic Breed Plus User Manual 11 1 Remove battery door screw 2 Remove battery door 3 Insert batteries 4 Once batteries are installed replace battery door and screw ...

Page 14: ...12 Magic Breed Plus User Manual 7 Fitting to the Mare The transmitter is secured in place under the mare s chin using a halter fitted with a transmitter pouch ...

Page 15: ...se cable ties to fasten the pouch to the halter Pouches are manufactured from high quality Weathermax canvas and should last many foaling seasons but if required replacements are available for purchase The pouch is deigned to work with both the original Magic Breed and the new Magic Breed Plus transmitters Once the pouch has been fitted to the halter the transmitter can then be fitted ...

Page 16: ...into the pouch in the orientation indicated in the following diagram Note that the transmitter must be inserted into the pouch in the correct orientation or it WILL NOT WORK Refer to the instructions on the transmitter front label for guidance in the field ...

Page 17: ...agic Breed Plus User Manual 15 Then pull the flap over and down sealing the Velcro so that the transmitter is held tightly It s important that the transmitter is not able to move around inside the pouch ...

Page 18: ...ver features an LCD screen and three buttons to aid in configuration and user information Operation is simple Switch between the various menu and status screens Change a setting on the current screen Silence the alarm Some functions require that the button is pressed and held ...

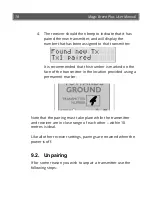
Page 19: ...a single receiver when a transmitter is paired the receiver assigns it an identifying number from 1 to 8 9 1 Pairing To perform pairing use the following procedure 1 Turn the receiver on and place it in learning mode by pressing SELECT until the option press CHANGE to pair a new Tx is shown 2 Press CHANGE and the receiver will begin listening for a new transmitter to learn 3 Insert the batteries i...

Page 20: ...that this number is marked on the face of the transmitter in the location provided using a permanent marker Note that the pairing must take place while the transmitter and receiver are in close range of each other within 10 metres is ideal Like all other receiver settings pairings are retained when the power is off 9 2 Unpairing If for some reason you wish to unpair a transmitter use the following...

Page 21: ...ntil the corresponding transmitter information page is displayed 2 Press and hold the CHANGE button for 5 seconds The following will be displayed 3 When the unpairing is complete the buzzer will beep twice and a confirmation message will be displayed ...

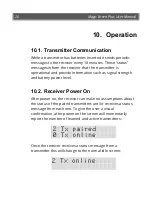
Page 22: ... information such as signal strength and battery power level 10 2 Receiver Power On After power on the receiver can make no assumptions about the status of the paired transmitters until it receives a status message from each one To give the user a visual confirmation after power on the screen will momentarily report the number of learned and active transmitters Once the receiver receives a status ...

Page 23: ...k signal If the battery level reaches battery low then the transmitter batteries should be changed as soon as possible to ensure reliable operation If a weak signal is shown the system will still operate correctly but there is a chance of offline transmitter alarms occurring 10 4 Foaling Alarm The transmitter will detect when the mare enters a foaling position laid on its side head flat against th...

Page 24: ...is 5 minutes but this can be changed after which it will resume sounding The mute applies individually to each transmitter if another transmitter creates an alarm during the mute period then the mute will cancel and the buzzer will begin to sound again 10 6 Offline Transmitter Alarm If the receiver does not receive a status report from a paired transmitter for more than 20 minutes then an offline ...

Page 25: ...he foaling alarm this screen will provide a list of the transmitters that have an empty battery 10 8 Multiple Concurrent Alarms If multiple alarms are occurring at the same time then they are displayed based on priority foaling alarms are displayed first followed by empty battery alarms and offline transmitter alarms The status of individual transmitters can be viewed by pressing the SELECT button...

Page 26: ...must be on a flat and level surface In power save mode the transmitter will still transmit status updates but at a much longer interval of 2 hours Backlight The display is backlit so that it can be read in the dark The backlight turns off after 7 minutes of inactivity so that it is not disruptive Any time a button is pressed or an alarm occurs the backlight will automatically turn on again ...

Page 27: ...ncommon Trees fences and buildings can have a minimal to moderate impact on the range Hills can have a significant impact Regardless even with significant blocking objects a range of 500m should still be easily achievable To perform testing first check the pairing by placing a transmitter on its side near the receiver The alarm should sound and then silence once the transmitter is placed back in a...

Page 28: ...ll ignore an alarm for a specific receiver for after the mute button is pressed Pressing SELECT will cycle through each of the available settings 5 minutes default 10 minutes 15 minutes 20 minutes 30 minutes 12 2 Alarm Delay The alarm delay specifies how long the mare must have its head in a horizontal position until the alarm is triggered Pressing SELECT will cycle through each of the options 5 s...

Page 29: ...ceiver units prior to storage This will prevent the batteries being depleted and also prevent damage due to the chance of leaking batteries The Magic Breed Plus design features significant improvements over the old Magic Breed design and as such regular servicing is less necessary For peace of mind however many customers may still wish to send their Magic Breed system in for a factory check from t...

Page 30: ...uency 917MHz Signal modulation Chirp spread spectrum Transmitter Size 110 x 58 x 19mm Weight excluding batteries 58g Power 2x AAA 1 5V Alkaline batteries IP rating IP54 EIRP output power 50mW Receiver Size 110 x 110 x 37mm Weight 180g Power 5VDC 500mA max micro USB ...

Page 31: ...nty period this product will be free from faulty parts manufacture or workmanship when used within normal operating conditions 2 The warranty period for Magic Breed Plus components is 24 months from the date of purchase 3 The warranty does not apply where damage is caused by other factors including a abuse mishandling accident or failure to follow operating instructions b exposure to liquid or inf...

Page 32: ... Electrical Solutions as soon as the failure becomes apparent 2 Once authorised return the unit at the customer s cost to Electronic Electrical Solutions to be assessed and repaired Ensure that all contact information and a written fault description are included 3 The unit will be assessed and as appropriate either repaired or replaced It is then returned to the customer at the cost of Electronic ...

Reviews: