M40/50RF System September 2011, rev 2 - DRAFT
© 2011 Electronic Solutions, Inc.
Page 3 of 7
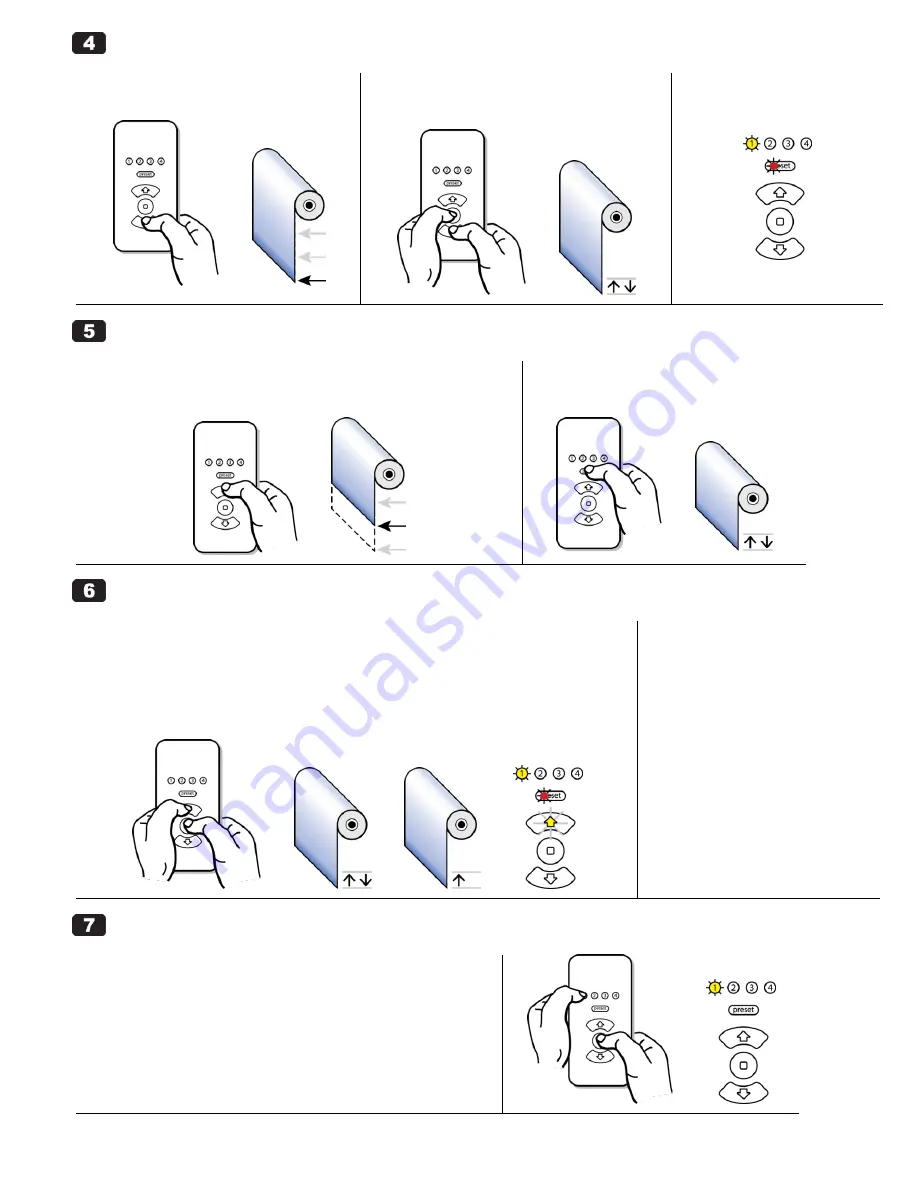
Set Limits (continued)
(d) Adjust shade to Lower limit position.
Press and hold the DOWN button.
(e) Set the Lower end limit.
Simultaneously press and hold STOP and DOWN
until motor jogs twice (approximately 2 seconds).
(f) Lower end limit is set.
Yellow LED on DOWN button
turns off.
Set “preset” (OPTIONAL)
(a)
Adjust shade to desired “preset” position.
NOTE: Both end limits must be set prior to setting a
―preset‖ position.
Press and hold the UP (or DOWN) button.
(b)
Set the “preset.”
Press and hold “preset” until motor jogs twice
(approximately 5 seconds) then release.
Adjust Limits / Clear Limits
(a) Adjust the Upper or Lower end limits.
NOTE: To set an end limit outside of a current end limit, you must clear that end limit first.
Clear Upper Limit:
Simultaneously press and hold STOP and UP until motor jogs twice, then jogs once (approximately 5
seconds), then release.
The UP button flashes to show its limit is cleared.
Clear Lower Limit:
repeat the above two instructions using the DOWN button (instead of UP).
(b) Set the new Upper or Lower
end limit.
UPPER: see Step 4 (a), (b), (c).
LOWER: see Step 4 (d), (e), (f).
------------------------------------------------
(c)
Adjust the “preset” limit.
NOTE: A ―preset‖ cannot be cleared
using the remote, only readjusted.
Follow the instructions in Step 5.
Finish the Installation
NOTE: If this is a single motor installation, complete Step 7 now,
otherwise continue with Step 8 for a multiple motor installation.
(a) On the remote, you must exit Setup Mode and put the
remote into User Mode after the installation is complete.
Hold “1” and briefly press and release STOP.
Red LED under “preset” turns off (remote is now in User Mode).


