background image

6

EnAct

OVERVIEW

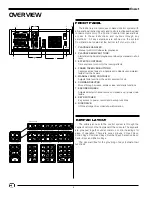
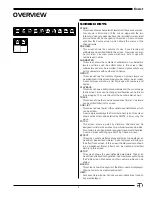
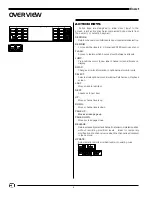
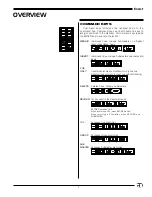
RESTORE:

Returns channels to conditions previous to last entered selection.

REM DIM:

Forces all other levels to '0'. Requires ENTER keystroke at end.

FLASH:

Access to feature which bounces level between set levels.

JUMP:

Pre-positions cursor to new label, channel or record blocks on

display.

SWAP:

Changes monitor information in optional dual monitor units.

SELECT:

Selects mode options in record window, Patch screen, Playback

screen.

LAST:

Moves back to last item.

NEXT:

Advances to next item.

UP:

Moves channel levels up.

DOWN:

Moves channel levels down.

PAGE UP:

Moves screen page up.

PAGE DOWN:

Moves screen page down.

RELEASE:

Returns manually selected channel to a fader completed position

without recording modified levels.  Ideal for temporary

modification of a channel value when the channel is addressed

in the next cue.

UPDATE:

Automatically records modified levels into existing cues.

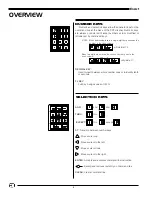
ACTION KEYS

Action keys are designed to allow direct input to the

screen.  Each action may be accompanied by key inputs from

the numeric or selection keypad.

Summary of Contents for EnAct

Page 1: ...1 EnAct Revision 7 September 1998 1998 Electronics Diversified Inc 070 0620 EnAct User Manual ...

Page 2: ...llow features like Auto Record Editing on Track and Cue Screens Advancing Submasters Preset or Track Mode operations and Remote Record features These features can also be controlled by Macros The user can switch these features by Macro or Set Up Screen based on preference EnAct Consoles offer significant additions in the submaster playback area of control With up to eight pages of 24 playbacks the...

Page 3: ... Playbacks 30 Running Playbacks Manually 31 TRACK SCREEN Setting Levels 32 CUE LIST SCREEN Editing the Cue List Screen 33 PATCH SCREEN Patch by Dimmer 34 Parked Dimmers 34 Position Controls 34 Unpatch 35 Unity Patch 35 Patch by Channel 35 Position Controls 35 EFFECT SCREEN Activating Steps by Groups 36 EFFECT TRACK SCREEN Setting Levels 37 Example Effect 37 SETUP SCREENS Main Menu 38 System Menu 3...

Page 4: ...line storage of recorded show information KEYPAD LAYOUT Fader Keys Action Keys Macro Keys Action Keys Command Keys Number Keys Selection Keys Screen Keys EnAct The EnAct is a microprocessor based control system with all operational instruction sets and controls routines embedded in read only memory The Control Console front panel allows access to these instructions and routines through key selecti...

Page 5: ...ced to new pages The current level of the handle is also shown TRACK This screen shows the cues in a spreadsheet format Cue levels can be edited blind in this screen CUE LIST This screen shows the list of the cue times and attributes which can be edited A second press displays the Timed Actions screen This screen shows actions that can be started by SMPTE a timer or by the clock PATCH This screen ...

Page 6: ... Playback screen LAST Moves back to last item NEXT Advances to next item UP Moves channel levels up DOWN Moves channel levels down PAGE UP Moves screen page up PAGE DOWN Moves screen page down RELEASE Returnsmanuallyselectedchanneltoafadercompletedposition without recording modified levels Ideal for temporary modification of a channel value when the channel is addressed in the next cue UPDATE Auto...

Page 7: ...ding a Submaster press RECORD and SUBMASTER DELETE Deletes Cues Groups Submasters SUB MASTER Accesses Submaster memories CUE Accesses Cue memories GROUP Accesses Group memories Command keys introduce the labeled items to the command line Command keys work with numeric keys to assign conditions to the displays All command keys require the ENTER key to execute the action CUE ONLY Used when levels ar...

Page 8: ... When addressing levels a single digit entry assumes the number in the ten s column will yield at 70 When two digits are entered the second number goes to the one s column will yield at 7 DECIMAL KEY Used to insert between whole number cues or to identify tenth of seconds FL KEY Full Key Assigns value of 100 NUMBER KEYS Numeric and selection keys allow the operator input on the command line at the...

Page 9: ...od of tailoring the console to individual performance needs Common repetative keystrokes can be recorded together to be replaced under a single keystroke The MACRO Screen key allows the operator to review or edit any macro created Macros can also be labeled with a name for easy identification MACRO KEY Displays Macro Screen see page 44 MACRO 1 6 Single key access to the recorded Macro CREATE MACRO...

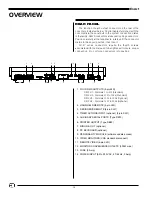
Page 10: ...ction Do not force connectors into position 1 2 3 5 7 6 8 4 REAR PANEL 01 FOUR DMX OUTPUTS 5 pinXLR DMX 1 Dimmers 1 to 512 Standard DMX 2 Dimmers 512 to 1024 Standard DMX 3 Dimmers 1025 to 1536 Optional DMX 4 Dimmers 1537 to 2048 Optional 02 HAND HELD REMOTE 4 pin XLR 03 DESIGNER S REMOTE 4 pin XLR 04 TIMED ACTIONS INPUT optional 3 pin XLR 05 AUXILIARY SERIAL PORTS Type DB15 06 PRINTER OUTPUT Type...

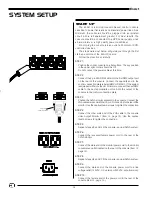
Page 11: ...tic fields NOTE Never eject a diskette while the disk drive indicator light is on This could result in loss of data or incomplete loading of a show Wait until the indicator light goes off before ejecting WRITE PROTECTION 1 Orient the diskette so that the round metal circle is pointed toward you 2 With the metal flap on top the write protect tab is located in the lower right hand corner If this tab...

Page 12: ...is equipped with more than 512 dimmers connect the next DMX cable to the next appropriate port on both the output of the console to the control connection plate STEP 3 Position the SVGA monitor adjacent to the console Connect the VGAcablemaleendwiththe 15 pin D connector totherearofthe monitor Use the captive thumb screws to tighten the connection STEP 4 Connect the other male end of the VGA cable...

Page 13: ...sic groups of information to alert the operator to the current status of operation 1 TITLE BLOCK 2 CHANNEL FIELD 3 CUE WINDOW 4 PROMPT WINDOW 5 FADER WINDOW 6 COMMAND LINE 001 02 03 04 05 06 07 08 09 10 11 12 13 14 15 16 17 18 19 20 21 22 23 24 25 FL FL FL FL FL 70 70 026 27 28 29 30 31 32 33 34 35 36 37 38 39 40 41 42 43 44 45 46 47 48 49 50 051 52 53 54 55 56 57 58 59 60 61 62 63 64 65 66 67 68 ...

Page 14: ... upper left position B Displays up to 200 channels Levels entered are displayed below the channel numbers SYSTEM SETUP 2 001 02 03 04 05 06 07 08 09 10 11 12 13 14 15 16 17 18 19 20 21 22 23 24 25 FL FL FL FL FL 70 70 026 27 28 29 30 31 32 33 34 35 36 37 38 39 40 41 42 43 44 45 46 47 48 49 50 051 52 53 54 55 56 57 58 59 60 61 62 63 64 65 66 67 68 69 70 71 72 73 74 75 076 77 78 79 80 81 82 83 84 85...

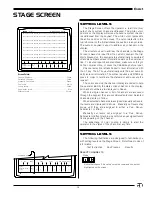
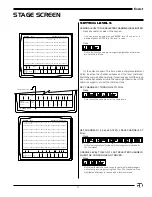
Page 15: ...tay brown until they are assigned to either a Cue Group Submaster or Effect Manually set levels not assigned to a Cue Group Submaster or Effect stay brown and block any assigned levels from appearing on the channel The advantage of color coding is simply to alert the operator to the status of the channel at any time SETTING LEVELS 001 02 03 04 05 06 07 08 09 10 11 12 13 14 15 16 17 18 19 20 21 22 ...

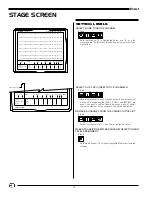
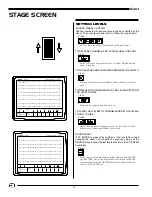
Page 16: ...nnel Level Cue Or At 15 STAGE Enact Grandmaster FL 9 01 00 SELECT A LIST OF CONSECTUTIVE CHANNELS Press SELECT MORE THAN ONE CHANNEL Press Note that channel 10 is highlighted Yellow and 15 is on the command line The AND key forceds the previous selection to be highlighted Notice that channel 15 is now highlighted but the cursor does not move unitl a bridge key like AND THRU and EXCEPT are used If ...

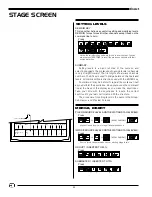
Page 17: ...1 42 43 44 45 46 47 48 49 50 151 52 53 54 55 56 57 58 59 60 61 62 63 64 65 66 67 68 69 70 71 72 73 74 75 176 77 78 79 80 81 82 83 84 85 86 87 88 89 90 91 92 93 94 95 96 97 98 99 00 S Cue Name Time Delay PF Link EA EB Macro Enter Fdr 1 2 3 4 5 6 7 8 Channel Level Cue Or At 15 STAGE Enact Grandmaster FL 9 01 00 ASSIGNALEVELTOTHESELECTEDCHANNELSHIGHLIGHTED Press any numeric value on the keypad You ca...

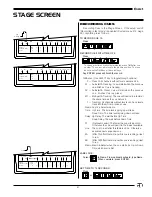
Page 18: ...13 14 15 16 17 18 19 20 21 22 23 24 25 52 52 FL 52 52 026 27 28 29 30 31 32 33 34 35 36 37 38 39 40 41 42 43 44 45 46 47 48 49 50 051 52 53 54 55 56 57 58 59 60 61 62 63 64 65 66 67 68 69 70 71 72 73 74 75 076 77 78 79 80 81 82 83 84 85 86 87 88 89 90 91 92 93 94 95 96 97 98 99 00 101 02 03 04 05 06 07 08 09 10 11 12 13 14 15 16 17 18 19 20 21 22 23 24 25 126 27 28 29 30 31 32 33 34 35 36 37 38 39...

Page 19: ...s Notice that the levels changed to the previous setting TO ELIMINATE ASSIGNED CHANNEL LEVELS Press This response is similar to the keystrokes AT ENTER The primary difference is AT ENTER eliminates the levels assigned to the highlightedchannels whileENTER ENTERselects allthechannels with the first ENTER If you accidently press ENTER ENTER you can return the channels to the previous levels by press...

Page 20: ...s end with the ENTER key Sometimes it may be helpful to repeat the syntax out loud as you perform the keystrokes Keep your eye on the command line at the base of the display as you make the keystrokes Take your time with the keystrokes to insure the correct keyhits until you feel comfortable with the structure The procedure for setting levels is the same in the Group Submaster and Preview Screens ...

Page 21: ...ait before Up Time Down Delay The wait before Down Time PF Preferred Fader The fader the cue will load into Otherwise the cue will load into the lowest available Link The cue to load after this fade is done Otherwise assumes next sequential cue EA Effect A Effect that will run while cue is running or last to run EB Effect B Effect that will run while cue is running or last to run Macro Macro initi...

Page 22: ...creen key TO SPLIT TIMES SO UP FADES ARE 30 AND DOWN FADES ARE 50 Press Note On up fade use SELECT to make cue load on a manual handle automatically Note Delays happen after GO and before cue fade times S Cue Name Time Delay PF Link EA EB Macro 10 House Lights Enter Fdr 1 2 3 4 5 6 7 8 Channel Level Cue Or At STAGE SCREEN RECORDING CUES S Cue Name Time Delay PF Link EA EB Macro 10 House Lights 3 1...

Page 23: ...4 95 96 97 98 99 00 S Cue Name Time Delay PF Link EA EB Macro Enter Fdr 1 2 3 4 5 6 7 8 Channel Level Cue Or At STAGE Enact Grandmaster FL 9 01 00 Are you sure DELETE CUE 8 Press Are you sure PROPORTIONALLY RAISE LOWER ALL ACTIVE CHANNELS IN ANY CUE Press Use the Wheel to roll to desired level To proportionally lower all active channels to 80 in any cue use the Grand Master Handle Lower handle so ...

Page 24: ... Name Any 16 character name In Fortimedsubmasters Thetimeittakestosimulate a handle movement from zero to full Dwell For timed submasters The time the simulated handle is at full Out For timed submasters The time it takes for the simulated handle to move back to zero Mode Manual Sub follows handle bump button takes handle to level set in setup Timed Sub simulates an up dwell and down handle moveme...

Page 25: ...39 40 41 42 43 44 45 46 47 48 49 50 051 52 53 54 55 56 57 58 59 60 61 62 63 64 65 66 67 68 69 70 71 72 73 74 75 076 77 78 79 80 81 82 83 84 85 86 87 88 89 90 91 92 93 94 95 96 97 98 99 00 101 02 03 04 05 06 07 08 09 10 11 12 13 14 15 16 17 18 19 20 21 22 23 24 25 126 27 28 29 30 31 32 33 34 35 36 37 38 39 40 41 42 43 44 45 46 47 48 49 50 151 52 53 54 55 56 57 58 59 60 61 62 63 64 65 66 67 68 69 70...

Page 26: ... from P to T RECORD CUE 5 TO TRACK FORWARD Press RECORD CUE 8 CUE ONLY Press In the following cue any tracked values will turn hard creating a new start track value and zeroes will be placed where new values from cue eight want to track in RE RECORD CUE ON STAGE WITH CHANGES TRACKING FORWARD Press RE RECORD CUE ON STAGE WITH CHANGE CUE ONLY Press DELETE CUE 5 WITHOUT CHANGING THE NEXT CUE Press ST...

Page 27: ...0 00 00 00 00 00 00 00 00 00 00 051 52 53 54 55 56 57 58 59 60 61 62 63 64 65 66 67 68 69 70 71 72 73 74 75 000 00 00 00 00 00 00 00 00 00 00 00 00 00 00 00 00 00 00 00 00 00 00 00 00 076 77 78 79 80 81 82 83 84 85 86 87 88 89 90 91 92 93 94 95 96 97 98 99 00 000 00 00 00 00 00 00 00 00 00 00 00 00 00 00 00 00 00 00 00 00 00 00 00 00 101 02 03 04 05 06 07 08 09 10 11 12 13 14 15 16 17 18 19 20 21 ...

Page 28: ... 81 82 83 84 85 86 87 88 89 90 91 92 93 94 95 96 97 98 99 00 101 02 03 04 05 06 07 08 09 10 11 12 13 14 15 16 17 18 19 20 21 22 23 24 25 126 27 28 29 30 31 32 33 34 35 36 37 38 39 40 41 42 43 44 45 46 47 48 49 50 151 52 53 54 55 56 57 58 59 60 61 62 63 64 65 66 67 68 69 70 71 72 73 74 75 176 77 78 79 80 81 82 83 84 85 86 87 88 89 90 91 92 93 94 95 96 97 98 99 00 Sub Name In Dwell Out Mode Source E...

Page 29: ...N Press MERGE INSERTARETHESAMEASINTHESTAGESCREEN Press All changes are automatically recorded MOVE CURSOR TO CHANNEL 256 Press SETTING LEVELS GROUP Grandmaster FL 9 01 00 001 02 03 04 05 06 07 08 09 10 11 12 13 14 15 16 17 18 19 20 21 22 23 24 25 70 70 50 70 70 70 026 27 28 29 30 31 32 33 34 35 36 37 38 39 40 41 42 43 44 45 46 47 48 49 50 60 60 60 60 051 52 53 54 55 56 57 58 59 60 61 62 63 64 65 6...

Page 30: ...0 Enter Fdr 1 2 3 4 5 6 7 8 Page Number Cue __ __S BUMP START TIMED EVENTS Second press pauses event Fader display window is always available on this screen CHANGE SUBMASTER TYPE Cursor to Mode and use SELECT key to toggle through options which appear in the Command Line Manual Default Sub follows handle bump brings to Full Timed Sub follows handle bump starts an up fade a dwell then a down fade b...

Page 31: ... LEDs Sub page changes with handle up will load when handle is restored to 0 Bump controls can start timed events amber Second press stops event Fader display window is always available on this screen Parked dimmers can be assigned to playback handles Play backs can support only one page of parked dimmers Parked dimmers do not illuminate LEDs LED Colors Manual Green Timed or Advancing Amber Disabl...

Page 32: ... LEVEL IN A CUE WITHOUT DISTURBING TRACKED VALUES IN THE NEXT CUE Press MOVE CURSOR TO INFO ON LEFT HAND OF SCREEN Press then cursor to position MOVE CUE 56 TO TOP OF SCREEN Cursor to any cue number Press TRACK SCREEN SETTING LEVELS S Cue Name Link 01 02 03 04 05 06 07 08 09 10 11 12 13 14 15 AP 0 Blackout Cue 0 0 0 0 0 0 0 0 0 0 0 0 0 0 0 P 10 Cue Number 10 0 1 2 3 4 5 6 7 8 9 10 11 12 13 14 AT 2...

Page 33: ...ss SET THE CUE TO OPERATE ON FADER 3 Cursor to PF Preferred Fader press SET A CUE TO GO TO CUE 105 WHEN FADE IS DONE Cursor to Link press RUN EFFECTS 5 AND 7 WITH CUE Cursor to EA press The effect starts when the cue containing the effect number is faded and the effect stops when a cue containing another effect or no effect is faded or START MACRO 87 WHEN CUE STARTS FADING Cursor to MACRO press ED...

Page 34: ... may be in use at any time and 1 may be designated as the Backup Patch To change Patch tables from the Patch screen touch JUMP This will place the cursor at the page location Change the page number to the desired page and press JUMP again The Patch table is now changed The format for operation on this screen is Dimmer at Channel at Level at Profile ENTER Dimmer numbers are the first call out on Pa...

Page 35: ...IMMERS Press UNITY PATCH Press SET UP key to open Main Menu Set up Screen Press 4 ENTER Are you sure will appear in the command line Press ENTER again to complete function This action will return the Dimmer Channels relationship to 1 to 1 JUMP CURSOR TO CHANNEL 467 Press DELETE DIMMER 5 FROM CHANNEL CURSOR IS ON Press ADD DIMMER 8 AT 50 TO CHANNEL CURSOR IS ON Press PATCH BY CHANNEL The format for...

Page 36: ...oggle through options Chase Steps from beginning to end then jumps back to the beginning Bounce Steps from beginning to end then steps back wards to the beginning Random Steps randomly through the effect Single Steps through effects only once then stops Invert NO Uses normal levels YES Uses inverse of the levels AUTO On every other time through it brings up the inverse of the levels ADDING A TIME ...

Page 37: ...Cue 30 s delay and time the effect will stop To make best use of the Master Channel have channel 45 fade in on Cue 10 and fade out on Cue 30 Group Name Time 1 2 3 4 5 6 7 8 9 10 11 12 13 14 15 1 2 3 4 5 6 7 8 9 10 11 12 13 14 15 16 17 18 19 20 21 22 23 24 25 EFFECT TRACK Grandmaster FL 9 01 00 Enter Mstr Test Chase Invert Effect Name Rate by Chan Effect Bounce Group Numbers Random 5 POT None No Si...

Page 38: ...tor can access any of the system categories listed on the screen by following the simple instructions outlined below ACCESS MENU Move the cursor to the desired number with the cursor control keys or select the number for the subject requested press ENTER To view or change default items in any menu A Type number or move cursor to desired position B To toggle a YES NO response press ENTER C To chang...

Page 39: ...complete function To change or set a value type number and press ENTER To return to Main menu press CLEAR key SYSTEM 1 Return to main menu 2 Display name and link in TRACK Yes 3 Levels shown in hex No 4 Group created in Effect Track Yes 5 Recording in fast mode Yes 6 Flash lower intensity 10 7 Flash upper intensity 80 8 Flashing rate 1 9 Number of dimmers 1024 10 Number of channels 1000 11 Title i...

Page 40: ...NTER 4 Activates or deactivates level wheel To toggle a YES NO press ENTER 5 Allows channels without levels to be changed by the wheel 6 Increases decreases wheel sensitivity To return to Main menu press CLEAR key FRONT PANEL MENU PATCH MENU NOTE Items set in BOLDFACE in each menu must be set by operator before console use 1 Returns to Main menu 2 Automatically establishes a one to one patch for e...

Page 41: ... to disk 10 Save Setup to disk 11 SAVE ALL TO DISK 12 Minutes for Auto Save 0 Off 0 SETUP Version 2 3 Grandmaster FL 9 01 00 Enter Are you sure LOAD FROM DISK FUNCTIONS 1 Return to main menu 2 Load Groups from disk 3 Load Cues from disk 4 Load Submasters from disk 5 Load Effects from disk 6 Load Macros from disk 7 Load Patch from disk 8 Load Profiles from disk 9 Load Smpte from disk 10 Load Setup ...

Page 42: ...turns to Main menu 2 Updates clock information to memory This must be done when any change has been made 3 Recalls clock from memory 4 Sets 12 or 24 hour clock operation 5 Determines clock display elements 6 Sets calendar day in memory 7 Sets calendar hour in memory 8 Sets calendar minutes in memory 9 Sets calendar seconds in memory To toggle a YES NO press ENTER Press ENTER to start function Are ...

Page 43: ...13 Multi screen set up for 2 monitor version optional 14 Multi screen set up for 3 monitor version optional To toggle a YES NO press ENTER Press ENTER to start function Are you sure will appear in the command line Press ENTER again to complete function To change or set a value type number and press ENTER To return to Main menu press CLEAR key PERIPHERALS UTILITIES MENU SETUP Version 2 3 Grandmaste...

Page 44: ... TO CREATE A MACRO Identify the number to store the Macro Press Enter keyhits or actions desired Press CREATE MACRO again to stop the recording process TO EDIT OR ADD KEYHITS INTO A MACRO Press Enter keyhits Press MACRO to view the Macro Screen Group Name 6 House Lights HELP RECORD Will record shown levels to a cue group or sub Example keys RECORD GROUP 5 ENTER This will bring up a Press a Key win...

Page 45: ...35 36 37 38 39 40 41 42 43 44 45 46 47 48 49 50 151 52 53 54 55 56 57 58 59 60 61 62 63 64 65 66 67 68 69 70 71 72 73 74 75 176 77 78 79 80 81 82 83 84 85 86 87 88 89 90 91 92 93 94 95 96 97 98 99 00 S Cue Name Time Delay PF Link EA EB Macro Enter Fdr 1 2 3 4 5 6 7 8 Channel Level Cue Or At SOURCE Enact Grandmaster FL 9 01 00 The Source Screen shows what control is bringing up levels By looking at...

Page 46: ...1 Return to main menu 2 Designers remote Yes 3 Hand held remote Yes 4 Smpte input No 5 Midi input output No 6 Device ID for Midi In 0 7 Device List for Midi Out 0 8 Device ID for Midi Out 0 9 SubCommander page 1 10 SubCommander playback 1 11 Remote record to SubCommander 12 Format disk 13 Screen 2 0 CUE 1 PLYBK 2 TRK 3 STG 4 EDIT 0 14 V Remote CUE 1 PLYBK 2 TRK 3 STG 4 EDIT 0 SETUP Version 2 3 Gra...

Page 47: ...Citizen GSX 190 Panasonic KX P1124 Citizen 200GX Panasonic KX P2023 Epson FX 870 PRINTERS Printer Connection SET UP PRINTER Load paper and test printer functions as identified in printer manual Configure printer for standard Epson protocol Set switch for line feed on carriage return Turn Off power to printer Connect printer cable to console printer port Connect printer cable to printer output Turn...

Page 48: ... When console is in flash mode the Decimal and Full keys will act as left and right cursors respectively HAND HELD REMOTE 6 Cord by EDI 4 Pin XLR Male Connector DISPLAY LINE 1 DISPLAY LINE 2 The EnAct Consoles support a Designer s Remote console which offers duplicate keypad features remote from the control console Coupled with EnAct s remote video capacity the Designer s Remote offers the feature...

Page 49: ... options of GO CUE and MACRO On CUE and MACRO enter number To sequentially arrange times press MERGE To delete a time press DELETE when on Time To toggle between source inputs press SELECT TIMED ACTIONS Optional 1 02 30 30 01 GO 26 xx xx xx xx 2 01 00 00 02 Cue 15 4 27 xx xx xx xx 3 00 15 00 03 GO 28 xx xx xx xx 4 02 15 05 04 Macro 17 29 xx xx xx xx 5 00 20 00 00 Macro 5 30 xx xx xx xx 6 xx xx xx ...

Page 50: ...s a multipart flag that cue will load the same time as the previous cue If there are cues8 9and10wherecues9and10aremulti parts allthree cues will be loaded on and started at the same time 9 How does cue only work One of the most important things to understand is how cue only works A cue only will go to the next cue and set any levels that might have been changed to hard level making the next cue u...

Page 51: ...the wheel control the fade speed manually Yes Press the Time button while in Stage It will ask which fader you want to affect Type a number then press ENTER or just Enter if you want all The fader will now speed up and slow down according to how you move the wheel 18 Can I write a macro to select setup options Yes Macros are just a sequence of keyhits If you can do something from the keyboard then...

Page 52: ...Video Card 1 or 2 119 0062 C Expanded Memory 1 M 903 3100 D Personality Module 670 8902 E Battery Back Up 146 0006 Lithium AA Off On Switch S4 F CPU Board 670 8906 G Optical Isolator 670 8908 670 8908 H I O Card 670 8907 I Disk Drive 119 0057 J Remote Video Card 670 8920 E I B D 1234 1234 1234 1234 1234 1234 1234 1234 1234 1234 1234 1234 C A F J CPU i 960 U18 U16 U14 U24 6 1 2 3 4 5 6 U13 7 5 6 6 ...

Page 53: ... 8901 L Front Panel Fader Card 672 8905 M Keyboard 670 8903 N Wheel Assembly 019 0134 P Control Switches 019 0142 Legend Dip Switch Connector Socketed IC w Direction Indicated K L M N P 1234 1234 1234 1234 1234 1234 1234 1234 1234 1234 1234 1234 1234 1234 1234 1234 N C TO A TO H U1 U5 ...

Page 54: ...icate by FAX 1 503 629 9877 After Hours Emergency contact 1 503 645 5533 Ask for Emergency Assistance Internet www edionline com Internet E Mail service edionline com If your EnAct console needs repair call 503 645 5533 for a Return Materials Authorization number and a shippping address will be furnished This console is a product of 1675 N W Cornelius Pass Road Hillsboro Oregon 97124 USA ...

Page 55: ..._ Facility and or Company ________________________________________ _____________________________________________________________ Street Address _______________________________________________ _____________________________________________________________ City ____________________________ State ______ Zip __________ Phone ______________________________________________________ Fax ___________________...

Page 56: ...56 EnAct ...

Reviews: