background image


26

WIG AANSCHERPEN 

Na  de  houtklover  enige  tijd  te  hebben  gebruikt,  de  wig  van  de  houtklover 
aanscherpen  met  behulp  van  een  fijne  vijl  en  eventuele  bramen  of  geplette  zone 
langsheen de snijdrand wegvijlen. 


PROBLEMEN VERHELPEN 

PROBLEEM


MOGELIJKE OORZAAK


VOORGESTELDE OPLOSSING


&

-


3!

!

4

4 !


!

4

!

!

44

!

!

4

5


6

44

7

4


2 4

! 4


8

6

4 !

- 9

4 !

!

44


+

!

4

!

-

!


* 4

44

!

4 !

4 !


:

-


8

4 :

-


3

4 7


.

4;4 <

7


9

7

!

4

47

7


+

4 7

7

44

=

7

7

!


>

4

)

!

)

)


!

-4

-!


3

4


)

)

-

-


+

?

@

!

4 !

4


3

!

4 !

7


.

!

4 !

7


3

4


.

4


6)

4

0

44

; < !


Summary of Contents for FB1500-5TEG52

Page 1: ...1 FB1500 5TEG52 FR FENDEUSE DE B CHE TRADUCTION DES INSTRUCTIONS D ORIGINE NL HOUTSPLIJTER VERTALING VAN DE ORIGINELE INSTRUCTIES GB LOG SPLITTER ORIGINAL INSTRUCTIONS S17 M04 Y2016...

Page 2: ...OIS 5 TONNES Mode d emploi POUR VOTRE SECURITE VEUILLEZ LIRE ET COMPRENDRE CE MANUEL EN ENTIER AVANT D UTILISER LA MACHINE NUMERO DE MODELE FB1500 5TEG52 Conservez ce manuel pour pouvoir le consulter...

Page 3: ...uides inflammables car cela cr erait des risques potentiels INSPECTER LA FENDEUSE V rifiez votre fendeuse avant de l allumer Les protections doivent tre leur place Prenez l habitude de v rifier que to...

Page 4: ...nt de fendeuse TENEZ LES VISITEURS ET LES ENFANTS A DISTANCE La fendeuse doit tre utilis e par une seule personne la fois Les autres personnes doivent se tenir une certaine de la zone de travail surto...

Page 5: ...de le nettoyer ou d effectuer tout travail sur la fendeuse consultez la notice technique avant de la r parer PROTECTION DE L ENVIRONNEMENT Apportez l huile usag e dans un point de collecte autoris e o...

Page 6: ...s 220 mm Le diam tre de la b che est indicatif une petite b che peut tre difficile s parer quand elle a des n uds ou des fibres particuli rement r sistantes D un autre c t il est facile de fendre des...

Page 7: ...Fixez la jambe de maintien la fendeuse soulevez la fendeuse par les poign es situ es aux extr mit s de la machine et posez la sur une surface de travail de 60 75cm de hauteur stable plate et horizonta...

Page 8: ...garantir que la fendeuse fonctionne sous une pression inf rieure 7 tonnes Le r glage a t effectu par un m canicien qualifi quip d instruments professionnels Les r glages non autoris s provoqueront le...

Page 9: ...9 SCHEMA DU CABLAGE SCHEMA DE LA TUYAUTERIE...

Page 10: ...endre les mat riaux particuli rement durs et r sistants Ces positions peuvent tre interchang es en baissant ou levant simplement le levier Ne forcez jamais sur la fendeuse pendant plus de 5 secondes e...

Page 11: ...UNE BUCHE COINCEE Rel cher les deux commandes Apr s que le pousseur de b ches est revenu en arri re et est compl tement arr t en position de d part ins rez un coin en bois sous la b che coinc e D mar...

Page 12: ...de l huile et remettez le sur le r servoir tout en tenant la fendeuse la verticale Assurez vous que le niveau d huile soit situ entres les deux rainures qui entourent la jauge Nettoyez le bouchon de...

Page 13: ...13 PANNES PROBLEME CAUSE PROBABLE REMEDE SUGGERE 0...

Page 14: ...ge Vous trouverez des vues clat es ainsi que des informations concernant les pi ces de rechange galement sous www eco repa com Les conseillers techniques et assistants ELEM GARDEN TECHNIC sont votre d...

Page 15: ...VEILIGHEID LEES DE HELE HANDLEIDING ZORGVULDIG DOOR VOORDAT U DE MACHINE GAAT BEDIENEN MODELNUMMER FB1500 5TEG52 Zowel het modelnummer als het serienummer zijn terug te vinden op het hoofdetiket Bewaa...

Page 16: ...e niet in ruimtes waar dampen van verf solventen of ontvlambare producten een potentieel gevaar vormen INSPECTEER UW HOUTKLOVER Controleer uw houtklover voordat u ze aanzet Laat de beschermingsmiddele...

Page 17: ...ricien Zorg ervoor dat uw vingers niet in contact komen met de metalen punten van de stekker wanneer u de stekker van de houtklover in het stopcontact steekt of eruit haalt HOUD BEZOEKERS EN KINDEREN...

Page 18: ...derdelen vervangt de machine reinigt of aan de houtklover werkt Raadpleeg de technische handleiding voordat u onderhoudswerkzaamheden uitvoert BESCHERM HET MILIEU Breng gebruikte olie naar een erkend...

Page 19: ...inimale grootte van de logs 220 mm De diameter van het houtblok is indicatief een klein houtblok kan moeilijk te kloven zijn als het knobbels of een bijzonder stugge houtvezel bevat Anderzijds kan het...

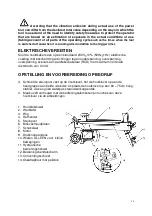
Page 20: ...ding met beschermingsinrichtingen tegen onderspanning overspanning overspanning evenals een aardlekschakelaar RCD met maximum nominale reststroom van 0 03A OPSTELLING EN VOORBEREIDING OP BEDRIJF 3 Sch...

Page 21: ...eker zijn dat het deksel van de olietank is vastgedraaid om olielekken vanaf dit punt te voorkomen 15 Drukbegrenzingsschroef Maximumdruk werd ingesteld vooraleer de houtklover de fabriek verliet en de...

Page 22: ...22 BEDRADINGSSCHEMA AFVOERSCHEMA...

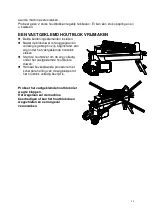
Page 23: ...klover om extreem hard hout te proberen klieven Na dit tijdsinterval wordt de olie onder druk oververhit en de machine kan beschadigd raken Voor dergelijke extreem harde houtblokken moet u het blok 90...

Page 24: ...lledig is gestopt in zijn beginstand een wig onder het vastgeklemde houtblok steken Start de houtklover om de wig volledig onder het vastgeklemde houtblok te duwen Herhaal bovenstaande procedure met s...

Page 25: ...in bovenstaande specificatietabel Maak het oppervlak van de peilstok op de olieaftapbout schoon en plaats het element opnieuw in de olietank terwijl u de houtklover verticaal houdt Zorg dat het peil...

Page 26: ...met behulp van een fijne vijl en eventuele bramen of geplette zone langsheen de snijdrand wegvijlen PROBLEMEN VERHELPEN PROBLEEM MOGELIJKE OORZAAK VOORGESTELDE OPLOSSING 3 4 4 4 44 4 5 6 44 7 4 2 4 4...

Page 27: ...our local dealer Any tampering with the appliance will invalidate the warranty Repairs carried out improperly and by unqualified persons may have serious consequences for the user In the interests of...

Page 28: ...28 GB 5 TON LOG SPLITTER Owner s Manual FOR YOUR SAFETY READ AND UNDERSTAND THE ENTIRE MANUAL BEFORE OPERATING MACHINE...

Page 29: ...king order Form a habit of checking to see that keys and adjusting wrenches are removed from tool area before turning it on Replace damaged missing or failed parts before using it DRESS PROPERLY Do no...

Page 30: ...der operations Never use another people to help you with freeing jammed log INSPECT YOUR LOG Make sure there are no nails or foreign objects in logs to be split The ends of the logs must be cut square...

Page 31: ...est and safest performance MAKE THE WORKSHOP CHILDPROOF Lock the shop Disconnect master switches Store the log splitter away from children and others not qualified to use it TABLE OF CONTENTS Safety W...

Page 32: ...3dB A ATTENTION The sound power pressure may exceed 85 dB A in this case individual hearing protection must be worn Weighted root mean square acceleration according to relevant standard 2 5 m s The de...

Page 33: ...Bolt the Support Leg to the Log Splitter lift the log splitter by the handles at both ends and place it on a 60 75cm high stable flat and level work surface 6 Familiarize yourself with the controls an...

Page 34: ...re the Bleed Screw is tightened to avoid oil leaking from this point 15 Max Pressure Limiting Screw Max pressure was set before the log splitter ex work and the max pressure limiting screw is sealed w...

Page 35: ...more than 5 seconds by keeping pressure on it to split excessively hard wood After this time interval the oil under pressure will be overheated and the machine could be damaged For such extremely har...

Page 36: ...completely stops at its starting position insert a wedge wood under the jammed log Start the log splitter to push the wedge wood to go completely under the jammed one Repeat above procedure with shar...

Page 37: ...in Bolt and put it back into the oil tank while keep the log splitter vertically Make sure the level of the refilled oil is just between 2 grooves around the Dipstick Clean the Oil Drain Bolt before t...

Page 38: ...38 TROUBLE SHOOTING PROBLEM PROBABLE CAUSE REMEDY SUGGESTED 3 A B A 2 3 A 5 3 C 3 4 4 7 A 7 7 7 C 4 4 4 4 3 4 7 2 7 D 2 7 C 2 7 3 2 7 4 C 3 2 7 4 6 0 7...

Page 39: ...e reach of children in a stable and secure position in a cool and dry place avoid too high and too low temperatures _ Protect it from exposure to direct sunlight Keep it in the dark if possible _ Don...

Page 40: ...40...

Page 41: ...leeftijd van de bediener Bewaar de machine buiten het bereik van kinderen wanneer deze niet wordt gebruikt Dit gereedschap is er niet voor bestemd om te worden gebruikt door personen inclusief kinder...

Page 42: ...ues pour tout produit thermique www eco repa com NL U kunt updates van handleidingen exploded views informatie over onderdelen en contact opnemen met onze technische stations voor elk product thermisc...

Page 43: ...014 1 2006 A1 2009 A2 2011 EN 55014 2 1997 A1 2001 A2 2008 EN 61000 3 2 2014 EN 61000 3 3 2013 EN 62233 2008 EN 60335 1 2012 A11 2014 Caract ristiques techniques Produit FENDEUSE DE B CHES Type FB1500...

Page 44: ...9 1 1999 A2 2009 EN 60204 1 2006 A1 2009 EN 55014 1 2006 A1 2009 A2 2011 EN 55014 2 1997 A1 2001 A2 2008 EN 61000 3 2 2014 EN 61000 3 3 2013 EN 62233 2008 EN 60335 1 2012 A11 2014 Technische Daten Pro...

Page 45: ...N 55014 1 2006 A1 2009 A2 2011 EN 55014 2 1997 A1 2001 A2 2008 EN 61000 3 2 2014 EN 61000 3 3 2013 EN 62233 2008 EN 60335 1 2012 A11 2014 Technical Data Product WOOD SPLITTER Type FB1500 5TEG52 230V 5...

Page 46: ...2009 EN 60204 1 2006 A1 2009 EN 55014 1 2006 A1 2009 A2 2011 EN 55014 2 1997 A1 2001 A2 2008 EN 61000 3 2 2014 EN 61000 3 3 2013 EN 62233 2008 EN 60335 1 2012 A11 2014 Technische Daten Produkt HOLZSP...

Page 47: ...es d tach es pour du mat riel de motoculture des compresseurs ou des groupes lectrog nes l atelier Euro Expos vous propose des r parations et du SAV de qualit Cliquez ici pour retrouver les pi ces d t...

Reviews: