background image


12

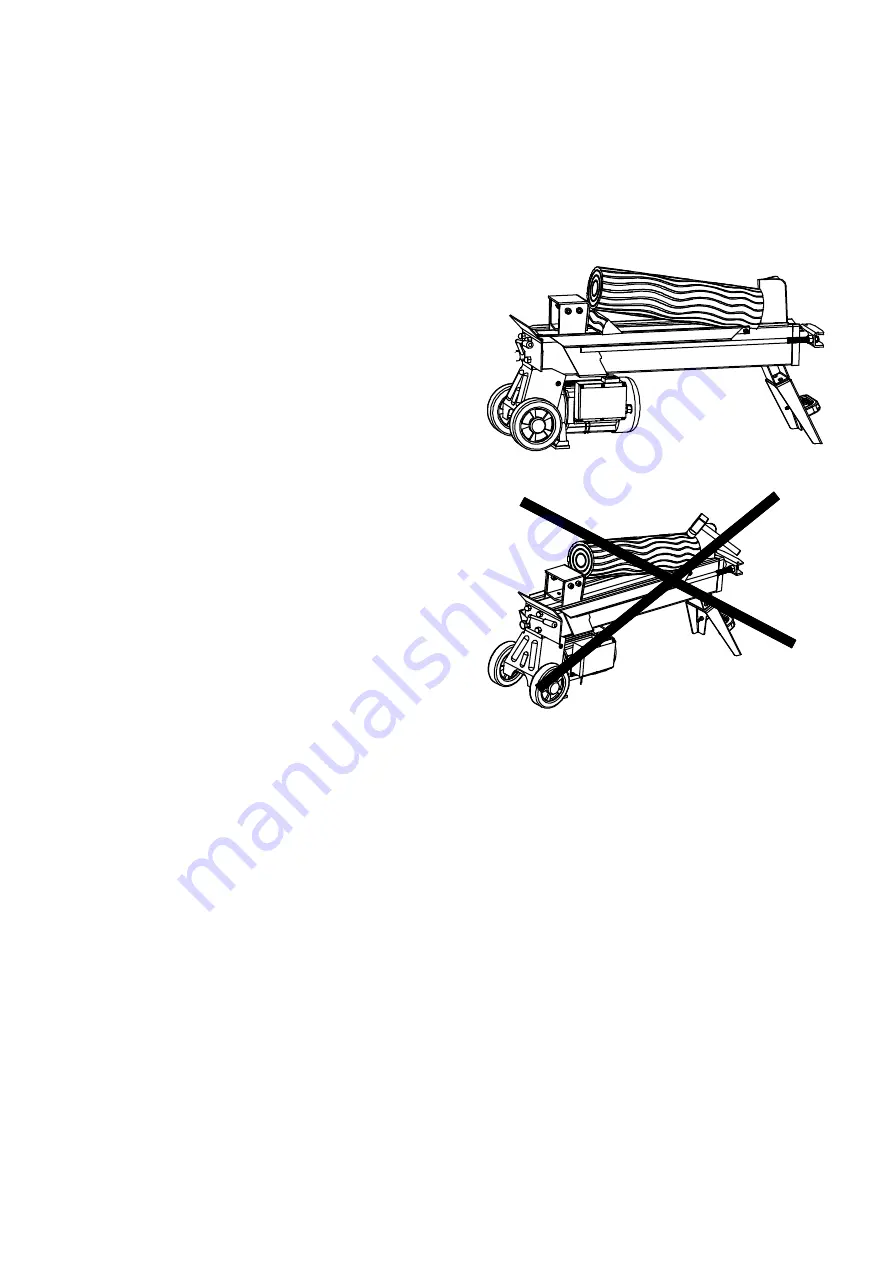
travers  de  la  fendeuse  pour  la  couper.  Cela  peut  être  dangereux  et  peut 
endommager sérieusement la machine. 
 
N’essayez pas de séparer 2 bûches en même temps. L’une d’entre elle pourrait être 
projeté en l’air et vous frapper. 


LIBERER UNE BUCHE COINCEE 

  Relâcher les deux commandes.   
  Après  que  le  pousseur  de  bûches  est 

revenu en arrière et est complètement 
arrêté en position de départ, insérez un 
coin en bois sous la bûche coincée. 

  Démarrez la fendeuse pour pousser la 

cale  de  bois  complètement  sous  la 
bûche coincée. 

  Répétez  la  procédure  ci-dessus  avec 

une  cale  plus  pointue  jusqu’à  ce  la 
bûche soit complètement décoincée. 


N'essayez  pas  de  débloquer  la  bûche 

en  y  frappant  dessus.  Cela  peut 

abîmer la machine ou projeter la bûche 

et provoquer des accidents. 


REMPLACEMENT DE L’HUILE HYDRAULIQUE 

Summary of Contents for FB1500-5TEG52SC

Page 1: ...1 FB1500 5TEG52SC FR FENDEUSE DE BÛCHE TRADUCTION DES INSTRUCTIONS D ORIGINE NL HOUTSPLIJTER VERTALING VAN DE ORIGINELE INSTRUCTIES GB LOG SPLITTER ORIGINAL INSTRUCTIONS S45 M11 Y2014 ...

Page 2: ...2 Montage des pieds Montagevoeten Mounting feet ...

Page 3: ...OIS 5 TONNES Mode d emploi POUR VOTRE SECURITE VEUILLEZ LIRE ET COMPRENDRE CE MANUEL EN ENTIER AVANT D UTILISER LA MACHINE NUMERO DE MODELE FB1500 5TEG52SC Conservez ce manuel pour pouvoir le consulter ultérieurement ...

Page 4: ... de peintures de solvants ou de liquides inflammables car cela créerait des risques potentiels INSPECTER LA FENDEUSE Vérifiez votre fendeuse avant de l allumer Les protections doivent être à leur place Prenez l habitude de vérifier que toutes les clés de réglage sont retirées de l outil avant de l allumer Remplacez les pièces manquantes ou endommagées avant l utilisation HABILLEZ VOUS CORRECTEMENT...

Page 5: ... branchement et du débranchement de fendeuse TENEZ LES VISITEURS ET LES ENFANTS A DISTANCE La fendeuse doit être utilisée par une seule personne à la fois Les autres personnes doivent se tenir à une certaine de la zone de travail surtout quand la fendeuse fonctionne Ne faites en aucun cas appel à une autre personne pour vous aider à débloquer les charges coincées INSPECTION DE LA CHARGE Assurez vo...

Page 6: ...ce de le nettoyer ou d effectuer tout travail sur la fendeuse consultez la notice technique avant de la réparer PROTECTION DE L ENVIRONNEMENT Apportez l huile usagée dans un point de collecte autorisée ou observez le règlement national du pays dans lequel vous utilisez la fendeuse Ne vidangez pas l huile dans les égouts dans le sol ou dans les cours d eau PRENDRE SOIN DE SA FENDEUSE La fendeuse do...

Page 7: ... des bûches 220 mm Le diamètre de la bûche est indicatif une petite bûche peut être difficile à séparer quand elle a des nœuds ou des fibres particulièrement résistantes D un autre côté il est facile de fendre des bûches à fibres régulières même si leur diamètre dépasse celui indiqué ci dessus Valeurs des émissions sonores mesurées selon la norme applicable Pression acoustique LpA 78 dB A K 3 dB A...

Page 8: ...xez la jambe de maintien à la fendeuse soulevez la fendeuse par les poignées situées aux extrémités de la machine et posez la sur une surface de travail de 60 à 75cm de hauteur stable plate et horizontale 2 Familiarisez vous avec les fonctions de commande de la fendeuse représentées sur les illustrations 1 Pousseur de bûche 2 Plan de travail 3 Coin 4 Poignée de soulèvement 5 Jambe de maintien 6 Pl...

Page 9: ...garantir que la fendeuse fonctionne sous une pression inférieure à 7 tonnes Le réglage a été effectué par un mécanicien qualifié équipé d instruments professionnels Les réglages non autorisés provoqueront le disfonctionnement de la pompe hydraulique en fournissant une pression de fente insuffisante ou bien PEUVENT CAUSER DE GRAVES BLESSURES AINSI QUE DOMMAGES DE LA MACHINE ...

Page 10: ...10 SCHEMA DU CABLAGE SCHEMA DE LA TUYAUTERIE UTILISATION DE LA FENDEUSE ...

Page 11: ...s Ces positions peuvent être interchangées en baissant ou levant simplement le levier Ne forcez jamais sur la fendeuse pendant plus de 5 secondes en appuyant dessus pour fendre les bois extrêmement durs Cet intervalle dépassé l huile sous pression surchauffera ce qui peut endommager la machine Pour fendre des bûches extrêmement dures faites tourner le morceau de 90o pour voir s il peut être fendu ...

Page 12: ...usseur de bûches est revenu en arrière et est complètement arrêté en position de départ insérez un coin en bois sous la bûche coincée Démarrez la fendeuse pour pousser la cale de bois complètement sous la bûche coincée Répétez la procédure ci dessus avec une cale plus pointue jusqu à ce la bûche soit complètement décoincée N essayez pas de débloquer la bûche en y frappant dessus Cela peut abîmer l...

Page 13: ...ttez le sur le réservoir tout en tenant la fendeuse à la verticale Assurez vous que le niveau d huile soit situé entres les deux rainures qui entourent la jauge Nettoyez le bouchon de vidange avant de le revisser Assurez vous qu il est bien serré afin d éviter les fuites avant de remettre la fendeuse à l horizontale Vérifiez de façon périodique pour être sûr qu il se trouve entre les 2 rainures de...

Page 14: ...14 PANNES PROBLEME CAUSE PROBABLE REMEDE SUGGERE 0 ...

Page 15: ... position stable et sûre dans un lieu sec et tempéré évitez les températures trop hautes ou trop basses _ Protégez la du rayonnement direct du soleil Tenez la si possible dans le noir _ Ne l enfermez pas dans des sacs en plastique car de l humidité pourrait s y former GARANTIE Pour les clauses de garantie reportez vous aux conditions de garantie ci jointes ENVIRONNEMENT Si après un certain temps v...

Page 16: ...VEILIGHEID LEES DE HELE HANDLEIDING ZORGVULDIG DOOR VOORDAT U DE MACHINE GAAT BEDIENEN MODELNUMMER FB1500 5TEG52SC Zowel het modelnummer als het serienummer zijn terug te vinden op het hoofdetiket Bewaar ze allebei op een veilige plaats voor later gebruik ...

Page 17: ...vochtige ruimtes en stel de machine niet bloot aan regen Gebruik ze niet in ruimtes waar dampen van verf solventen of ontvlambare producten een potentieel gevaar vormen INSPECTEER UW HOUTKLOVER Controleer uw houtklover voordat u ze aanzet Laat de beschermingsmiddelen op hun plaats en paraat Maak er een gewoonte van om te controleren of de sleutels en verstelbare sleutels uit de werkzone verwijderd...

Page 18: ...ooit te openen Mocht dit nodig zijn neem dan contact op met een gekwalificeerde elektricien Zorg ervoor dat uw vingers niet in contact komen met de metalen punten van de stekker wanneer u de stekker van de houtklover in het stopcontact steekt of eruit haalt HOUD BEZOEKERS EN KINDEREN UIT DE BUURT De houtkover mag steeds slechts door één persoon worden bediend Andere personen moeten een veilige afs...

Page 19: ...at u afstellingen uitvoert onderdelen vervangt de machine reinigt of aan de houtklover werkt Raadpleeg de technische handleiding voordat u onderhoudswerkzaamheden uitvoert BESCHERM HET MILIEU Breng gebruikte olie naar een erkend verzamelpunt of volg de bepalingen van het land waar de houtklover wordt gebruikt Loos geen olie in riolen bodem of water ONDERHOUD UW HOUTKLOVER ZORGVULDIG Houd de houtkl...

Page 20: ...lein houtblok kan moeilijk te kloven zijn als het knobbels of een bijzonder stugge houtvezel bevat Anderzijds kan het moeilijk zijn om houtblokken te kloven met gewone houtvezels zelfs als de diameter het max cijfer hierboven aangegeven overschrijdt Toepassing zijnde standaard Lpa Geluidsdrukniveau 78 dB A K 3 dB A Lwa Geluidsprestatieniveau 89 dB A K 3 dB A AANDACHT Draag gehoorbeschermers wannee...

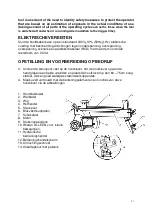
Page 21: ...nning evenals een aardlekschakelaar RCD met maximum nominale reststroom van 0 03A OPSTELLING EN VOORBEREIDING OP BEDRIJF 3 Schroef de steunpoot vast op de houtklover hef de houtklover op aan de handgrepen aan beide uiteinden en plaats de houtklover op een 60 75cm hoog stabiel vlak en goed waterpas staand werkoppervlak 4 Maak uzelf vertrouwd met de bedieningselementen en functies van deze houtklove...

Page 22: ...zeker zijn dat het deksel van de olietank is vastgedraaid om olielekken vanaf dit punt te voorkomen 15 Drukbegrenzingsschroef Maximumdruk werd ingesteld vooraleer de houtklover de fabriek verliet en de drukbegrenzingsschroef is afgedicht met lijm om te zorgen dat de houtklover onder een druk van maximum 5 ton werkt De instelling werd uitgevoerd door ervaren mechanicus met professionele instrumente...

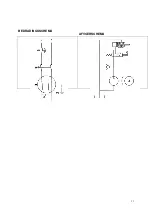
Page 23: ...23 BEDRADINGSSCHEMA AFVOERSCHEMA ...

Page 24: ...ger dan 5 seconden grote druk uit op de houtklover om extreem hard hout te proberen klieven Na dit tijdsinterval wordt de olie onder druk oververhit en de machine kan beschadigd raken Voor dergelijke extreem harde houtblokken moet u het blok 90 verdraaien om na te gaan of het in een andere richting kan worden gekliefd In ieder geval als u het houtblok niet kan klieven betekent dit dat de hardheid ...

Page 25: ...aten Nadat de blokduwer is teruggegaan en volledig is gestopt in zijn beginstand een wig onder het vastgeklemde houtblok steken Start de houtklover om de wig volledig onder het vastgeklemde houtblok te duwen Herhaal bovenstaande procedure met scherpere helling van de wigblokjes tot het houtblok volledig bevrijd is Probeer het vastgeklemde houtblok niet weg te kloppen Het wegslaan zal de machine be...

Page 26: ...n in bovenstaande specificatietabel Maak het oppervlak van de peilstok op de olieaftapbout schoon en plaats het element opnieuw in de olietank terwijl u de houtklover verticaal houdt Zorg dat het peil van de ververste olie net tussen de 2 groeven rond de peilstok staat Maak de olieaftapbout schoon vooraleer deze weer in te schroeven Zorg dat de bout goed is aangespannen om lekkage te vermijden voo...

Page 27: ...ebben gebruikt de wig van de houtklover aanscherpen met behulp van een fijne vijl en eventuele bramen of geplette zone langsheen de snijdrand wegvijlen PROBLEMEN VERHELPEN PROBLEEM MOGELIJKE OORZAAK VOORGESTELDE OPLOSSING 3 6 2 6 3 A B 4 3 C D 3 3 6 0 A ...

Page 28: ...ren in a stable and secure position in a cool and dry place avoid too high and too low temperatures _ Protect it from exposure to direct sunlight Keep it in the dark if possible _ Don t keep it in plastic bags to avoid humidity build up GUARANTEE Refer to the enclosed guarantee conditions for the terms and conditions of guarantee ENVIRONMENT Should your machine need replacement after extended use ...

Page 29: ...29 GB FB1500 5TEG52SC 5 TON LOG SPLITTER Owner s Manual FOR YOUR SAFETY READ AND UNDERSTAND THE ENTIRE MANUAL BEFORE OPERATING MACHINE ...

Page 30: ...rking order Form a habit of checking to see that keys and adjusting wrenches are removed from tool area before turning it on Replace damaged missing or failed parts before using it DRESS PROPERLY Do not wear loose clothing gloves neckties or jewelry rings wrist watches They can be caught in moving parts Protective electrically non conductive gloves and non skid footwear are recommended when workin...

Page 31: ...nder operations Never use another people to help you with freeing jammed log INSPECT YOUR LOG Make sure there are no nails or foreign objects in logs to be split The ends of the logs must be cut square Branches must be cut of flush with the trunk DON T OVERREACH Floor must not be slippery Keep proper footing and balance at all times Never stand on log splitter Serious injury could occur if the too...

Page 32: ...best and safest performance MAKE THE WORKSHOP CHILDPROOF Lock the shop Disconnect master switches Store the log splitter away from children and others not qualified to use it TABLE OF CONTENTS Safety Warnings Cautions Application Conditions Specifications Electrical Requirements Contents of Shipping Container Set up and Preparation for Operation Wiring Diagram Plumbing Diagram Log Splitter Operati...

Page 33: ...A K 3dB A ATTENTION The sound power pressure may exceed 85 dB A in this case individual hearing protection must be worn Weighted root mean square acceleration according to relevant standard 2 5 m s The declared vibration total value has been measured in accordance with a standard test method and may be used for comparing one tool with another that the declared vibration total value may also be use...

Page 34: ... Bolt the Support Leg to the Log Splitter lift the log splitter by the handles at both ends and place it on a 60 75cm high stable flat and level work surface 6 Familiarize yourself with the controls and features of this log splitter in the illustrations 1 Log Pusher 2 Work Table 3 Wedge 4 Lift Handle 5 Support Leg 6 Log Retaining Plates 7 Switch 8 Motor 9 Pushbutton Box 10 Wheels for Minor Moving ...

Page 35: ...ure the Bleed Screw is tightened to avoid oil leaking from this point 15 Max Pressure Limiting Screw Max pressure was set before the log splitter ex work and the max pressure limiting screw is sealed with glue to ensure the log splitter works under pressure no more than 5 tons The setting was done by qualified mechanic with professional instruments Unauthorized resetting will cause the hydraulic p...

Page 36: ...t to split excessively hard wood After this time interval the oil under pressure will be overheated and the machine could be damaged For such extremely hard log rotate it by 90o to see whether it can be split in a different direction In any case if you are not able to split the log this means that its hardness exceeds the capacity of the machine and thus that log should be discarded to protect the...

Page 37: ...ert a wedge wood under the jammed log Start the log splitter to push the wedge wood to go completely under the jammed one Repeat above procedure with sharper slope wedge woods until the log is completely freed Do not try to knock the jammed log off Knocking about will damage the machine or may launch the log and cause accident ...

Page 38: ...ain Bolt and put it back into the oil tank while keep the log splitter vertically Make sure the level of the refilled oil is just between 2 grooves around the Dipstick Clean the Oil Drain Bolt before thread them back Make sure they are tightened to avoid leakage before place the log splitter horizontally Periodically check oil level to ensure it is between 2 grooves around the Dipstick Upon Lower ...

Page 39: ...39 TROUBLE SHOOTING PROBLEM PROBABLE CAUSE REMEDY SUGGESTED 3 8 5 8 2 3 8 3 7 3 A 8 7 B 3 2 C E D 2 7 2 3 2 7 3 2 6 0 A ...

Page 40: ...ldren in a stable and secure position in a cool and dry place avoid too high and too low temperatures _ Protect it from exposure to direct sunlight Keep it in the dark if possible _ Don t keep it in plastic bags to avoid humidity build up GUARANTEE Refer to the enclosed guarantee conditions for the terms and conditions of guarantee ENVIRONMENT Should your machine need replacement after extended us...

Page 41: ...41 ...

Page 42: ... de leeftijd van de bediener Bewaar de machine buiten het bereik van kinderen wanneer deze niet wordt gebruikt Dit gereedschap is er niet voor bestemd om te worden gebruikt door personen inclusief kinderen met beperkte fysieke zintuigelijke of geestelijke vermogens of gebrekkige ervaring en of gebrekkige kennis tenzij zij onder toezicht staan van een voor hun veiligheid verantwoordelijke persoon o...

Page 43: ...iques pour tout produit thermique www eco repa com NL U kunt updates van handleidingen exploded views informatie over onderdelen en contact opnemen met onze technische stations voor elk product thermische www eco repa com GB You can find updates of manuals exploded views information on spare parts and contact our technical stations for any product thermal www eco repa com ...

Page 44: ...2 2006 A1 2009 A 2 2009 EN 61000 3 3 2008 EN 62233 2008 EN 60335 1 2002 A11 A1 2004 A12 A2 2006 A13 2008 A14 2010 A15 2011 Caractéristiques techniques Produit FENDEUSE DE BÛCHES Type FB1500 5TEG52SC Tension du réseau V 230 Fréquence du réseau Hz 50 Puissance W1500 S3 Vitesse à vide min 1 2800 Poids avec pieds kg 50 Valeurs des émissions sonores mesurées selon la norme applicable Pression acoustiqu...

Page 45: ...09 EN 55014 2 1997 A1 2001 A2 2008 EN 61000 3 2 2006 A1 2009 A 2 2009 EN 61000 3 3 2008 EN 62233 2008 EN 60335 1 2002 A11 A1 2004 A12 A2 2006 A13 2008 A14 2010 A15 2011 Technische Daten Product HOUTSPLIJTER Type FB1500 5TEG52SC Netspanning V 230 Netfrequentie Hz 50 Vermogen W 1500 S3 Toerental onbelast min 1 2800 Gewicht geen voet kg 50 toepassing zijnde standaard Lpa Geluidsdrukniveau 78 dB A K 3...

Page 46: ...2 2006 A1 2009 A 2 2009 EN 61000 3 3 2008 EN 62233 2008 EN 60335 1 2002 A11 A1 2004 A12 A2 2006 A13 2008 A14 2010 A15 2011 Technical Data Product WOOD SPLITTER Type FB1500 5TEG52SC Mains voltage V 230 Mains frequency Hz 50 Power input W 1500 S3 No load speed min 1 2800 Weight without stand kg 50 Noise emission values measured according to relevant standard Acoustic pressure level LpA 78 dB A K 3 d...

Page 47: ...997 A1 2001 A2 2008 EN 61000 3 2 2006 A1 2009 A 2 2009 EN 61000 3 3 2008 EN 62233 2008 EN 60335 1 2002 A11 A1 2004 A12 A2 2006 A13 2008 A14 2010 A15 2011 Technische Daten Produkt HOLZSPALTER Typ FB1500 5TEG52SC Netzspannung V 230 Netzfrequenz Hz 50 Leistungsaufnahme W 1500 S3 Leerlaufdrehzahl min 1 2800 Gewicht ohne Standfuß kg 50 Höhe des Schalldrucks LpA Schalldruck dB A 78 K 3 dB A LWA Schallei...

Page 48: ...s détachées pour du matériel de motoculture des compresseurs ou des groupes électrogènes l atelier Euro Expos vous propose des réparations et du SAV de qualité Cliquez ici pour retrouver les pièces détachées pour la réf FB1500 5TEG52SC ...

Reviews: