background image

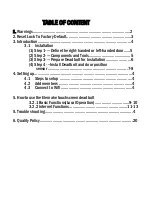
TABLE OF CONTENT 

1. Warnings

……………………………………………………………………………..2


2. Reset Lock To Factory Default...........................................................3 
3. Introduction.....................................................................................4 

3.1    Installation 

(1) Step 1----Define the right-handed or left-handed d

oor……

(2) Step 2----Components and Tools

…………………………………

(3) Step 3----Prepare Deadbolt for Installation

…………

.

……

....6 

(4) Step 4 ---Install Deadbolt and door position 

sensor 

……

..

……………………………………………

.

…………

.7-8 

4. Setting up.........................................................................................4 

4.1    Steps to setup ..................................................................4 
4.2    Add members ...................................................................4 
4.3    Connect to Wifi .................................................................4 
 

5. How to use the Elemake touchscreen deadbolt 

3.2.1 Basic Functions(Local Operation) …………….……………

9-10 

3.2.2 Internet Functions…………………………………………...

..11-13 

5. Trouble shooting................................................................................4 


6. 

Quality Policy………………………………………………………………………….20


TABLE OF CONTENTS


Summary of Contents for S110BBL-F

Page 1: ...WW ELEMAKELOCKS COM Elemake keeps on working hard to provide customers top grade quality hardware at affordable price Gracing customers doors with stylish designs and excellent craftsmanship since 197...

Page 2: ...less deadbolt products come with a 5 years warranty NOTE TO INSTALLER Watching the videos are highly recommended the video will help the customer to understand the installation and functions more easi...

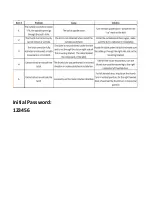
Page 3: ...Initial Password 123456...

Page 4: ...ts and Tools 5 3 Step 3 Prepare Deadbolt for Installation 6 4 Step 4 Install Deadbolt and door position sensor 7 8 4 Setting up 4 4 1 Steps to setup 4 4 2 Add members 4 4 3 Connect to Wifi 4 5 How to...

Page 5: ...installed and used as the instructions on users manual may have harmful interference to radio communications However If this deadbolt does cause harmful Interference to radio or television reception w...

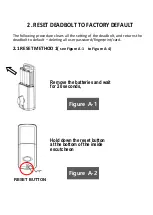
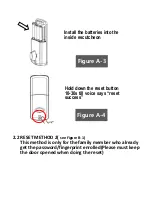
Page 6: ...the deadbolt and returns the deadbolt to default deleting all user password fingerprint card 2 1 RESET METHOD 1 see Figure A 1 to Figure A 4 Figure A 1 Remove the batteries and wait for 20 seconds Hol...

Page 7: ...the family member who already get the password fingerprint enrolled Please must keep the door opened when doing the reset Install the batteries into the inside escutcheon Hold down the reset button 1...

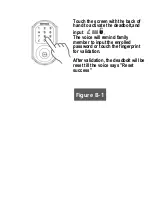
Page 8: ...d to activate the deadbolt and input 888 The voice will remind family member to input the enrolled password or touch the fingerprint for validation After validation the deadbolt will be reset till the...

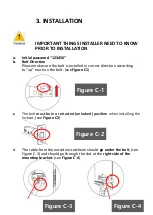
Page 9: ...ect direction according to up mark on the bolt see Figure C1 c The bolt must be in a retracted unlocked position when installing the lockset see Figure C2 d The cable from the outside escutcheon shoul...

Page 10: ...f Before installing the batteries test the mechanical operation of the lock by using Both thumb turn and the key The movement of the bolt should be smooth and unobstructed If operation is not smooth...

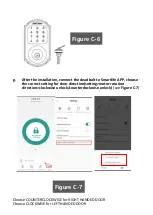
Page 11: ...rtlife APP choose the correct setting for door direction setting motor rotation direction clockwise unlock counterclockwise unlock see Figure C 7 Choose COUNTERCLOCKWISE for RIGHT HANDED DOOR Choose C...

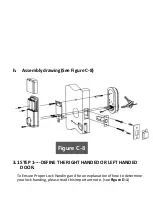
Page 12: ...See Figure C 8 3 1 STEP 1 DEFINE THE RIGHT HANDED OR LEFT HANDED DOOR To Ensure Proper Lock Handing and for an explanation of how to determine your lock handing please read this important note see Fig...

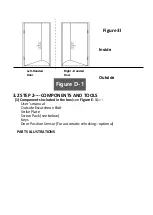
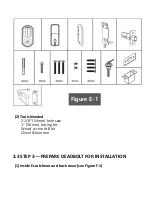
Page 13: ...ed in the box see Figure E 1 User s manual Outside Escutcheon Bolt Strike Plate Screw Pack see below Keys Door Position Sensor For automatic relocking optional PARTS ILLUSTRATIONS Inside Outside Left...

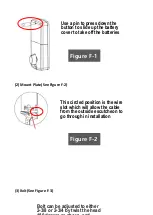
Page 14: ...2 Tools Needed 2 1 8 54mm hole saw 1 26mm boring bit Wood screw drillbit Chisel hammer 3 3 STEP 3 PREPARE DEADBOLT FOR INSTALLATION 1 Inside Escutcheon and back cover see Figure F 1 Figure E 1...

Page 15: ...the button to slide up the battery cover to take off the batteries This circled position is the wire slot which will allow the cable from the outside escutcheon to go through in installation Bolt can...

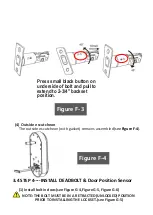
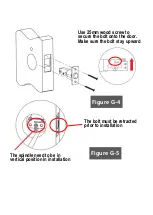
Page 16: ...L DEADBOLT Door Position Sensor 1 Install bolt in door see Figure G 4 Figure G 5 Figure G 6 NOTE THE BOLT MUST BE IN A RETRACTED UNLOCKED POSITION PRIOR TO INSTALLING THE LOCKSET see Figure G 5 Press...

Page 17: ...m wood screw to secure the bolt onto the door Make sure the bolt stay upward The bolt must be retracted prior to installation The spindle need to be in vertical position in installation Figure G 5 Fig...

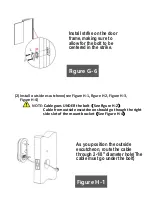
Page 18: ...from outside escutcheon should go though the right side slot of the mount bracket See Figure H 4 Install strike on the door frame making sure to allow for the bolt to be centered in the strike As you...

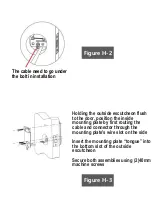
Page 19: ...o the door position the inside mounting plate by first routing the cable and connector through the mounting plate s wire slot on the side Insert the mounting plate tongue into the bottom slot of the o...

Page 20: ...ee Figures I 1 and Figure I 2 Figure I 3 b If need automatic relocking function need to install the door position sensor supplied in the box attach the sensor cable to the inside escutcheon printed ci...

Page 21: ...k by using both thumb turn and the key The movement of the bolt should be smooth and unobstructed If operation is not smooth review the previous steps to ensure proper installation see Figure J 5 Door...

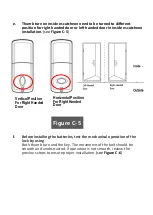
Page 22: ...cut to adapt to the depth of the lock Horizontal Position For Left Handed Door For right handed or left handed door the thumb turn need to be put in different position prior to installation And pleas...

Page 23: ...r and the magnet need to be aligned in same line If user want to use manual relocking just don t install the door position sensor IMPORTANT Before installing the batteries test the mechanical operatio...

Page 24: ...etting for right handed or left handed door see Figure J 7 Choose COUNTERCLOCKWISE for RIGHT HANDED DOOR Choose CLOCKWISE for LEFT HANDED DOOR Insert four 4 AA alkaline batteries The lock keypad will...

Page 25: ...Choose COUNTERCLOCKWISE for RIGHT HANDED DOOR Choose CLOCKWISE for LEFT HANDED DOOR Figure J 7...

Page 26: ...e App Smartlife with Bluetooth See Figure L 1 Figure L 2 Figure L 3 Figure L 4 a Turn on the bluetooth on celluar phone b Touch the screen with back of your hand to activate the deadbolt See Figure L...

Page 27: ...d Click the deadbolt s logo to connect the deadbolt Name the deadbolt and save See Figure L 3 Figure L 1 Figure L 2...

Page 28: ...User can use the mobile phone to unlock the deadbolt via the Bluetooth See Figure L 4 3 Step 3 Enroll the fingerprint password card for unlocking See Figure M 1 Click Settings Click the Fingerprint m...

Page 29: ...lly authorized be able to control and use all devices Other member with the limited authority by the family member administrator c Invite member Send out the invitation to be member via social messeng...

Page 30: ...Figure N 1...

Page 31: ...4 3 Connect WIFI Optional See Figure O 1 Figure O 2 a Elemake Internet Wireless Communication Diagram See Figure O 1 Internet Mobile Phonoe Tuya Core Wifi Gateway Figure N 1 Figure O 1...

Page 32: ...b Setup the Tuya Wifi gateway optional any wifi gateway with Tuya gateway IC If user want to use the internet functions See Figure O 2 Figure O 2...

Page 33: ...he smart deadbolt with common sense for specific operation also can refer to below detailed instructions 5 1 Basic Functions 1 Password unlocking See Figure P 1 a Touch the screen with the back of you...

Page 34: ...nlocking See Figure P 2 Put the finger on the fingerprint reader Deadbolt will be automatically unlocked 2 Key unlocking See Figure P 3 Remove the lid with the suction tool use the key to unlock Figur...

Page 35: ...middle of the escutcheon user can hear the beep then deadbolt will be automatically unlocked 5 1 6 Bluetooth Remote Unlocking with Mobilephone APP Turn on the bluetooth of the celluar phone 4 Tempora...

Page 36: ...with power bank and Type C charging line from the bottom of outside escutcheon 6 Lock the door Relock See Figure P 5 Figure P 6 a The door position sensor can detect the status of the lock if they fou...

Page 37: ...level monitoring real time See Figure P 7 User can easily read the percentage of the battery level when turn on the Tuya smart APP and enter the lock page At the top of the page there is the percenta...

Page 38: ...gure P 8 Enter the lock s page click the opening record at the page bottom user can see all unlocking records with the family member information 9 Choose Languages See Figure P 9 There are 2 languages...

Page 39: ...of the WIFI to use the battery energy will not consume the battery power in deadbolt 2 Online password unlocking See Figure Q 2 There are 2 kinds of the online password unlocking the oline password ca...

Page 40: ...rt See Figure Q 4 Click smart linkage on the deadbolt s home page scene SceneEdit Then to set up the alert When the door is opened or in abnormal status user will get the message voice or other notifi...

Page 41: ...6 Smart Home Can be use a with Tuya SmartHome as a related items which can be a part of the smart home system See Figure Q 6 Figure Q 5 Figure Q 6...

Page 42: ...avoid loss to any customers What if the product is out of return replacement window the warranty has expired In most cases we will continuously provide return replacement service or other support to...

Page 43: ...h have not been misused carelessly handled or mis repaired by persons other than Seller or Authorized Service Center To make a claim under this Limited Warranty you must make sure to keep a copy of yo...

Page 44: ...THE U S SOME CANADIAN PROVINCES DO NOT ALLOW LIMITATI ONS ON HOW LONG AN IMPLIED WARRANTY LASTS SO THE ABO VE LIMITATION MAY NOT APPLY TO YOU IN NO EVENT SHALL THE SELLER BE LIABLE FOR ANY INCIDENT A...

Page 45: ...WARRANTY APPLIES ONLY TO PORTABLE ELECTRI C TOOLS BENCH POWER TOOLS OUTDOOR POWER EQUIPMEN T AND PNEUMATIC TOOLS SOLD WITHIN THE UNITED STATES O F AMERICA AND CANADA FOR WARRANTY COVERAGE WITHIN OTHER...

Page 46: ...nline customer service Facebook csservice168 163 com Skype customerservice products Email address customerservice elemakelocks com Customer service center address 5448 Apex Peakway 197 Apex NC 27502 F...

Page 47: ......

Page 48: ...ference in a residential installation This equipment generates uses and can radiate radio frequency energy and if not installed and used in accordance with the instructions may cause harmful interfere...

Reviews: