background image

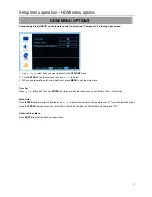
Setup menu operation – HDMI menu options 

 27

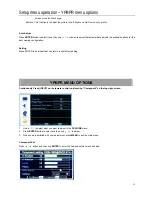
HDMI MENU OPTIONS 

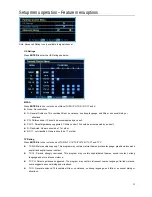
Continuously Press [INPUT] on the remote control until coming “Component” on the top-right screen. 


1. Use   /    to select what you want to adjust in the FEATURE menu. 

2. Press 

ENTER button to select and then use 

 /   to adjust. 

3.  When you are satisfied with your adjustment, press MENU to exit the main menu.


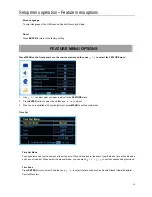
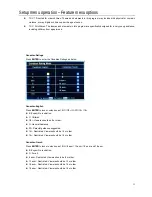
Time Set 

Press 

 /    button and then use ENTER the time set menu that allows you to set the time the TV will display. 


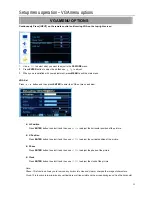
Sleep timer 

Press ENTER button to select it and then use 

 /    to adjust the amount of time before your TV turn off automatically and 

press the ENTER that can select the 15min/30min/ 45min/60min/ 90min/120min/180min/240min and OFF. 


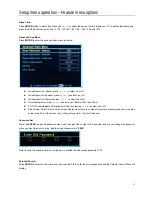
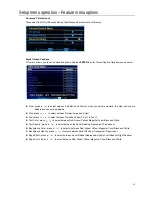
Advance Video Menu 

Press ENTER to enter the advance video menu. 

Summary of Contents for 32LE30Q

Page 1: ......

Page 2: ...e exposed to dripping or splashing No objects filled with liquids such as vases shall be placed on the TV CAUTION Do Not Place This TV on an unstable cart stand or table The TV may fall causing serious injury to a child or adult and serious damage to the TV Use only with a cart or stand recommended by the manufacturer or sold with the TV CAUTION Installation on concrete wall has passed UL safety t...

Page 3: ...PLASHING AND THAT NO OBJECTS FILLED WITH LIQUIDS SUCH AS VASES SHALL BE PLACED ON THE APPARATUS CAUTION TO PREVENT ELECTRIC SHOCK MATCH WIDE BLADE OF PLUG TO WIDE SLOT IN OUTLET CAUTION THESE SERVICING INSTRUCTIONS ARE FOR USE BY QUALIFIED SERVICE PERSONNEL ONLY TO REDUCE THE RISK OF ELECTRIC SHOCK DO NOT PERFORM ANY SERVICING ACTIVITIES BUT CALL QUALIFIED ELECTRICIAN PERSONNEL CAUTION DANGER OF E...

Page 4: ...ES AND A THIRD GROUNDING PRONG THE WIDE BLADE OR THE THIRD PRONG IS PROVIDED FOR YOUR SAFETY IF THE PROVIDED PLUG DOES NOT FIT INTO YOUR OUTLET CONSULT AN ELECTRICIAN FOR REPLACEMENT OF THE OBSOLETE OUTLET 10 PROTECT THE POWER CORD FROM BEING WALKED ON OR PINCHED PARTICULARLY AT PLUGS CONVENIENCE RECEPTACLES AND THE POINT WHERE THEY EXIT FROM THE APPARATUS 11 ONLY USE ATTACHMENTS ACCESSORIES SPECI...

Page 5: ... this cloth to wipe the surface of the display panel and then wipe it with a dry cloth of the same type until the surface is dry Do not scratch or hit the surface of the panel with fingernails or other hard objects Furthermore avoid contact with volatile substances such as insect sprays solvents and thinner otherwise the quality of the surface may be adversely affected Please read all the safety a...

Page 6: ... Basic operation TURNING ON AND OFF THE TV CHOOSING TV CHANNEL SELECTING INPUT SOURCE VOLUME ADJUSTMENT Setup menu operation ADJUST THE OSD SCREEN SELECT ON SCREEN LANGUAGE PICTURE MENU OPTIONS AUDIO MENU OPTIONS SETUP MENU OPTIONS FEATURE MENU OPTIONS VGA MENU OPTIONS YPBPR MENU OPTIONS HDMI MENU OPTIONS APPENDIX Troubleshooting Removing TV Stand Wall Mounting Unit Specification Universal Remote ...

Page 7: ...te is loose they should not be used Do not handle the power cord plug with wet hands Doing so may cause electric shocks Do not do anything that might damage the power cable When disconnecting the power cable hold the plug not the cable Do not make any modifications to place heavy objects on place near hot objects heat bend twist or forcefully pull the power cable Doing so may cause damage to the p...

Page 8: ...Clean the power cable regularly to prevent it from becoming dusty Built up dust on the power cord plug can increase humidity which might damage the insulation and cause fire Unplug the cord from the wall outlet and clean it with a dry cloth This TV set radiates infrared rays therefore it may affect other infrared communication equipment Install your infrared sensor in a place away from direct or r...

Page 9: ... Yourself with the Main Hardware The picture of the product may vary depending on the model a Select signal input It changes to ENTER function when main menu displays b Main Menu display and menu selection c Channel up d Channel down e Volume up f Volume down g ON OFF button ...

Page 10: ...ry depending on the model HDMI Input Input1 J Input2 K Component Input 1 Video E1 F1 G1 Audio B B1 Component Input 2 Video E F G Audio C C1 Composite Input Video L Audio D D1 S Video Input Video M Audio D D1 VGA input Video I Audio H 3 5mm plug Others Power Input A COAX Digital Out N External Antenna O ...

Page 11: ...d B Connect the left white and right red cables correctly to the sound cable C Check the terminals to connect the product to on the rear panel 2 Connecting an Antenna There are internal and external types of antenna Connecting an Antenna Cable TV network A Use a coaxial cable to connect the rear panel of the TV s AIR or CABLE terminals and the wall mount or external antenna B When an Air signal is...

Page 12: ...nel directly using the numberic buttons 11 RECALL Press to switch between the current channel and the last channel 12 When selecting a digital broadcast channel press the number followed by button followed by sub channel number 13 EPG One of signal channel EPG or Multi channel EPG 14 PICTURE Press to change to a preset picture mode 15 SOUND Press to change to a preset sound mode 16 INPUT Press to ...

Page 13: ...rities of the batteries correct z Are the batteries worn out z Is there an AC power failure z Is the power cable plugged in z Is any special fluorescent or neon sign board turned on Remote Control Reception Angle Use the Remote control within a range of 7 10m and at an angle of 30 to either side of the receiver CAUTION z Used batteries should be recycled z Kept out of children s reach z Do NOT use...

Page 14: ...ss CH to increase channel number z Press CH to decrease channel number 2 Using 0 9 digital buttons and button You can select the channel number by pressing 0 to 9 3 For example IN ANALOG SIGNAL To select channel e g Channel 22 Press 2 2 ENTER It will jump to 22 0 directly IN DIGITAL SIGNAL To select digit channel e g Channel 22 1 Press 2 2 1 ENTER the program will appear immediately NOTE Sub chann...

Page 15: ...RCE You can select the input source by pressing the INPUT on the remote control or on the side panel VOLUME ADJUSTMENT 1 Press VOL to adjust the volume 2 If you want to switch the sound OFF press the MUTE 3 You can cancel the mute function by pressing MUTE or VOL ...

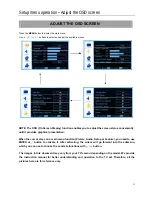
Page 16: ...cal presentation When the cursor stays on a main menu function Picture Audio Setup or Feature you need to use ENTER or button to activate it After activating the cursor will go forward into the submenu which you can use to choose the concrete functions with button The images in this document may vary from your TV s menu depending on the model We provide the instruction manual for better understand...

Page 17: ...MENU OPTIONS NOTE In this manual the OSD On Screen Display may be different from your TV s in colors Press the MENU on the front panel or on the remote control and then use to select the PICTURE menu 1 Use to select what you want to adjust in the PICTURE menu 2 Press ENTER button to adjust 3 When you are satisfied with your adjustment Press MENU to exit the main menu Picture Mode Select the type o...

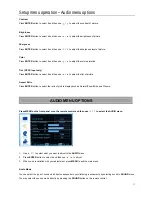
Page 18: ...se to adjust the tint of picture Aspect Ratio Press ENTER button to select the ratio of picture display such as Normal Zoom Wide and Cinema AUDIO MENU OPTIONS Press MENU on the front panel or on the remote control and then use to select the AUDIO menu 1 Use to select what you want to adjust in the AUDIO menu 2 Press ENTER button to select it and then use to adjust 3 When you are satisfied with you...

Page 19: ...ital Audio Output Press ENTER button to select the one of mode of the digital audio output such as PCM and RCW Auto Volume Adjust Press ENTER button to adjust the volume automatically TV and HDMI input only SETUP MENU OPTIONS Press MENU on the front panel or on the remote control and then use to select the SETUP menu 1 Use to select what you want to adjust in the SETUP menu 2 Press ENTER button to...

Page 20: ...as below Note If you want you exit the Auto Ch Search during the Auto search process press MENU twice to exit Add On Channel Search When the channels are found use ENTER to add it to the cannel list Manual Channel Set Press ENTER button to display a channel list that you can select channel as below Note this image comes from a engineering sample Please operate according to actual channel list in y...

Page 21: ...n the FEATURE menu 2 Press ENTER button to select it and then use to adjust 3 When you are satisfied with your adjustment press MENU to exit the main menu Time Set Time Set Mode You can select one of auto and manual to set the time When selected auto the item of year date and time will be disabled and can not to adjust When select the manual mode you can press to set the corresponding functions Ti...

Page 22: ...ormal Cool and Warm z 3D Y C Enable disable 3D digital comb filter for pressing to select on or off z Blue screen Select to turn on blue screen display when there is no signal However we recommend not to use blue screen long time If the screen is not changed long time it can hurt the panel Password Set Press the ENTER to enter old password menu and then input the number of 0 9 as below and you can...

Page 23: ...tricted Viewers should be 17 or older z NC 17 not classified Viewers should be 17 or older TV Rating Press ENTER to lock or unlock one of TV MA TV 14 TV PG TV G TV Y7 and TV Y z TV MA Mature audiences only This program may contain mature themes profane language graphic violence and explicit and explicit sexual content z TV 14 Parents strongly cautioned This program may contain sophisticated themes...

Page 24: ...s below Canadian English Press ENTER to lock or unlock one of E C C8 G PG 14 18 z E Expect No restriction z C Children z C8 Viewers should be 8 or order z G General Audience z PG Parental guidance suggested z 14 Restricted Viewers should be 14 or older z 18 Restricted Viewers should be 18 or older Canadian French Press ENTER to lock or unlock one of E G 8 ans 13 ans 16 ans and 18 ans z E Expect No...

Page 25: ...s to select between Normal Large and Small z Font press to select between Default and from Front 1 to Font 7 z Text Color press to select between Red Green Yellow Magenta Cyan Black and White z Text Opacity press to select between the Solid Flashing Transparent Translucent z Background Color press to select o between Red Green Yellow Magenta Cyan Black and White z Background Opacity press to selec...

Page 26: ...ow z H Position Press ENTER button to select it and then use to adjust the horizontal position of the picture z V Position Press ENTER button to select it and then use to adjust the vertical position of the picture z Phase Press ENTER button to select it and then use to adjust the phase of the picture z Clock Press ENTER button to select it and then use to adjust the clock of the picture Note Phas...

Page 27: ... best viewing configuration Setting Press ENTER to do preset that can return to the factory setting YPBPR MENU OPTIONS Continuously Press INPUT on the remote control until coming Component on the top right screen 1 Use to select what you want to adjust in the FEATURE menu 2 Press ENTER button to select and then use to adjust 3 When you are satisfied with your adjustment press MENU to exit the main...

Page 28: ...hen you are satisfied with your adjustment press MENU to exit the main menu Time Set Press button and then use ENTER the time set menu that allows you to set the time the TV will display Sleep timer Press ENTER button to select it and then use to adjust the amount of time before your TV turn off automatically and press the ENTER that can select the 15min 30min 45min 60min 90min 120min 180min 240mi...

Page 29: ...t If you are trying to view a TV station switch to another station because some channels may be having broadcast difficulties Check to make sure the brightness contrast settings are correct by entering the main menu and adjusting Q I have picture with no sound A Make sure the television is not muted Check all cables to ensure they are firmly connected into the TV and your eternal AV source After y...

Page 30: ...tion Then press the power button down for 30 seconds If the problem still exists replace the batteries if needed If you have reset or changed the batteries in a universal remote control you will need to reprogram the remote for the TV and other units Q I currently receive digital cable from my cable company Isn t that HDTV A Many Cable TV companies use the term digital cable to refer to the digita...

Page 31: ...oise standard The noise should be within the allotted 30dB A level for audio If you think the noise is excessive call the Element Electronics technical support line Q No audio on local channels A Your TV is designed to receive Stereo broadcasts It is also capable of receiving SAP Second Audio Programs available from TV stations Some stations broadcast radio stations weather foreign language or not...

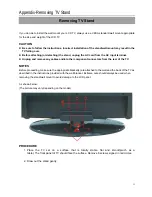
Page 32: ...emove any cables and or other component connectors from the rear of the TV NOTES Before proceeding make sure the appropriate bracket s are attached to the wall and the back of the TV as described in the instructions provided with the wall bracket Extreme care should always be used when removing the stand wall mount to avoid damage to the LCD panel As shown below The picture may vary depending on t...

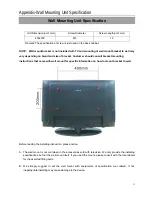
Page 33: ...uld consult bracket mounting instructions that came with wall mount for specific information on how to mount bracket to wall Before reading the installing instruction please notice A The wall mount is not contained in the accessories sold with television We only provide the installing specifications but not the wall mount itself If you need the mount please consult with the local dealer for the as...

Page 34: ...sted below please use accompanying codes and refer to your Universal Remote Control User Manual for basic instruction for changing TV code to operate TV model z Codes for Sony TV 8003 8012 8058 z Codes for Philips TV 1005 1006 1007 1035 1064 1216 z Codes for other universal remotes 272 132 134 116 040 016 024 056 019 262 ...

Page 35: ... 50 60 Hz Power consumption Less than 140W Audio power 8W 8W Connection Interface RF input Cable Antenna 1 VIDEO input VIDEO 1 S VIDEO 1 COMPONENT 2 HDMI 2 GRAPHIC input Analog RGB 15pin 1 AUDIO Input AV Audio 1 Component Audio 2 PC Audio Input 1 AUDIO output Digital audio output 1 TV Dimensions Height 22 6inches Width 31 3inches Depth 9 2inches With stand Package Dimensions Height 25 4inches Widt...

Reviews: