-33-
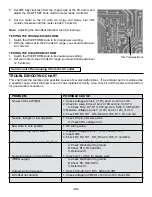
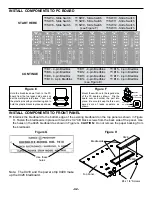
5. Set VR8 fully clockwise from the copper side of the PC board, and
adjust the DC OFFSET knob until the meter reads 0 volts DC.
6. Set the meter to the 20 volts AC range and slowly turn VR8
counter-clockwise until the meter reads 5.5 volts AC.
Note: Adjusting the DC offset will affect the VAC readings.
TESTING THE TRIANGLE WAVEFORM
1. Switch the WAVEFORM knob to its triangle wave setting.
2. With the meter set to the 20 volts AC range, you should read about
6.3 volts AC.
TESTING THE SQUARE WAVEFORM
1. Switch the WAVEFORM knob to its square wave setting.
2. Set your meter to the 20 volts AC range, you should now read about
12.5 volts AC.
Turn the unit off and unplug it from the AC outlet.
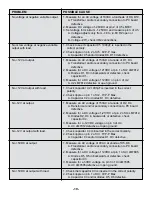
TROUBLESHOOTING CHART
This chart lists the condition and possible causes of several malfunctions. If a particular part is mentioned as
a possible cause, check that part to see if it was installed correctly. Also, check it and the parts connected to it
for good solder connections.
PROBLEM
POSSIBLE CAUSE
No wave form at FREQ
1. Check voltage at pins 4 (+12V) and 12 (-12V) of U6.
2. Check for wave forms at pin 2 of U6 and pin 3 of U10.
A. Check R3-4, R7, R13, C18-22, C24, SW2-3, VR5 & VR7.
3. Measure voltage at pins 7 (+12V) and 4 (-12V) of U10.
4. Check R8, R9, R11, R14, R44-48, D16, D17, Q1 and Q2.
No sine, triangle or low amplitude
1. Check U6 pin 2 for wave form.
A. Check VR8, voltage to IC.
Saw wave in sine position
1. R5 wrong value.
Wave forms clip top or bottom
1. Measure voltage at pins 7 (+12V) and 4 (-12V).
2. Adjust VR8.
3. Check R7, R9, R11, R14, R44-49, D16-17 and Q2-3.
No CLK wave output or low amplitude
1. Check pin 11 of U6 for square wave.
A. Check Q2 shorted to ground.
B. Check R10, R12 and Q3.
C. Defective IC.
No square wave or low amplitude
1. Check pin 11 of U6 for square wave.
(FREQ output)
A. Check Q2 shorted to ground.
B. Check R3, R49, SW3.
C. Defective IC.
Outputs wrong frequency
1. Check C18-22, C24, R13, SW2 and VR7.
DC offset not working
1. Check voltage on VR6 for +12V and -12V; check R8.
Trim Pot Adjustment
Summary of Contents for XK-550K
Page 37: ...SCHEMATIC DIAGRAM ANALOG SECTION 36 ...
Page 50: ...SCHEMATIC DIAGRAM 49 ...

