8
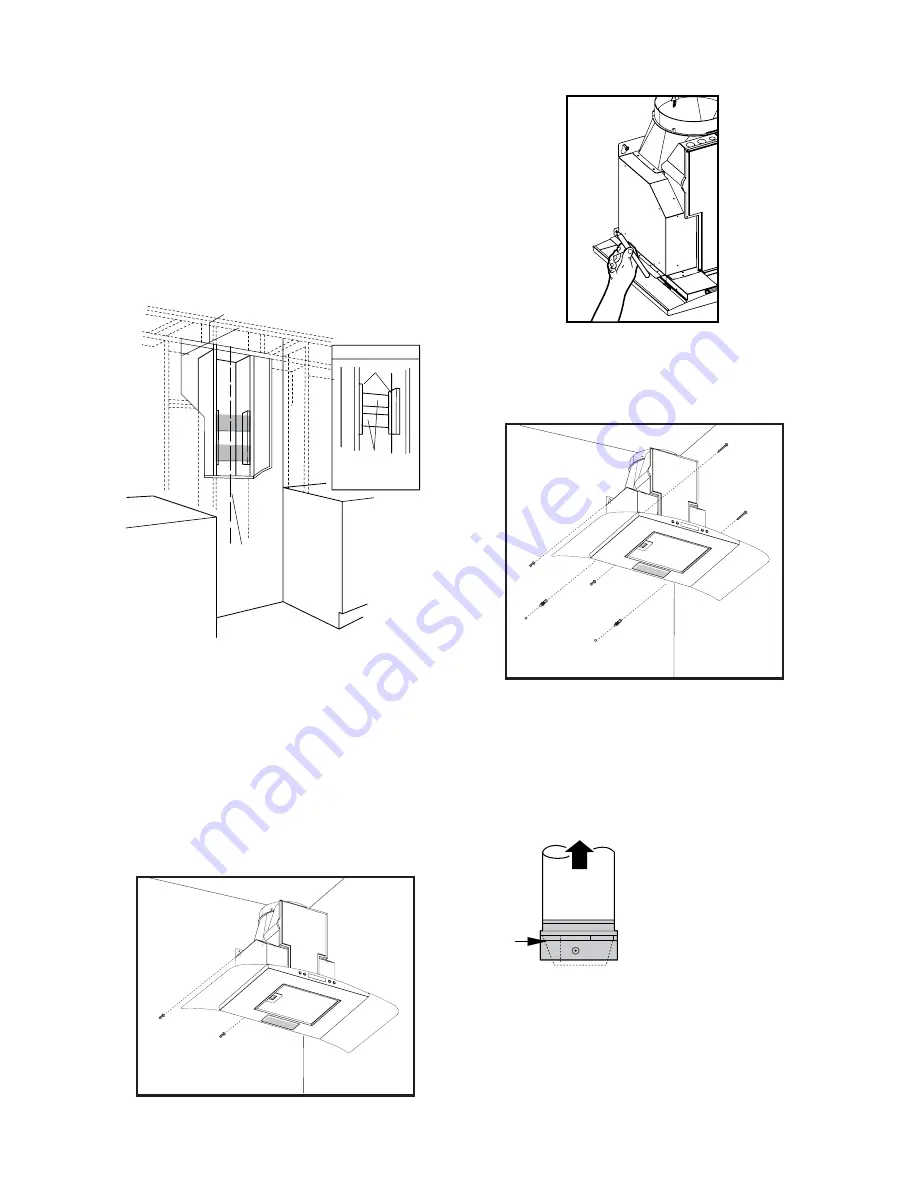
Install framing for hood support
If drywall is present, mark the screw hole locations.
Remove the template.
Cut away enough drywall to expose 2 vertical studs at
the holes location indicated by the template.
,QVWDOOWZRKRUL]RQWDOVXSSRUWVDWOHDVW;´EHWZHHQ
two wall studs at the bottom and upper mounting holes
installation location.
7KHKRUL]RQWDOVXSSRUWPXVWEHÀXVKZLWKWKHURRPVLGH
of the studs.
Use cleats behind both sides of the support to secure to
wall studs.
5HLQVWDOOOGU\ZDOODQGUH¿QLVK
,03257$17)UDPLQJPXVWEHFDSDEOHRIVXSSRUWLQJOEV
Mounting the hood
:$51,1*SHRSOHDUHUHTXLUHGWROLIWDQGSRVLWLRQWKHKRRG
onto the mounting screws.
3ODFHWKHWHPSODWHRQWKHZDOODORQJWKHKRUL]RQWDOOLQH
make sure the template is leveled and centered with the
centerline.
0DUN³XSSHU´VFUHZKROHVORFDWLRQVLQWKHZDOO
,03257$17&KHFNWREHVXUHWKDWKROHORFDWLRQVDUH
leveled and correctly centered by the vertical centerline.
'ULYH³XSSHU´ZRRGVFUHZVE\KDQG/HDYHó³RI
distance between the screw head and the wall.
5HPRYHWKHJUHDVH¿OWHUDQGPRXQWWKHKRRGRQWRWKH
³XSSHU´VFUHZV
•
•
•
•
•
•
•
•
•
•
´PLQRSHQLQJIRUGXFWZRUN
9LHZIURPUHDU
cleats
´[´PLQ
Mounting Support
Centerline of
installation
space
0DUN³ORZHU´ZRRGVFUHZKROHVORFDWLRQVLQWKHZDOOXVLQJ
a pencil.
Remove the hood.
'ULYH³ORZHU´ZRRGVFUHZVE\KDQG5HPRYHVFUHZV
0RXQWWKHKRRGRQWRWKH³XSSHU´VFUHZV
'ULYHDQGWLJKWHQWKH³XSSHU´ZRRGVFUHZVE\KDQG
'ULYHDQGWLJKWHQWKH³ORZHU´ZRRGVFUHZVE\KDQG
Connecting the ductwork
Install ductwork, making connections in the direction of
DLUÀRZDVLOOXVWUDWHG
Push duct over the exhaust outlet.
:UDSDOOGXFWMRLQ]WVDQGWKHÀDQJHFRQQHFWLRQVZLWKGXFW
tape for an airtight seal.
Make the same connection in the wall or ceiling vent exit.
•
•
•
•
•
•
•
•
•
•
$$LUÀRZ
B. Duct tape over seam
$
B
Summary of Contents for Dekor Glass 30
Page 44: ... 6 G Printed in Mexico ...


