background image

9

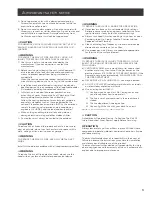
Install range hood

I      

WARNING

EXCESSIVE WEIGHT HAZARD.

USE TWO OR MORE PEOPLE TO MOVE AND INSTALL 

RANGE HOOD.FAILURE TO DO SO CAN RESULT IN BACK OR 

OTHER INJURY.

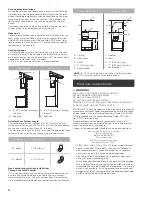
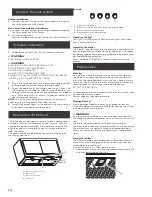
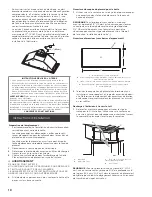
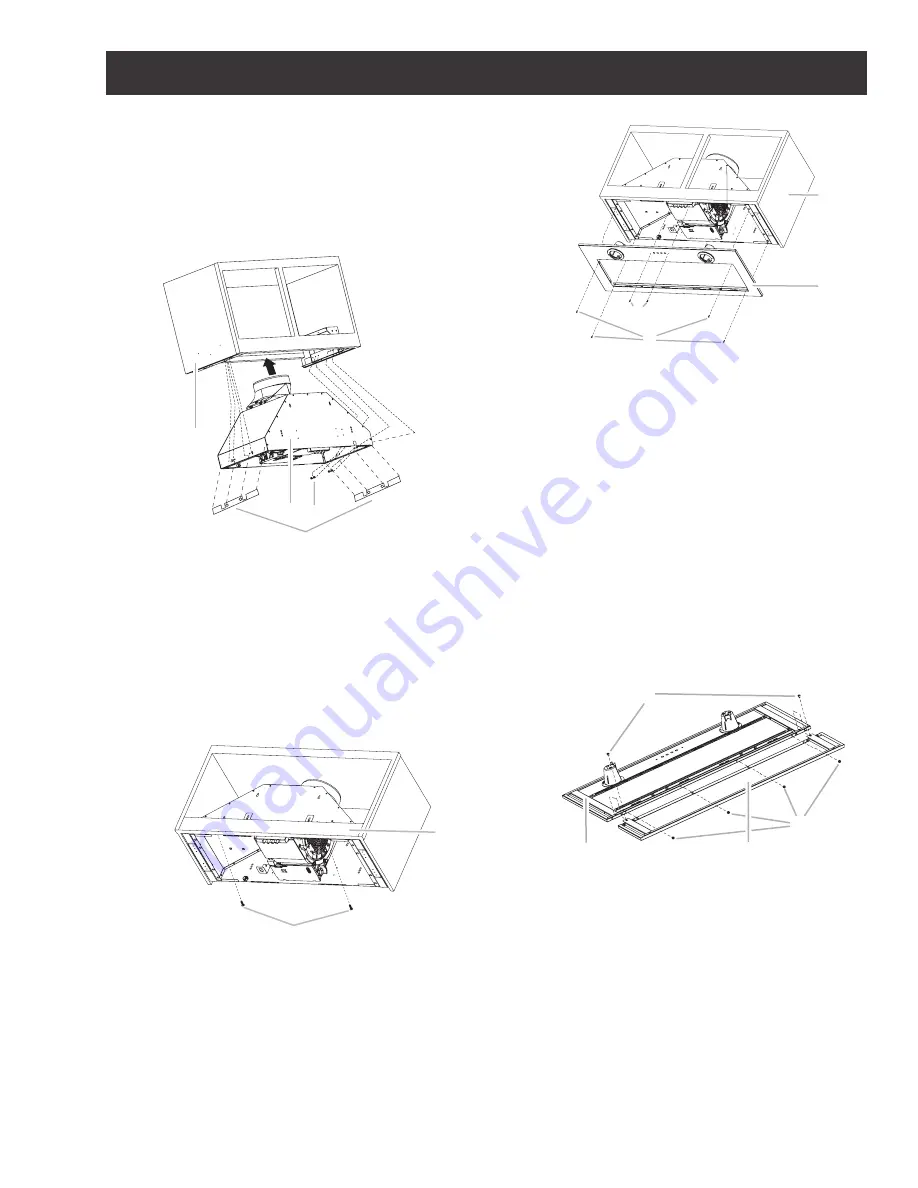
Using 2 or more people, lift the hood liner into its mounte 

location. Attach with four 4.2 x 19 mm screws into the 

slotted openings. Do not tighten screws.

A

B C

D

A.   Cabinet
B.   Hood liner canopy assembly

C.   Screws - 4.2 x 19 mm (8)
D.   Spacer (optional)

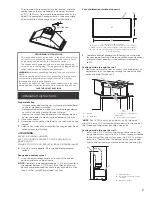
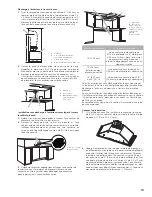
If needed, insert spacers between each side of the canopy 

and the mounting plate to space and center the canopy  

in the cabinet. Align the bottom of the canopy with the 

bottom of the cabinet. Install four 4.2 x 19 mm screws into 

the round mounting plate openings and tighten all eight 

mounting screws.

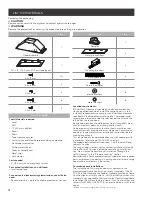
3  (For some installations): 

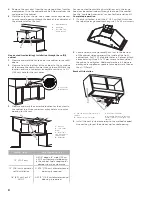
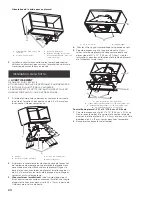
A filler strip may be required 

for some cabinets.Install a filler strip and secure with two 

4.5 x 13 mm screws from inside the front of the hood liner 

assembly.

B

A

A.   Screws: 4.5 x 13 mm

B.   Filler strip

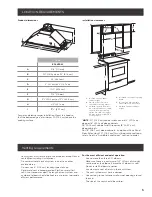
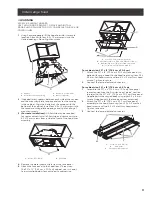
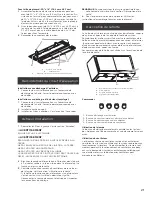
Remove the metal grease filters from the face panel.

Attach the face panel to the hood liner. (Three sizes: 

The 30” x 12” [76.2 cm x 30.5 cm] cabinet size is shown.) 

See instruction below for your specific cabinet size.

A

B

C

D

A.  Screws: 3.5 x 9.5 mm flat-head (4)

B.  Face plate (30” x 12” [76.2 cm x 30.5 cm] shown)

C.  Cabinet (30” x 12” [76.2 cm x 30.5 cm] shown

D.  Screws: 4.2 x 15 mm truss-head (2)

For cabinet size: 30” x 12” (76.2 cm x 30.5 cm)

Attach the 30” x 12” (76.2 cm x 30.5 cm) face panel (su-

pplied with range hood) to the hood liner using four 3.5 x 

9.5 mm flat-head screws and two 4.2 x 15 mm truss head 

screws. Tighten to secure.

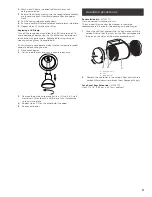
Connect the lamp electrical connector.

For cabinet size: 30” x 18” (76.2 cm x 45.7 cm)

Assemble the 30” x 6” (76.2 cm x 15.2 cm) face panel 

rear extension (see the “Assistance or Service” section 

to order) to the 30” x 12” (76.2 cm x 30.5 cm) face panel 

(supplied with the range hood) using eight 4.2 x 8 mm 

screws (supplied with the face panel rear extension).

Attach the 30” x 18” (76.2 cm x 45.7 cm) face panel 

assembly to the hood liner using four 3.5 x 9.5 mm flat-

head screws and two 4.2 x 15 mm truss head screws. 

Tighten to secure.

Connect the lamp electrical connector.

A

B

C

A

A. 

Screws: 4.2 x 8 mm (8)
B. 

Face panel

C. 

Face panel rear extension


Summary of Contents for EAS430SS

Page 1: ...d utilisation d entretien et d installation Guía de instalación uso y mantenimiento READ AND SAVE THESE INSTRUCTIONS LISEZ CES INSTRUCTIONS ET CONSERVEZ LES LEA Y CONSERVE ESTAS INSTRUCCIONES LIB0168796 Printed in Mexico 05 20 Model EAS430SS ...

Page 2: ... 12 APPROVED FOR RESIDENTIAL APPLIANCES FOR RESIDENTIAL USE ONLY READ AND SAVE THESE INSTRUCTIONS PLEASE READ ENTIRE INSTRUCTIONS BEFORE PROCEEDING INSTALLATION MUST COMPLY WITH ALL LOCAL CODES IMPORTANT Save these Instructions for the Local Electrical Inspector s use INSTALLER Please leave these Instructions with this unit for the owner OWNER Please retain these instructions for future reference ...

Page 3: ...METAL DUCT WORK Install this hood in accordance with all requirements specified IWARNING To reduce the risk of fire or electric shock do not use this hood with any external solid state speed control device IWARNING TO REDUCE THE RISK OF A RANGE TOP GREASE FIRE a Never leave surface units unattended at high settings Boilovers cause smoking and greasy spillovers that may ignite Heat oils slowly on l...

Page 4: ...d inside the liner behind the filter on the left wall of the range hood Range hood location should be away from strong draft areas such as windows doors and strong heating vents Cabinet opening dimensions that are shown must be used Given dimensions provide minimum clearance Consult your cooktop range manufacturer installation instructions before making any cutouts This range hood is recommended f...

Page 5: ...deep cabinets 36 91 4 cm cabinet width requires 18 45 7 cm deep cabinets For 18 45 7 cm deep cabinets an optional Face Panel Rear Extension 30 76 2 cm must be purchased sepa rately See the Available accessories section to order Venting requirements Vent system must terminate to the outdoors except for no vented recirculating installations Do not terminate the vent system in an attic or other enclo...

Page 6: ...ing a charcoal filter Recirculation Kit is available from the dealer or an authorized parts distributor Through Cabinet Through Soffit A B D E F G I H A B C D E F G A Ceiling B Vent cover C Soffit D 6 15 2 cm vent E Range hood F Cabinet G Wall H 12 30 5 cm min I 17 43 2 cm min vent cover height NOTE 12 30 5 cm high cabinets without soffit may allow the 6 15 2 cm vent and vent coverto be seen Electr...

Page 7: ...RD USE TWO OR MORE PEOPLE TO MOVE AND INSTALL RANGE HOOD FAILURE TO DO SO CAN RESULT IN BACK OR OTHER INJURY 4 Using 2 or more people lift range hood onto covered surface Range hood cabinet cutout 1 Use a saber saw or keyhole saw to cut out the cabinet bottom inside the cabinet frame NOTE Frameless type cabinets require 1 9 cm front lip in the cabinet bottom A 1 9 cm thick filler strip not su ppli...

Page 8: ...5 9 cm x 20 3 cm rectangular opening in the cabinet top is required for damper transition clearance 15 38 1 cm cabinet or soffit installation A 61 4 15 9 cm diameter round opening is required 18 45 7 cm or 24 61 0 A 53 4 14 6 cm diameter round opening is required For non vented recirculating installations only the range hood can be vented indoors through the top of the cabinet See the Available Ac...

Page 9: ...5 Attach the face panel to the hood liner Three sizes The 30 x 12 76 2 cm x 30 5 cm cabinet size is shown See instruction below for your specific cabinet size A B C D A Screws 3 5 x 9 5 mm flat head 4 B Face plate 30 x 12 76 2 cm x 30 5 cm shown C Cabinet 30 x 12 76 2 cm x 30 5 cm shown D Screws 4 2 x 15 mm truss head 2 For cabinet size 30 x 12 76 2 cm x 30 5 cm 1 Attach the 30 x 12 76 2 cm x 30 5...

Page 10: ...ED lamps Controls 1 2 3 4 1 Light On Off button 2 Blower On Off button and speed minimum button 3 Blower speed medium button 4 Blower speed maximum button Operating the light The Light On Off button 1 controls both lights Press once for On and again for Off Operating the blower The Blower Speed buttons turn the blower on and control the blower speed and sound level for quiet operation The speed ca...

Page 11: ...ng service 1 Disconnect power 2 Push up on the lens and turn it counterclockwise 3 Remove the bulb and replace it with a 120 volt 6 5 watt maximum LED bulb with a GU10 base Turn it clockwise to lock it into place 4 Repeat steps 2 3 for the other bulb if needed 5 Reconnect power Available accessories Recirculation kit KIT02770 for non vented installations only The charcoal filters cannot be cleaned...

Page 12: ...e use of corrosive or abrasive cleaning products pads and oven cleaner products WHO IS COVERED This warranty is extended to the original purchaser for products purchased for ordinary residential use in North America Including the United States Guam Puerto Rico US Virgin Islands Canada This warranty is non transferable and applies only to the original purchaser and does not extend to subsequent own...

Page 13: ...ULEMENT LISEZ CES INSTRUCTIONS ET CONSERVEZ LES VEUILLEZ LIRE CES INSTRUCTIONS AU COMPLET AVANT DE COMMENCER L INSTALLATION DE L APPAREIL DOIT RESPECTER TOUS LES CODES EN VIGUEUR IMPORTANT Conservez ces instructions afin de pouvoir les remettre à l inspecteur électricien de votre région INSTALLATEUR Veuillez laisser ces instructions avec l appareil pour le propriétaire PROPRIÉTAIRE Veuillez conser...

Page 14: ... IAVERTISSEMENT Pour réduire les risques d incendie et de choc électrique n utilisez pas cette hotte avec un contrôleur de vitesse à semi conducteurs Installez cette hotte en respectant toutes les exigences mentionnées I ATTENTION Dispositif à commande automatique pour réduire le risque de Blessure Débrancher de l alimentation électrique avant la maintenance IAVERTISSEMENT POUR RÉDUIRE LES RISQUES...

Page 15: ...létique de l appareil La plaque signalétique de l appareil est située derrière le filtre sur la paroi arrière gauche de la hotte Installer la hotte de cuisinière à distance de toute zone exposée à des courants d air comme fenêtres portes et bouches de chauffage Respecter les dimensions indiquées pour les ouvertures à découper dans les placards Ces dimensions tiennent compte des valeurs minimales d...

Page 16: ...panneau avant de 30 76 2 cm Voir la sec tion Assistance ou service pour commander Exigences Concernant l évacuation Le circuit d évacuation doit décharger l air à l extérieur excepté pour les installations sans décharge à l extérieur recyclage Ne pas terminer le circuit d évacuation dans un grenier ou dans un autre espace clos Ne pas utiliser une bouche de décharge murale de 4 10 2 cm normalement ...

Page 17: ...m posants utilisés dans le circuit Composant 6 15 2 cm Coude à 45 2 5 pi 0 8 m Coude à 90 5 0 pi 1 5 m Installation sans décharge à l extérieur recyclage à travers le soffite placard S il n est pas possible d évacuer les fumées et vapeurs de cuisson à l extérieur on peut employer la version sans décharge à l extérieur recyclage de la hotte dotée d un filtre à charbon Ensamble de ltres à charbon Vo...

Page 18: ...per au préalable l ouverture dans le fond du placard 1 Déconnecter la source de courant électrique 2 Déterminer la méthode d évacuation à utiliser décharge à travers le mur ou le toit ou recyclage 3 Choisir une surface plane pour l assemblage de la hotte Placer le matériau de protection sur cette surface I AVERTISSEMENT RISQUE DU POIDS EXCESSIF UTILISER DEUX OU PLUS DE PERSONNES POUR DÉPLACER ET I...

Page 19: ...re pour le passage du conduit d évacuation D A B C A Ouverture B Voir le ta bleau ci dessous C 73 4 19 7 cm entre l axe central et l avant du placard D Axe central Hauteur du placard Taille et forme du trou 12 30 5 cm Une ouverture rectangulaire de 61 4 de profondeur x 8 de largeur 15 9cm x 20 3cm dans le sommet du placard est obligatoire pour établir le dégagement nécessaire au clapet anti reflux...

Page 20: ...lacard Aligner la base de l auvent avec le bas du placard Installer quatre vis de 4 2 x 19 mm dans les trous de la plaque de montage et serrer les huit vis de montage 3 Pour certaines installations Une tringle d appui peut être nécessaire pour certains placards Installer une tringle d appui et la fixer avec deux vis de 4 5 x 13 mm à partir de l intérieur de la caisse de hotte B A A Vis 4 5 x 13 mm...

Page 21: ...trôler le fonctionnement du ventilateur de la hotte et de la lampe Voir la section Utilisation de la hotte Si la hotte ne fonctionne pas déterminer si un disjoncteur s est ouvert ou si un fusible du domicile est grillé Déconnecter la source de courant électrique et inspecter les connections du câblage REMARQUE Pour pouvoir tirer le plus grand parti de la nou velle hotte de cuisinière lire la secti...

Page 22: ...es étapes 1 à 5 pour l autre filtre Remplacement de la lampe à DEL Interrompre l alimentation de la hotte attendre le refroidis sement de la lampe DEL Pour éviter d endommager ou de réduire la longévité de l ampoule neuve ne pas toucher l am poule avec les doigts nus Remplacer l ampoule en la manipu lant avec un mouchoir de papier ou des gants de coton Si les nouvelles lampes ne fonctionnent pas v...

Page 23: ... Usure normale Usure due à une mauvaise utilisation du propriétaire un entretien incorrect une utilisation de substances nettoyantes QUI EST COUVERT Cette garantie s étend à l acheteur original de produits achetés pour un usage domestique habituel en Amérique du Nord Y compris Etats Unis Guam Porto Rico les Iles virgin Américaines le Canada Cette garantie n est pas transférable et vaut uniquement ...

Page 24: ......
Page 25: ...DE USO DOMÉSTICO SÓLO PARA USO DOMÉSTICO LEA Y GUARDE ESTAS INSTRUCCIONES ANTES DE CONTINUAR LEA LAS INSTRUCCIONES POR COMPLETO LA INSTALACIÓN DEBE CUMPLIR TODA LA NORMATIVA LOCAL IMPORTANTE Guarde estas instrucciones para su uso por parte del inspector de electricidad local INSTALADOR Entregue al propietario estas instrucciones junto con la unidad PROPIETARIO Conserve estas instrucciones para fut...

Page 26: ...cine a una temperatura alta o cuando realice flameados por ejemplo Crepas Suzette cerezas flameadas ternera a la pimienta flameada c Limpie con frecuencia los ventiladores No permita que la grasa se acumule en el ventilador o filtro d Utilice un tamaño de sartén adecuado Utilice siempre piezas de batería de cocina adecuadas al tamaño del elemento de superficie I ADVERTENCIA PARA REDUCIR EL RIESGO ...

Page 27: ...eantes las cuales pueden encenderse Caliente los aceites lentamente y con ajustes bajos o medios Siempre ENCIENDA LA CAMPANA cuando cocine Limpie los filtros anti grasa con frecuencia al menos cada 2 meses No permita que se acumule la grasa en el filtro Aplica para filtros de aluminio Se recomienda cambiar los filtros de carbón cada 6 meses ver números de parte en pág 21 No flamear alimentos bajo ...

Page 28: ...ión estufa antes de hacer cualquier corte Se requiere un enchufe eléctrico con conexión a tierra Consulte la sección Requisitos eléctricos La campana para cocina se ha ajustado de fábrica para las instalaciones con ventilación a través del techo o de la pared Para ver la instalación sin ducto de escape con recirculación consulte Instalación sin ducto de escape con recirculación a través del sofito...

Page 29: ...la cubierta El tamaño del ducto de escape debe ser uniforme Instalaciones en climas fríos Como parte del sistema de ventilación se deberá instalar una compuerta de contratiro adicional para minimizar el flujo de aire frío hacia atrás y un dispositivo de interrupción térmico para reducir la conducción de las temperaturas exteriores La compuerta deberá estar en el lado del aire frío del dispositivo ...

Page 30: ... East Pleasant Valley Road Cleveland Ohio 44131 5575 Se necesita un circuito eléctrico de 120 voltios 60 hertzios CA solamente de 15 ó 20 amperios y protegido con fusibles También se recomienda usar un fusible retardador o un cortacircuitos Asimismo se recomienda el uso de un circuito independiente que preste servicio únicamente a esta campana para cocina Esta campana para cocina viene equipada co...

Page 31: ... espesor para la parte inferior del gabinete E Frente del gabinete 2 Complete la preparación del gabinete siguiendo las instrucciones para el tipo de ventilación que ha elegido Determine los cortes para el ducto de ventilación en el gabinete pared o techo Ventilación hacia el exterior a través del techo 1 Mida y marque las líneas como se muestra Use una sierra para hacer una apertura a través de l...

Page 32: ...diámetro Para instalaciones sin ventilación recirculación la campana extractora puede ventilarse en interiores a través de la parte superior del gabinete Consulte en la sección Accesorios el Kit recirculante Complete la preparación 1 Si aún no está sujeto instale la transición de 6 15 2 cm a la parte superior de la campana usando 2 tornillos de 3 5 x 9 5 mm 2 Ubique el soporte de montaje lateral a...

Page 33: ...te de 30 x 12 76 2 cm x 30 5 cm Consulte las instrucciones a continuación para conocer el tamaño de su gabinete específico A B C D A 4 tornillos de 3 5 x 9 5 mm B Panel frontal en imagen 30 x 12 76 2 cm x 30 5 cm C Cabinet en imagen 30 x 12 76 2 cm x 30 5 cm shown D 2 tornillos de 4 2 x 15 mm Para gabinete de 30 x 12 76 2 cm x 30 5 cm Fije el panel frontal de 30 x 12 76 2 cm x 30 5 cm sum inistrad...

Page 34: ...locidad mínima del motor 3 Botón de la velocidad media del motor 4 Botón de la velocidad máxima del motor Funcionamiento de la luz El botón de encendido apagado de la luz 1 controla ambas luces Presione una vez encendido y nuevamente para apagado Funcionamiento del motor Los botones de velocidad del ventilador encienden el ventila dor y controlan su velocidad y nivel de sonido para un funcio namie...

Page 35: ...adas correctamente antes de llamar al servicio técnico 1 Desconecte la energía 2 Empuje hacia arriba la bombilla y gírela en sentido contra reloj 3 Retire la bombilla y reemplácela con una bombilla LED de 120 V y 6 5 W como máximo con una base GU10 Gírelo en sentido horario para bloquearlo en su lugar 4 Repita los pasos 2 3 para la otra bombilla si es necesario 5 Reconecte la energía Accesorios Ki...

Page 36: ... usuario mantenimiento inadecuado uso de productos toallas de limpieza corrosivos o abrasivos y por uso de limpiadores para hornos QUIÉN ESTÁ CUBIERTO Esta garantía se extiende al comprador original de productos adquiridos para uso residencial en Norte América incluyendo Estados Unidos Guam Puerto Rico Islas Vírgenes de EU y Canadá Esta garantía no es transferible y aplica solamente al comprador o...

Reviews: