11
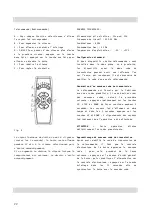
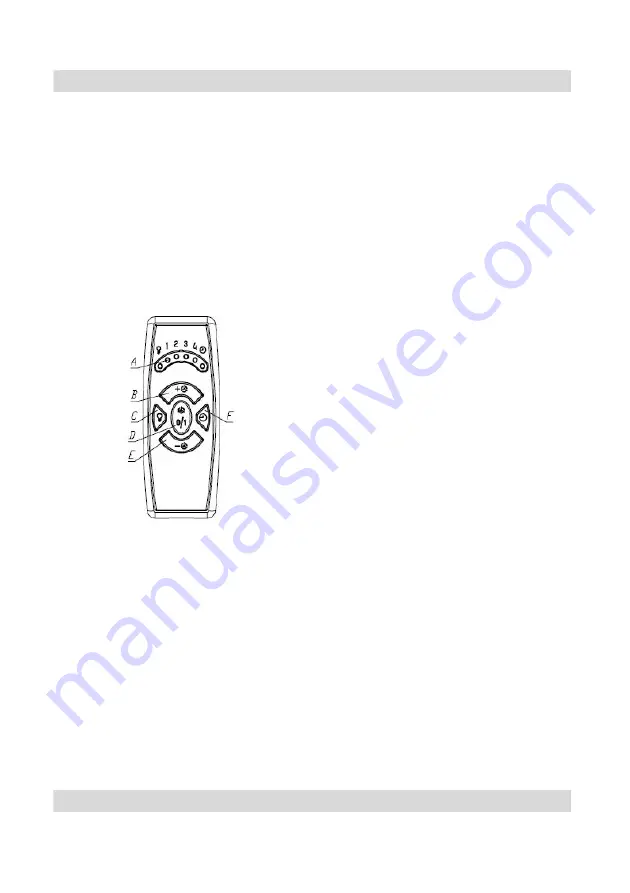
Remote control
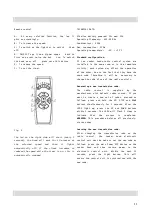
A: At every selected function, the led li
ghts on accordingly.
B: To increase the speed.
C: To switch on the lights or to switch them
off.
D: ON/OFF To go from a higher speed back to
first one press twice the but ton: To switch
the hood on or off press once this button.
E: To reduce the speed.
F: To set the timer.
fig. 4
The led on the right side will start (every 5
seconds), the hood will work for 10 minutes at
the selected speed and then it lights
automatically off. If the client increases or
reduced the speed while the timer is on, this is
automatically stopped.
TECHNICAL DATA:
Alkaline battery powered: 12v mod. 23A
Operating frequency: 433.92 Mhz
Combinations: 4096
Max. consumption: 25Ma
Operating temperature: -20° : +55°C
Standard configuration.
If two cooker hoods-radio control system are
installed in the same room or in the immediate
vicinity, each system may affect the operation
of the other, due to the fact that they have the
same code. Therefore it will be necessary to
change the code of one of the radio controls.
Generating a new transmission code.
The radio control is supplied by the
manufacturer with default codes stored. If you
want to create a new set of codes, proceed as
follows: press and hold the UP, STOP and DOWN
buttons simultaneously for 2 seconds. After the
LEDS light up, press the UP and DOWN buttons
within 5 seconds. The LEDS will flash 3 times to
indicate that the process is completed.
WARNING:
This procedure deletes all previously-
stored codes.
Learning the new transmission code.
After changing the transmission code on the
radio control, the cooker hood electronic
control unit must be made to set the new code as
follows: press the main Power Off button on the
cooker hood and then restore power to the
electronic control unit. Within the next 15
seconds, press the Light button. This will
ensure the control unit is synchronized with the
new code.
Summary of Contents for ESNX43S1
Page 2: ...2 ...
Page 36: ...LIB0142425A Ed 10 18 ...


