background image

9

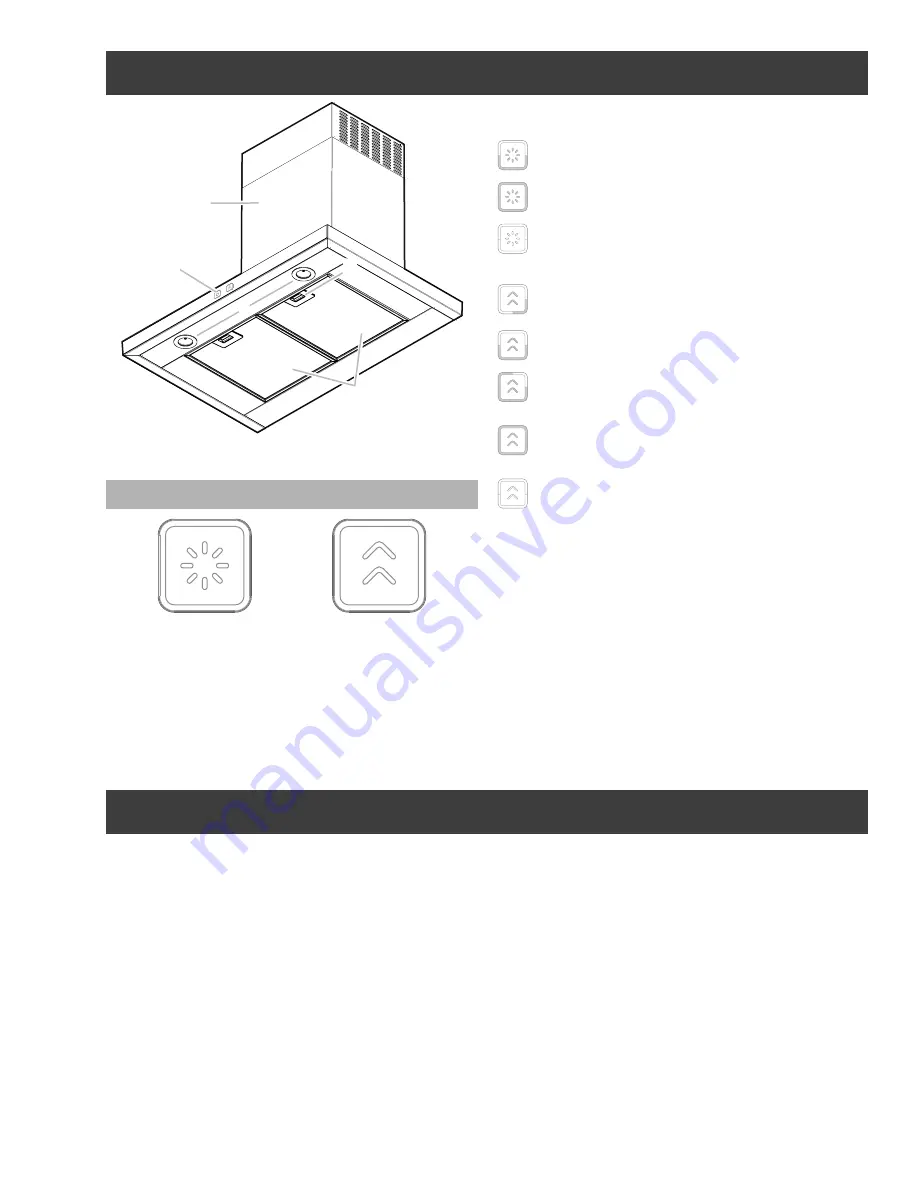
Description of the Hood

3

4

2

5

1

A. Blower and light controls

B. LED lamps

C. Grease filter handle

D. Grease filter

E. Canopy

F. Duct covers

Control

A

B

A. Light button

B.  Blower button

Operating the light

The Light On/Off button (A) controls both lights. 

Press once for turning On soft light and the button sun 

icon lightens with the bottom half of the edge slightly. 

Press again for regular light and the button will be 

completely illuminated.

Press a third time to turn Off the light, the whole 

button light turns off.

Operating the blower

Press the button (B) to turn On the hood on low 

speed, the icon and right low corner of the edge on 

button will be illuminated.

Press a second time for medium speed, the icon and 

the lower half of the edge on the button enlightens.

Press again to high speed and ¾ of the edge on the 

button will illuminate.

Press the button a fourth time to activate Boost 

speed for five minutes (the full icon and edge will be 

illuminated) and then, automatically switch to high 

speed.

Press the button a fifth time to turn Off the blower and 

button lights.

Change light color

With lights and motor turned Off, press and hold light button 

for 3 sec, both buttons will fully illuminate on the current light 

color. The buttons can be used to select desired color (Light 

<< button backwards, Blower button forward >>)

Available light colors are white (default color), blue, green or 

red. To set color, choose one and press both buttons at the 

same time.

Sound

To enter sound mode, with lights and motor turned Off 

press both buttons at the same time and the upper left 

corner of the light button will illuminate with white light. The 

buttons can be used to select desired sound (Light <<button 

backwards, Blower button forward>>).

Available feedback sounds are regular beep, soft beep and 

mute. As the regular and soft beep are selected, the hood 

will reproduce each sound. When mute is selected, upper left 

corner of the light button will illuminate with red light. To set 

sound, choose one and press both buttons at the same time.

CFM Reduction System

Before operating your hood: 

Some States and Provinces of the US & Canada restrict the

maximum exhausting airflow of range hoods. 

Airflow is measured as cubic feet per minute (CFM). 

These maximum levels allowed are detailed in the local code 

of your area. Please check local codes to find out if you need 

to restrict the maximum airflow of your hood. If your local 

code mandates a maximum airflow level below the maximum 

airflow of this hood (i.e. 400 CFM), please execute the 

procedure below to reduce the maximum airflow. 

With blower and light turned Off

• Press and hold both buttons at the same time for 3 sec 

you will hear a beep and the icon lights (no edge) will 

illuminate for 3 seconds. 

• This action will disable speed 4 and effectively lower the 

maximum airflow to > 300 CFM.

• Locate the CFM certification sticker in the hardware pack.

• Peel and Affix this sticker to a visible area in the blower.This 

sticker provides official certification to your local inspector 

that this hoods maximum airflow has been reduced to > 

300 CFM.

Indicators of filter saturation:

At regular time intervals, the hood indicates the need of 

performing filter maintenance.

Blower button icon blink (no edge):

Perform grease filter maintenance.

Light button blink (no edge):

Perform activated charcoal filter maintenance.

Reset of filter saturation indicators:

With blower Off press and hold the blower button for 3 sec.

Activation of saturation indicator activated charcoal filter:

NOTE:

 This operation must be performed with the hood off.

This indicator is normally deactivated; press and hold the 

blower button for 3 sec. to activate the function: the button 

blinks for 1 sec.

To deactivate the function, press and hold the blower button 

for 3 sec., the button blinks for half a sec.

Summary of Contents for ETB430S3

Page 1: ...lisation d entretien et d installation Guía de instalación uso y mantenimiento READ AND SAVE THESE INSTRUCTIONS LISEZ CES INSTRUCTIONS ET CONSERVEZ LES LEA Y CONSERVE ESTAS INSTRUCCIONES LIB0176920 Printed in Mexico 11 21 Models ETB430S3 ETB436S3 ...

Page 2: ...ese instructions for future reference Safety Warning Turn off power circuit at service panel and lock out panel before wiring this appliance Requirement 120 V AC 60 Hz 15 or 20 A Branch Circuit ENGLISH 2 Important Safety Notice 3 Electrical Installation Requirements 4 Product Dimentions 4 List of Materials 5 Supplied Parts 5 Partos not supplied 5 Ducting Options 6 Ducting version 6 Ductless Recirc...

Page 3: ...ce IWARNING TO REDUCE THE RISK OF A RANGE TOP GREASE FIRE a Never leave surface units unattended at high settings Boilovers cause smoking and greasy spillovers that may ignite Heat oils slowly on low or medium settings b Always turn hood ON when cooking at high heat or when flambeing food I e Crepes Suzette Cherries Jubilee Peppercorn Beef Flambe c Clean ventilating fans frequently Grease should n...

Page 4: ... box Copies of the standards listed may be obtained from National Fire Protection Association Batterymarch Park Quincy Massachusetts 02269 CSA International 8501 East Pleasant Valley Road Cleveland Ohio 44131 5575 BEFORE INSTALLING THE HOOD 1 For the most efficient air flow exhaust use a straight run or as few elbows as possible CAUTION Vent unit to outside of building only 2 At least two people a...

Page 5: ...ing template 1 Partos not supplied Tools Materials required Level Drill 11 4 3 2 cm 1 8 3 2 mm and 1 16 4 8 mm drill bits Pencil Wire stripper or utility knife Tape measure or ruler Pliers Caulking gun and weatherproof caulking compound Jigsaw or keyhole saw Metal snips Screwdrivers Flat blade Phillips Parts needed Home power supply cable 1 12 7 mm UL listed or CSA approved strain relief 3 UL list...

Page 6: ...ttom is at least 30 76 2 cm above the cooking surface For electric induction cooktop range installations Mount the hood so the bottom is at least 24 61 cm above the cooking surface There is no maximum mounting height however we recom mend mounting the hood no greater than 36 91 4 cm above the cooking surface For every inch 2 54 cm above 36 91 4 cm fume and moisture capture efficiency diminishes at...

Page 7: ...here must be enough conduit and wires from the fused disconnect or circuit breaker box to make the connection in the hood s electrical terminal box NOTE Do not reconnect power until installation is complete 4 Use caulk to seal all openings Install Range Hood Connect Vent System 1 Install transition on top of hood if removed for shipping with 2 3 5 x 9 5 mm sheet metal screws A B A Vent transition ...

Page 8: ...onnect green or bare ground wire from home power supply to yellow green ground wire F in terminal box using UL listed wire connectors 8 Tighten strain relief screw 9 Install terminal box cover 10 Check that all light bulbs are secure in their sockets 11 Reconnect power Install duct covers When using both upper and lower vent covers push lower cover down onto hood and lift upper cover to ceiling an...

Page 9: ...he regular and soft beep are selected the hood will reproduce each sound When mute is selected upper left corner of the light button will illuminate with red light To set sound choose one and press both buttons at the same time CFM Reduction System Before operating your hood Some States and Provinces of the US Canada restrict the maximum exhausting airflow of range hoods Airflow is measured as cub...

Page 10: ...tering capacity To remove the grease filter pull the spring release handle A Spring handle release A Replacing a LED Lamp The LED lights are replaceable by a service technician only See Who to contact section in the warranty for service contact information Charcoal Filter If the model is not vented to the outside the air will be recirculated through disposable charcoal filters that help remove smo...

Page 11: ...d for ordinary residential use in North America Including the United States Guam Puerto Rico US Virgin Islands Canada This warranty is non transferable and applies only to the original purchaser and does not extend to subsequent owners of the product This warranty is made expressly in lieu of all other warranties expressed or implied including but not limited to any implied warranty of merchantabi...

Page 12: ...AIRE Veuillez conserver ces instructions pour pouvoir vous y référer plus tard Avertissement de sécurité Coupez l alimentation du circuit dans le panneau électrique et verrouillez le panneau avant de raccorder les fils de cet appareil Exigence 120 V c a 60 Hz circuit de dérivation de 15 V c a 20 Hz de 15 ou 20 A Avis de Sécurité Important 13 Exigences électriques et d installation 14 Dimensions du...

Page 13: ...trique avant la maintenance I AVERTISSEMENT POUR RÉDUIRE LES RISQUES D INCENDIE DE GRAISSE SUR LES CUISINIÈRES a Ne laissez jamais la cuisinière sans surveillance lorsqu elle est réglée à une haute température Les débordements par bouillonnement causent de la fumée et des débordements de gras qui peuvent s enflammer Faites chauffer l huile lentement à une température basse ou moyenne b Faites touj...

Page 14: ...exemplaire des normes indiquées en vous adressant à La National Fire Protection Association Batterymarch Park Quincy Massachuse tts 02269 La CSA International 8501 East Pleasant Valley Road Cleveland Ohio 44131 5575 AVANT D INSTALLER LA HOTTE 1 Pour assurer la ventilation la plus efficace possible installez la conduite en ligne droite ou avec le moins de coudes possibles ATTENTION La sortie de la ...

Page 15: ... 4x8 mm 4 Bride de support du cache conduit 1 Adaptateur Torx 10 1 5x45 mm 6 Pièces non fournies Outils nécessaires Niveau Perceuse avec forets de 1 3 2 cm 1 8 3 2 mm y 1 16 4 8 mm Crayon Pince à dénuder ou couteau utilitaire Mètre ruban ou règle Pince Pistolet à calfeutrage et composé de calfeutrage résistant aux intempéries Brides de conduit Scie sauteuse ou scie à guichet Cisaille de ferblantie...

Page 16: ...tte de sorte que le rebord inférieur est pas moins de 24 61 cm sur la surface de cuisson Il est recommandé d installer cette hotte plus de 36 91 4 cm au dessus de la surface de cuisson Par pouce 2 54 cm supérieure à 36 91 4 cm diminuera l efficacité de la capture de la fumée et de l humidité et la performance de ventilation S IL VOUS PLAÎT LIRE L INSTALLATION POUR UNE INSTALLATION SPÉCIFIQUE Avant...

Page 17: ...conducteurs soit suffisante depuis le tableau de distribution avec fusibles ou disjoncteurs pour réaliser le raccordement dans le boîtier de connexion de la hotte REMARQUE Ne pas mettre le système sous tension avant d avoir complètement terminé l installation 4 Utiliser un calfeutrant pour assurer l étanchéité au niveau de chaque ouverture Installation de la hotte Raccordement du circuit d évacuat...

Page 18: ...nnecteurs de fils homologation UL I AVERTISSEMENT RISQUE DE CHOC ÉLECTRIQUE I AVERTISSEMENT DÉCONNECTER LA SOURCE DE COURANT ÉLECTRIQUE AVANT L ENTRETIEN REPLACER PIÈCES ET PANNEAUX AVANT DE FAIRE LA REM ISE EN MARCHE LE NON RESPECT DE CES INSTRUCTIONS PEUT CAUSER UN DÉCÈS OU UN CHOC ÉLECTRIQUE 7 À l aide des connecteurs de fils homologation UL connecter le conducteur de liaison à la terre vert ou...

Page 19: ...Appuyez une deuxième fois pour la vitesse moyenne l icône et la moitié inférieure du bord sur le bouton s allument Appuyez une nouvelle fois sur le bouton pour la vitesse élevée et les du bord sur le bouton s allument Appuyez une quatrième fois sur le bouton pour activer la vitesse Boost pendant cinq minutes l icône et le bord complet s illuminent puis passez automatiquement à la vitesse élevée Ap...

Page 20: ...e l indicateur de saturation du filtre à charbon actif NOTE Cette opération doit être effectuée avec la hotte éteinte Cet indicateur est normalement désactivé pour activer la fonction appuyez sur le bouton de soufflage pendant 3 secondes le bouton clignote pendant 1 seconde Pour désactiver la fonction appuyez sur le bouton de soufflage pendant 3 secondes le bouton clignote pendant une demi seconde...

Page 21: ...EMARQUE NE PAS rincer ou mettre les filtres à charbon au lave vaisselle REMARQUE Les filtres à charbon NE sont PAS inclus dans la hotte Ils doivent être commandés chez votre revendeur Commander le kit nécessaire en spécifiant votre modèle de hotte et sa largeur Placement du filtre au charbon Accessoires de recyclage d air Placer le matelas du filtre au charbon sur le côté supérieur de chaque filtr...

Page 22: ...our un usage domestique habituel en Amérique du Nord Y compris Etats Unis Guam Porto Rico les Iles virgin Américaines le Canada Cette garantie n est pas transférable et vaut uniquement pour l acheteur original et ne s étend pas aux propriétaires successifs du produit Cette garantie vaut expressément en lieu et place de toute autre garantie expresse ou sous entendue mais ne limite pas toute autre g...

Page 23: ...tas instrucciones para futuras consultas Advertencia de seguridad Antes de realizar el cableado de este aparato desactive el circuito de energía eléctrica en el panel de servicio y desbloquee el panel Requisito Circuito auxiliar de 120 V AC 60 Hz 15 ó 20 A Aviso de Seguridad Importante 24 Requisitos eléctricos y de instalación 25 Dimensiones del producto 25 Lista de materiales 26 Métodos de ventil...

Page 24: ...ego o descarga eléctrica no utilice esta campana con ningún dispositivo externo en estado sólido para el control de la velocidad I ADVERTENCIA PARA REDUCIR EL RIESGO DE INCENDIO OCASIONADO POR GRASA a No deje nunca ninguna unidad externa desatendida y con valores de fuego altos La cocción puede causar humo o reboses de grasa que pueden prender fuego Caliente el aceite a fuego lento o medio b Limpi...

Page 25: ...ias de los estándares enumerados en National Fire Protection Association Batterymarch Park Quincy Massachusetts 02269 CSA International 8501 East Pleasant Valley Road Cleveland Ohio 44131 5575 ANTES DE INSTALAR LA CAMPANA 1 Para obtener una circulación del flujo de aire más eficaz utilice un tubo de tramo recto o el menor número posible de tubos acodados PRECAUCIÓN el conducto de ventilación solam...

Page 26: ...mientas Materiales necesarios Nivel Taladro con brocas de 1 3 2 cm 1 8 3 2 mm y 1 16 4 8 mm Lápiz Pelacables o cuchillo de uso general Cinta de medir o regla Pinzas Pistola para calafateo y masilla para calafateo a prueba de agua Abrazaderas para ducto de ventilación Sierra de vaivén o sierra caladora Tiijeras de hojalatero Destornilladores Phillips De hoja plana Partes necesarias Cable de aliment...

Page 27: ...e que existe el espacio libre adecuado en el techo o muro para la expulsión del aire I PRECAUCIÓN Para la instalación de estufas de gas instale esta campana de tal manera que la cornisa inferior se encuentre a 30 76 2 cm sobre la superficie de cocción Para la instalación de estufas eléctricas inducción instale esta campana de tal manera que la cornisa Inferior se encuentra a no menos de 24 61 cm s...

Page 28: ...ineado con el techo usando 2 tornillos de 5 x 45 mm A C B A Techo B Pared C Línea central Complete la operación 1 Determine y haga todos los cortes necesarios en la pared para el sistema de ventilación Instale el sistema de ventilación antes de instalar la campana Vea la sección Requisitos de ventilación 2 Determine la altura necesaria para el cable de suministro eléctrico de la casa y taladre un ...

Page 29: ... 1 Desconecte el suministro de energía 2 Retire la caja de terminales 3 Quite el precorte removible que está en la caja de terminales e instale un protector de cables de 1 2 que esté en la lista de UL o esté aprobado por CSA B A Precorte removible B Cubierta de la caja de terminales A 4 Haga pasar el cableado de suministro de energía doméstico a través del protector de cables dentro de la caja de ...

Page 30: ...l filtro de metal para grasa Consulte la sección Mantenimiento Instale los filtros de metal Consulte la sección Mantenimiento Si la campana extractora no funciona Compruebe que el disyuntor no está disparado o que el fusible de la casa está fundido Desconecte la alimentación eléctrica Compruebe que el cableado es correcto Para obtener un uso más eficaz de su nueva campana de cocina lea la sección ...

Page 31: ...n funcionamiento su campana Algunos estados y provincias de Estados Unidos y Canadá restringen el el flujo de aire máximo de las campanas extractoras El flujo de aire se mide en pies cúbicos por minuto CFM Estos niveles máximos permitidos se detallan en el código local de su zona Por favor compruebe los códigos locales para saber si es necesario restringir el flujo de aire máximo de su campana Si ...

Page 32: ...rasa metálico puede desteñirse pero sus características de filtrado no cambian absolutamente Para desmontar el filtro antigrasa tirar de la manija de desenganche de muelle A A Manija de desenganche Reemplazo de las lámparas LED Las luces LED son reemplazables sólo por un técnico de servicio Vea la sección A quién contactar para la información de contacto del servicio Filtro de carbón Si el modelo ...

Page 33: ...hornos QUIÉN ESTÁ CUBIERTO Esta garantía se extiende al comprador original de productos adquiridos para uso residencial en Norte América incluyendo Estados Unidos Guam Puerto Rico Islas Vírgenes de EU y Canadá Esta garantía no es transferible y aplica solamente al comprador original y no se extiende a propietarios subsecuentes del producto Esta garantía se expresa en lugar de otras garantías expre...

Page 34: ......

Page 35: ......

Page 36: ......

Reviews: