background image

7

Installation

Prepare location

•  It is recommended that the vent system be installed before 

hood is installed.

•  Before making cutouts, make sure there is proper clearance 

within the ceiling or wall for exhaust vent.

•  Check your ceiling height and the hood height maximum 

before you select your hood.

Disconnect power.

Determine which venting method to use: roof, wall, or 

nonvented.

Select a flat surface for assembling the range hood. 


Place covering over that surface.


I        

WARNING

TO REDUCE THE RISK OF FIRE, ELECTRIC SHOCK, OR 

INJURY TO PERSONS, OBSERVE THE FOLLOWING. 

Using 2 or more people, lift range hood onto covered 


surface. 


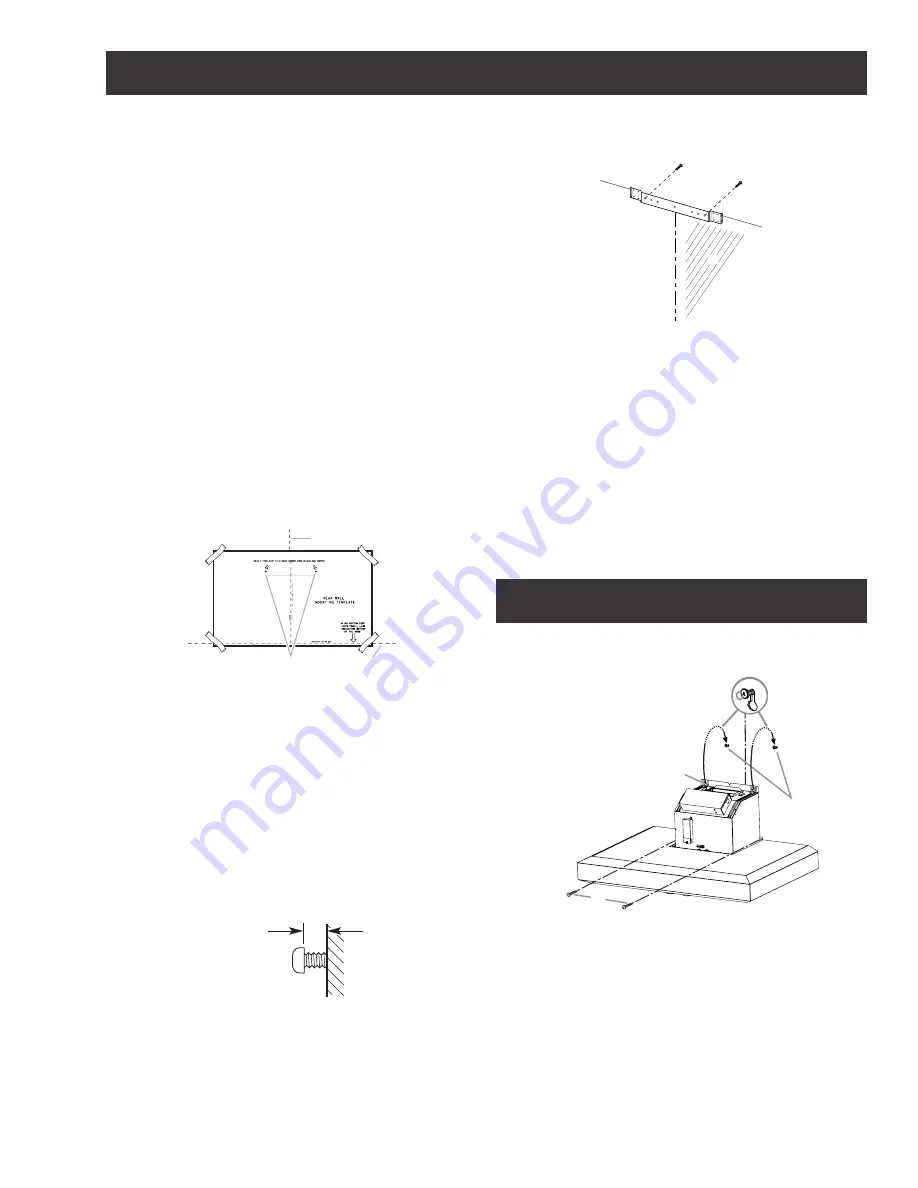
Mounting the duct cover bracket

Determine and mark the centerline on the wall where the 

canopy hood will be installed. Disconnect power.

Mark a reference line on the wall.

Tape template in place, aligning the template centerline 

and bottom of template with hood bottom line and with 

the centerline marked on the wall.

A

C

B

A. 

Centerline 

B. 

Fastener locations

C. 

Mounting height reference (hood bottom line)

Mark centers of the fastener locations through the  

template to the wall. 

IMPORTANT: 

All screws must be installed into wood.  

If there is no wood to screw into, additional wall framing 

supports may be required.

Remove the template.

Drill 

3

16

” (4.8 mm) pilot holes at all locations where screws 

are being installed into wood.

Install the 2 - 5 x 45 mm mounting screws. Leave a 

1

4

”  

(6.4 mm) gap between the wall and the back of the screw 

head to slide range hood into place.

1

4

(6.4 mm)

Vent cover bracket installation

Attach vent cover bracket to wall flush to the ceiling using 

2 - 5 x 45 mm screws.

A

C

B

A.  Ceiling

B.  Wall

C.  Centerline

Complete preparation

Determine and make all necessary cuts in the wall for the 

vent system. Install the vent system before installing the  

hood. See “Venting Requirements” section.

Determine the required height for the home power supply 

cable and drill a 1¼” (3.2 cm) hole at this location.

Run the home power supply cable according to the  

National Electrical Code or CSA Standards and local codes 

and ordinances. There must be enough ½” conduit and 

wires from the fused disconnect (or circuit breaker) box to 

make the connection in the hood’s electrical terminal box.

NOTE

: Do not reconnect power until installation is complete.

Use caulk to seal all openings.

Install Range Hood

Using 2 or more people, hang range hood on 2 mounting 

screws through the mounting slots on back of hood. 

B

A

C

A.  Mounting screws

B.  Mounting slots

C.  Lower mounting screws

Mark with a pencil the lower mounting holes location.

Uninstall the hood assembly, and drill 

3

16

” (4.8 mm) pilot  

holes at marked locations.

Hang the range hood again on 2 upper mounting screws.

Level the range hood and tighten upper mounting screws.

Install 2 - 5 x 45 mm lower mounting screws and tighten. 

Use the optional wall anchors if needed.

Summary of Contents for EVV636SS

Page 1: ...lisation d entretien et d installation Guía de instalación uso y mantenimiento READ AND SAVE THESE INSTRUCTIONS LISEZ CES INSTRUCTIONS ET CONSERVEZ LES LEA Y CONSERVE ESTAS INSTRUCCIONES LIB0143341 Printed in Mexico 05 18 Models EVV636SS EVV648SS ...

Page 2: ...2 APPROVED FOR RESIDENTIAL APPLIANCES FOR RESIDENTIAL USE ONLY READ AND SAVE THESE INSTRUCTIONS PLEASE READ ENTIRE INSTRUCTIONS BEFORE PROCEEDING INSTALLATION MUST COMPLY WITH ALL LOCAL CODES IMPORTANT Save these Instructions for the Local Electrical Inspector s use INSTALLER Please leave these Instructions with this unit for the owner OWNER Please retain these instructions for future reference Sa...

Page 3: ...te Speed Control Device IWARNING TO REDUCE THE RISK OF A RANGE TOP GREASE FIRE a Never leave surface units unattended at high settings Boilovers cause smoking and greasy spillovers that may ignite Heat oils slowly on low or medium settings b Always turn hood ON when cooking at high heat or when flambeing food I e Crepes Suzette Cherries Jubilee Peppercorn Beef Flambe c Clean ventilating fans frequ...

Page 4: ...ply conduit at the range hood and at the junction box Copies of the standards listed may be obtained from National Fire Protection Association Batterymarch Park Quincy Massachusetts 02269 CSA International 8501 East Pleasant Valley Road Cleveland Ohio 44131 5575 BEFORE INSTALLING THE HOOD 1 For the most efficient air flow exhaust use a straight run or as few elbows as possible CAUTION Vent unit to...

Page 5: ...ion 1 4x8 mm 8 8x40 mm 2 Torx 10 adapter 1 10x60 mm 4 Mounting template 1 Duct cover bracket 1 Parts no supplied Tools Materials required Level Drill 11 4 3 2 cm 1 8 3 2 mm and 1 16 4 8 mm drill bits Pencil Wire stripper or utility knife Tape measure or ruler Pliers Caulking gun and weatherproof caulking compound Jigsaw or keyhole saw Metal snips Screwdrivers Flat blade Phillips Torx 10 Optional a...

Page 6: ...d must be cut then a supporting frame must be constructed Fittings material is provided to secure the hood to most types of walls ceilings However a qualified technician must verify suitability of the materials in accordance with the type of wall ceiling Before making cutouts make sure there is proper clearance within the ceiling or wall for exhaust vent Recommended installation height I CAUTION F...

Page 7: ... being installed into wood 7 Install the 2 5 x 45 mm mounting screws Leave a 1 4 6 4 mm gap between the wall and the back of the screw head to slide range hood into place 1 4 6 4 mm Vent cover bracket installation 1 Attach vent cover bracket to wall flush to the ceiling using 2 5 x 45 mm screws A C B A Ceiling B Wall C Centerline Complete preparation 1 Determine and make all necessary cuts in the ...

Page 8: ... install a UL listed or CSA approved 1 2 strain relief A B C A Knockout B Junction box cover C Junction box cover screws 4 Run home power supply cable through strain relief into terminal box A B C F E D A Home power supply cable B UL listed or CSA approved strain relief C Black wires D UL listed wire connectors E White wires F Green or bare and yellow green ground wires 5 Use UL listed wire connec...

Page 9: ...Upper vent cover B Lower vent cover C 4 x 8 mm screws D Bracket Secure the bottom of the duct with 2 4 x 8 mm screws Install metal filters See the Maintenance section To get the most efficient use from your new range hood read the maintenance section Keep your Use Care and Installation Guide close to range hood for easy reference Description of the hood 5 1 4 3 2 1 Blower and light controls 2 LED ...

Page 10: ... is detected in the control area When the blower switch is in the Off position this sensor will turn the blower to high speed when necessary When the heat decreases the blower will turn off When the blower switch is in the On position the heat sensor is not active and the range hood functions normally Control The range hood is designed to remove smoke cooking vapors and odors from the cooktop area...

Page 11: ...ot detergent solution to clean 4 Reinstall filters grasp filter handles and place front edge of filter into the hood 5 Push up on the back handle and set rear of filter into the drip tray to secure Repeat for each filter A A Grease filter Replacing a LED Lamp Turn off the range hood and allow the LED lamp to cool To avoid damage or decreasing the life of the new lamp do not touch lamp with bare fin...

Page 12: ...h Wear to finish due to operator abuse improper maintenance use of corrosive or abrasive cleaning products pads and oven cleaner products WHO IS COVERED This warranty is extended to the original purchaser for products purchased for ordinary residential use in North America Including the United States Guam Puerto Rico US Virgin Islands Canada This warranty is non transferable and applies only to th...

Page 13: ...CES INSTRUCTIONS ET CONSERVEZ LES VEUILLEZ LIRE CES INSTRUCTIONS AU COMPLET AVANT DE COMMENCER L INSTALLATION DE L APPAREIL DOIT RESPECTER TOUS LES CODES EN VIGUEUR IMPORTANT Conservez ces instructions afin de pouvoir les remettre à l inspecteur électricien de votre région INSTALLATEUR Veuillez laisser ces instructions avec l appareil pour le propriétaire PROPRIÉTAIRE Veuillez conserver ces instru...

Page 14: ...ISSEMENT POUR RÉDUIRE LES RISQUES D INCENDIE DE GRAISSE SUR LES CUISINIÈRES a Ne laissez jamais la cuisinière sans surveillance lorsqu elle est réglée à une haute température Les débordements par bouillonnement causent de la fumée et des débordements de gras qui peuvent s enflammer Faites chauffer l huile lentement à une température basse ou moyenne b Faites toujours fonctionner la hotte lorsque v...

Page 15: ...t à la boîte de jonction AVANT D INSTALLER LA HOTTE 1 Pour assurer la ventilation la plus efficace possible installez la conduite en ligne droite ou avec le moins de coudes possibles ATTENTION La sortie de la conduite de ventilation doit donner sur l extérieur 2 Deux personnes sont nécessaires pour effectuer l installation 3 La quincaillerie fournie permet de fixer la hotte à la plupart des murs e...

Page 16: ... 8 1 4x8 mm 8 8x40 mm 2 Adaptateur Torx 10 1 10x60 mm 4 Gabarit de montage 1 Bride de support du cache conduit 1 Pièces non Fournies Outils nécessaires Niveau Perceuse avec forets de 1 3 2 cm 1 8 3 2 mm y 1 16 4 8 mm Crayon Pince à dénuder ou couteau utilitaire Mètre ruban ou règle Pince Pistolet à calfeutrage et composé de calfeutrage résistant aux intempéries Brides de conduit Scie sauteuse ou s...

Page 17: ...on Ne coupez pas une solive ou un montant à moins qu il soit absolument nécessaire de le faire Si vous devez couper une solive ou un montant vous devez construire un cadre de soutien La quincaillerie fournie permet de fixer la hotte à la plupart des murs et des plafonds Vous devez cependant demander à un technicien qualifié de vérifier la solidité des matériaux selon le type de mur ou de plafond A...

Page 18: ...is où cela est possible Si l on ne peut pas visser les vis de montage de la hotte dans du bois des tasseaux supplémentaires pour accrochage mural seront peut être nécessaires 5 Retirer le gabarit 6 Pour bois percer des avant trous de 3 16 4 8 mm à tous les emplacements de pose des vis dans du bois 7 Pour bois installer les 2 vis de montage de 5 x 45 mm Laisser un espace de 1 4 6 4 mm entre le mur ...

Page 19: ...cle du boîtier de connexion 3 Ôter l opercule arrachable du boîtier de connexion et ins taller un serre câble de homologation UL ou CSA A B C A Opercule arrachable B Couvercle du boîtier de connexion C Vis 4 Acheminer le cordon d alimentation du domicile à travers le serre câble dans le boîtier de connexion A B C F E D A Câble d alimentation électrique du domicile B Serre câble homologation UL ou ...

Page 20: ...érieure du cache conduit C Vis de 4 x 8 mm D Support Fixer le bas du cache conduit avec 2 vis de 4 x 8 mm Achever l installation Pour les installations sans décharge à l extérieur recyclage uniquement installer les filtres à charbon sur le filtre à graisse métallique Voir la section Entretien Installer les filtres métalliques Voir la section Entretien de la hotte REMARQUE Pour pouvoir tirer le plu...

Page 21: ...ur d éclairage sur la position ON pour allumer les lumières 2 Placer le commutateur d éclairage à la position OFF arrêt pour éteindre les lumières Utilisation du ventilateur 1 Tournez le bouton du ventilateur à 1 pour allumer la hotte 2 Tournez le commutateur du ventilateur à la position de vitesse désiré 3 Tournez le commutateur du ventilateur à la position MAX pour mettre la hotte Haut 4 Tournez...

Page 22: ...nstaller le plateau d égouttement à graisse 6 Réinstaller les filtres saisir les poignées du filtre et placer le rebord avant du filtre dans la hotte 7 Pour bien fixer le filtre pousser vers le haut sur la poigné arrière et installer l arrière du filtre dans la plateau d égouttement Répéter pour chaque filtre A A Filtre à graisse Remplacement de la lampe à DEL Interrompre l alimentation de la hott...

Page 23: ...s filtres métalliques ou au charbon et toute autre pièce consommable Usure normale Usure due à une mauvaise utilisation du propriétaire un entretien incorrect une utilisation de substances nettoyantes QUI EST COUVERT Cette garantie s étend à l acheteur original de produits achetés pour un usage domestique habituel en Amérique du Nord Y compris Etats Unis Guam Porto Rico les Iles virgin Américaines...

Page 24: ...CIÓN DEBE CUMPLIR TODA LA NORMATIVA LOCAL IMPORTANTE Guarde estas instrucciones para su uso por parte del inspector de electricidad local INSTALADOR Entregue al propietario estas instrucciones junto con la unidad PROPIETARIO Conserve estas instrucciones para futuras consultas Advertencia de seguridad Antes de realizar el cableado de este aparato desactive el circuito de energía eléctrica en el pan...

Page 25: ...stado sólido para el control de la velocidad I ADVERTENCIA PARA REDUCIR EL RIESGO DE INCENDIO OCASIONADO POR GRASA a No deje nunca ninguna unidad externa desatendida y con valores de fuego altos La cocción puede causar humo o reboses de grasa que pueden prender fuego Caliente el aceite a fuego lento o medio b Encienda siempre la campana cuando cocine a una temperatura alta o cuando realice flamead...

Page 26: ...o use conductos metálicos Deben de cumplirse las regulaciones que se relacionen con la evaluación de la descarga de aire RECOMENDACIONES GENERALES Nunca deje las unidades de superficie sin vigilancia cuando estén en ajustes altos Los derrames por hervor causan salpicaduras grasosas y humeantes las cuales pueden encenderse Caliente los aceites lentamente y con ajustes bajos o medios Siempre ENCIEND...

Page 27: ...na y en la caja de conexiones Se pueden obtener copias de los estándares enumerados en National Fire Protection Association Batterymarch Park Quincy Massachusetts 02269 CSA International 8501 East Pleasant Valley Road Cleveland Ohio 44131 5575 ANTES DE INSTALAR LA CAMPANA 1 Para obtener una circulación del flujo de aire más eficaz utilice un tubo de tramo recto o el menor número posible de tubos a...

Page 28: ...0 mm 2 adaptador Torx 10 1 10x60 mm 4 Plantilla de montaje 1 Soporte de la cubierta del ducto 1 Piezas no suministradas Herramientas Materiales necesarios Nivel Taladro con brocas de 1 3 2 cm 1 8 3 2 mm y 1 16 4 8 mm Lápiz Pelacables o cuchillo de uso general Cinta de medir o regla Pinzas Pistola para calafateo y masilla para calafateo a prueba de agua Abrazaderas para ducto de ventilación Sierra ...

Page 29: ...cesario Si fuera necesario efectuar el corte deberá construirse un marco de soporte Se suministra el material de ajuste necesario para fijar la campana a la mayoría de tipos de muro o techo No obstante un técnico cualificado debe comprobar la idoneidad de los materiales de acuerdo con el tipo de muro o techo Antes de efectuar algún corte asegúrese de que existe el espacio libre adecuado en el tech...

Page 30: ...aladre orificios piloto de 3 16 4 8 mm en todas las ubicaciones donde se vayan a instalar los tornillos en madera 7 Instale los 2 tornillos de montaje de 5 x 45 mm Deje un espacio de 1 4 6 4 mm entre la pared y la parte posterior de la cabeza del tornillo para deslizar la campana de cocina en su lugar 1 4 6 4 mm Instalación del soporte de la cubierta del ducto 1 Sujete el soporte de la cubierta de...

Page 31: ...año medido Deflector Toma de corriente 3 Selle la conexión con las abrazaderas 4 Verifique que las compuertas de contratiro funcionen adecuadamente Conexión Eléctrica Características eléctricas nominales Modelos EVV636SS EVV648SS Voltaje 120 V Potencia 490 W Corriente 4 1 A Frecuencia 60 Hz Potencia Máx de lámparas 2 x 7 5 W Consumo de energía Modo de espera 0 W h Modo de operación 463 5 W h I ADV...

Page 32: ...o conectores de alambres que estén en la lista de UL 8 Apriete el tornillo del protector de cables 9 Instale la cubierta de la caja de terminales 10 Cerciórese de que todos los focos estén seguros en sus portalámparas 11 Reconecte el suministro de energía Instalación de las cubiertas del ducto Cuando use ambas cubiertas del ducto de escape superior e inferior empuje la cubierta inferior hacia abaj...

Page 33: ...D B Control de velocidades del motor Funcionamiento de las lámparas 1 Gire el control a la posición ON para encender las luces 2 Gire el control a la posición OFF para apagar las luces Funcionamiento del motor 1 Gire el control a la posición 1 para encender la campana 2 Gire el control a la velocidad deseada 3 Gire el control a la posición MAX para obtener la máxima potencia de su campana 4 Gire e...

Page 34: ...las graseras en lavaplatos o con solución jabonosa caliente 5 Vuelva a colocar las graseras 6 Reinstale los filtros A A Filtro de grasa Reemplazo de las lámparas LED Apague la campana de cocina y espere a que la lámpara se enfríe Para evitar daños en la nueva lámpara o que se disminuya la vida útil de ésta no toque la lámpara directamente con los dedos descubiertos Reemplace usando algún pañuelo o...

Page 35: ...e consumible Desgaste normal Desgaste terminal debido a abusos del usuario mantenimiento inadecuado uso de productos toallas de limpieza corrosivos o abrasivos y por uso de limpiadores para hornos QUIÉN ESTÁ CUBIERTO Esta garantía se extiende al comprador original de productos adquiridos para uso residencial en Norte América incluyendo Estados Unidos Guam Puerto Rico Islas Vírgenes de EU y Canadá ...

Page 36: ... para uso residencial en Latinoamérica Para cualquier defecto estético se tiene una garantía limitada por treinta 30 días de la fecha de compra del usuario final Esta garantía no es transferible y aplica solamente al comprador original y no se extiende a propietarios subsecuentes del producto Esta garantía se expresa en lugar de otras garantías expresadas o implicadas incluyendo pero no limitada a...

Reviews: