29
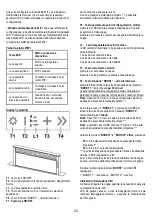
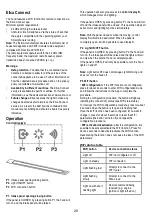
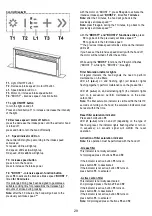
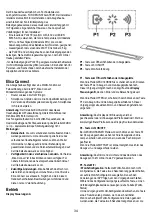
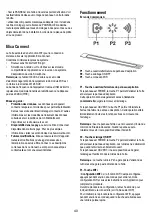
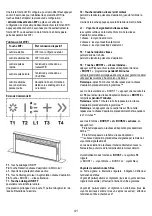
Control Display B
T1.
Light ON/OFF button
T2 .
Decrease intake speed / motor off button
L1.
Speed indicator LED on
T3.
Motor on / increase intake speed button
T4 .
"BOOST” – intensive speed - function button
T1:
Light ON/OFF button
to turn the light on and off.
Press and hold button T1 to increase / decrease the intensity
of the light.
T2:
Decrease speed / motor off button
press the decrease the intake power, until the extractor hood
is turned off.
press and hold to turn the hood off directly.
L1:
Speed indicator LED on
the central LEDs light up according to the intake speed
active/used:
1st speed, LED
a
will light up
2nd speed, LEDs
a+b
will light up
3rd speed, LEDs
a+b+c
will light up
T3: Increase speed button
press to turn the hood on
press to increase the intake power.
T4:
"BOOST” – intensive speed - function button
press
T4
to activate the intensive intake speed “
BOOST 1
”,
timed
for 30 minutes
this prolonged timing has been designed to guarantee a
suitable cooking time for preparations that release high
amounts of smoke during cooking
Note:
after the 30 minutes, the hood will go back to the
previously set intake speed ***
with the motor on “BOOST 1”, press
T4
again to activate the
intensive intake speed “
BOOST 2
”, timed
for 7 minutes
Note:
after the 7 minutes, the hood will go back to the
previously set intake speed ***
Note:
press
T4
again, during the 7 minutes, to go back to the
previously set intake speed ***
with the “
BOOST1” and “BOOST2” functions active
, press:
T2
to go back to the previously set intake speed ***
T3
to go back to the 3rd intake speed
*** the previous intake speed remains visible via the indicator
LEDs
L1
if you have set the intensive speed directly with the hood off,
the motor will be turned off after the set time.
While using the “
BOOST
” functions, the
T4
symbol flashes
(“BOOST 1”: white light - “BOOST 2”: blue light)
Filter Saturation indicator lights
At regular intervals, the hood signals the need to perform
maintenance on the filters.
LED
L1
(a-b-c)
on and flashing light (all indicator lights
flashing together): perform maintenance on the grease filter.
LED
L1
(a-b-c)
on and alternating light (the indicator lights
turn on in sequence): perform maintenance on the active
carbon filter
Note:
The filter saturation indicator is visible within the first 10
seconds on turning on the hood; the saturation indicators must
be reset within this time.
Reset filter saturation indicator:
Press and hold button
T3
LED
L1
(a-b-c)
turns on and off (depending on the type of
filter being reset, the indicator lights flash together or turn on
in sequence); an acoustic signal will confirm the reset
operation.
Activation of filter saturation indicator
Note:
this operation must be performed with the hood off.
- Grease filter
This indicator is normally activated
1st prolonged press of buttons
T3
and
T2
if the indicator is active, button
T3
turns on
press button
T2
, to deactivate it
if the indicator is not active, button
T2
turns on
press button
T3
, to activate it
- Active carbon filter
This indicator is normally deactivated
2nd prolonged press of buttons
T3
and
T2
if the indicator is active, button
T3
turns on
press button
T2
, to deactivate it
if the indicator is not active, button
T2
turns on
press button
T3
, to activate it
Note:
3rd prolonged press of buttons
T3
and
T2
to exit settings menu.
Summary of Contents for GETUP BL MAT/A/90
Page 3: ... M1 M2 a 5 ...
Page 4: ...1 754 862 785 270 2 300 94 303 198 300 110 24 64 82 737 min 749 max ...
Page 5: ... 60 112 850 7 90 90 6 r3 3 A s s P P 864 2 100 ...
Page 6: ... 60 100 850 B P P ø150mm 11 1 11 2 4 3 ...
Page 7: ...5 b FRONT a L 754mm b a a L 64mm L max 20mm M1 M2 ...
Page 8: ...1 2 6 M1 M2 a b ...
Page 9: ...7 M1 M2 3 2X M4x15a 4 ...
Page 10: ...8 M1 M2 ...
Page 11: ...2X ø3 5X9 5 1X ø4 5X16 3X ø3 5X9 5 1X ø4 5X16 2X 90 10 9 2X ...
Page 12: ...11 1 FRONT 8X FRONT FRONT 2 1 ...
Page 13: ...11 2 BACK 8X 8X BACK FRONT BACK 8X 1 2 3 ...
Page 14: ...V Hz 12 13 1 2 3 4 ...
Page 15: ...4X M4X10 4X ø4 5X16 V Hz 14 1 14 2 ...
Page 16: ...15 1 cm2 cm2 Ø 150 mm 16 2 P1 1 2 ...
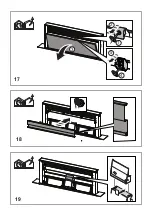
Page 17: ...19 18 17 1 2 3 4 5 ...
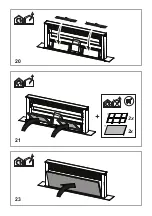
Page 18: ...20 21 23 2x 2x ...
Page 19: ......
Page 189: ...6 21 ...
Page 190: ...5 ...
Page 191: ...4 ...
Page 192: ...3 2 5 ...
Page 193: ...2 ...
Page 194: ...1 ...
Page 195: ......
Page 196: ...LIB0163215 Ed 10 20 ...


