7
Installation
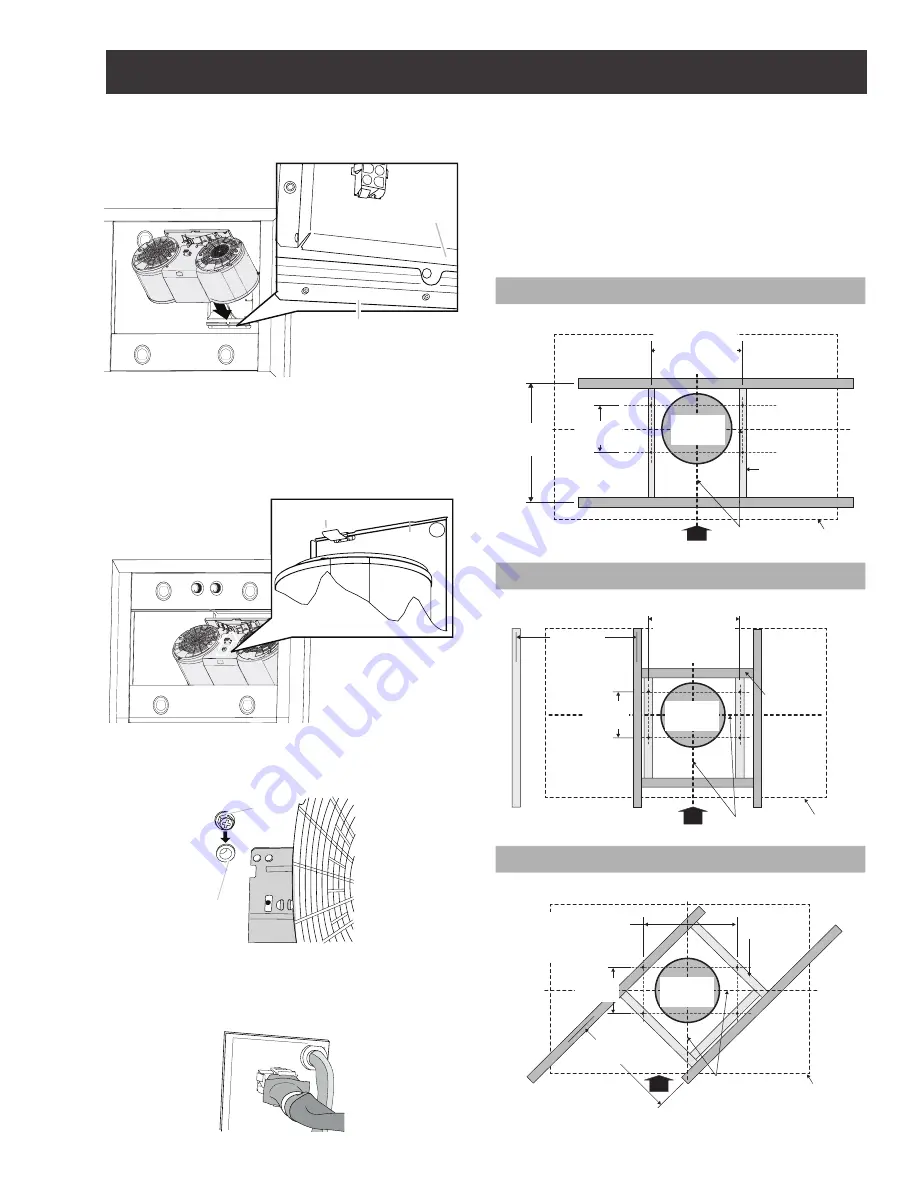
Mounting the range hood blower
• Slide the rear mounting plate flange under the bracket.
A
B
A.
Bracket
B.
Blower mounting plate
• Push the front end of the mounting plate up and snap into
spring tab.
NOTE:
The spring tab should be outside of the slot in the
mounting plate.
A
B
A.
Blower mounting plate
B.
Spring tab
• Align mounting holes and install 4 - 6 x 16 mm screws.
B
A
A.
Screw with lock washer
B.
Mounting hole
• Attach power cord connector to connector on wire box on
blower motor mounting plate.
Ceiling support structures
• This vent hood is heavy. Adequate structure and support
must be provided in all types of installations.
• At the hood location, install 2”x 4” cross framing between
ceiling joists as shown (2”x 4” are required to support
the weight of the hood).
• Arrange cross framing in the ceiling to suit the existing
structure.
Your ceiling joists will be like one of the following:
Example A
NOTE:
Top view ceiling joists
parallel to front of hood
10
1
⁄
16
” (25.5 cm)
install cross-
framing
symmetrically
over duct/cooktop
Centerline
16”
(40.6 cm)
joist spacing
7
1
⁄
16
”
(17.9cm)
Ø 8
1
⁄
4
” (21
cm) duct
2 x 4 cross
framing
Align duct to
center of cooktop
Hood front
Cooktop
outline
Example B
2 x 4 cross
framing
Align duct to
center of cooktop
Hood front
Cooktop
outline
NOTE:
Top view ceiling joists
parallel to front of hood
10
1
⁄
16
” (25.5 cm)
install cross-
framing zz
symmetrically
over duct/cooktop
Centerline
Ø 8
1
⁄
4
” (21
cm) duct
7
1
⁄
16
”
(17.9cm)
16”
(40.6 cm)
joist spacing
Example C
NOTE:
Top view ceiling joists
parallel to front of hood
Align duct to
center of cooktop
Hood front
Cooktop
outline
2 x 4 cross
framing
Ø 8
1
⁄
4
” (21
cm) duct
7
1
⁄
16
”
(17.9cm)
16”
(40.6 cm)
joist spacing
10
1
⁄
16
” (25.5 cm)
install cross-framing
symmetrically over
duct/cooktop
Centerline
Summary of Contents for Leone ELI136S2
Page 40: ......


