background image

DECOR MODEL
INSTALLATION INSTRUCTIONS AND
OPERATING INSTRUCTION
READ AND SAVE THESE INSTRUCTIONS

1. GENERAL

1.1

Carefully read the following important information regarding in-

stallation safety and maintenance. Keep this information booklet ac-
cessible for further consultations. The appliance has been designed
external exhaust version  cooker hood.

2.   

INSTALLATION INSTRUCTIONS

2.1

Power Supply Connection

For connection to the power supply refer to the follows:
      BLACK    =  L line
      WHITE    =  N neutral
      GREEN / YELLOW = G ground
A double-pole switch properly rated must be installed to provide the
range hood power supply disconnection.
2.2 The appliance must be installed at a minimum height of 26
inches (66 cm) from an electric cooker stove, or 30 inches (76 cm)
from gas or combined cooker stoves. If a connection ductwork com-
posed of two parts is used, the upper part must be placed outside
the lower part. Do not connect the range hood exhaust duct air to the
same duct air used to exhaust hot air or fumes from other appliances
other than electrical.
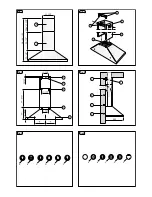
2.3 Mounting the cooker hood to the wall. Drill holes 

A-B-C-D

 accord-

ing to indications quoted in (fig. 3).
Use screws and screw anchors suitable for wall (e.g. reinforced ce-
ment, plasterboard) for the mounting of the cooker hood.
Where screws and screw anchors are supplied ensure that they are
suitable for the type of wall where the cooker hood is to be mounted.
Lock in the flange connector 

Y

 to the cooker hood (fig. 2) with the

supplied screws.
Affix the bracket 

Z

 to the wall via the drill holes 

A

 (fig. 4) .

Hang the cooker hood on the wall using the drill holes 

C

 (fig. 3).

Fasten the cooker hood using the fastening drill holes 

D

 (fig. 3).

Summary of Contents for Cooker Hood 3LI0D3UL

Page 1: ...3LI0D3UL COOKER HOOD U S E R I N S T R U C T I O N S HOTTE PER CUISINE M A N U E L D U T I L I S A T I O N USA DEU F ...

Page 2: ......

Page 3: ...lls or ceilings or into attics crawl spaces or garages CAUTION For general ventilating use only Do not use to exhaust hazardous or explosive materials and vapors 1 WARNING TO REDUCE THE RISK OF FIRE ELECTRIC SHOCK OR INJURY TO PERSONS OBSERVE THE FOLLOWING 1 1 Use this unit only in the manner intended by the manufacturer If you have questions contact the manufacturer 1 2 Before servicing or cleani...

Page 4: ...violent steam explosion will result 3 4 Use an extinguisher ONLY if You know you have a Class ABC extinguisher and you already know how to operate it The fire is small and contained in the area where it started The fire department is being called You can fight the fire with your back to an exit INSTALLATION INSTRUCTIONS 4 WARNING TO REDUCE THE RISK OF FIRE ELECTRIC SHOCK OR INJURY TO PERSONS OBSER...

Page 5: ...CES MAY BE DANGEROUS 5 1 Do not check filters with hood working 5 2 Do not touch the lamps after a prolonged use of the appliance 5 3 No food must be cooked flambè underneath the hood 5 4 The use of an unprotected flame is dangerous for the filters and could cause fires 5 5 Watch constantly the fried food in order to avoid the cooking oil flares up 5 6 before performing any mainteinance operation ...

Page 6: ...0 inches 76 cm from gas or combined cooker stoves If a connection ductwork com posed of two parts is used the upper part must be placed outside the lower part Do not connect the range hood exhaust duct air to the same duct air used to exhaust hot air or fumes from other appliances other than electrical 2 3 Mounting the cooker hood to the wall Drill holes A B C D accord ing to indications quoted in...

Page 7: ... with the supplied screws in the drill holes G of the bracket Z fig 2 previously affixed to the wall via the drill holes A fig 3 3 USE 3 1 If the apparatus is equipped with the following controls fig 5 A LIGHT B OFF C SPEED I D SPEED II E SPEED III F AUTOMATIC STOP TIMER 15 minutes The automatic stop timer delays stopping of the hood which will continue functioning for 15 minutes at the operating ...

Page 8: ...recommendable to clean the filter at a maximum of 2 months by carry ing out the following instructions Remove the filters from the cooker hood and wash them in a solu tion of water and neutral liquid detergent leaving to soak Rinse thoroughly with warm water and leave to dry The filters may also be washed in the dishwasher The aluminium panels may alter in colour after several washes This is not c...

Page 9: ...d incendie et pour aspirer l air correctement assurez bien une conduite d air vers l extérieur Ne pas évacuer l air d aspiration dans des espaces avec murs ou pla fonds ou encore dans des mansardes espaces couverts ou garages ATTENTION Seulement pour une ventilation générale Ne pas utili ser pour aspirer des matériaux ou vapeurs dangereux ou explosifs 1 AVERTISSEMENT POUR RÉDUIRE LE RISQUE D INCEN...

Page 10: ...ions des élements de cuis son 3 AVERTISSEMENT POUR RÉDUIRE LE RISQUE D ACCDIDENT AUX PERSONNES DANS LE CAS D UN INCENDIE PROVOQUÉ PAR LES GRAISSES SUR LA TABLE DE CUISSON OBSERVEZ CE QUI SUIT 3 1 Étouffer les flammes avec un couvercle adérent une feuille de papier aluminium ou un plateau en métal puis éteignez le brûleur FAITES ATTENTIONAUX BRÛLURES Si les flammes ne s éteignent pas sortez immédia...

Page 11: ...ouez ou forez un mur ou un plafond n abîmez pas le câblage électriques ou d autres services protégés 4 4 Les ventilateurs à conduit doivent toujours évacuer l air vers l ex térieur AVERTISSEMTNT POUR RÉDUIRE LE RISQUE D INCENDIE UTILISEZ UNIQUEMENT DES CONDUITS EN MÉTAL 5 AVERTISSEMENT DANS CERTAINS CAS LES APPAREILS MÉNAGERS PEUVENT ÊTRE DANGEREUX 5 1 Ne contrôlez pas les filtres lorsque la hotte...

Page 12: ...ique ou à 76 cm dans le cas d un plan de cuisson mixte ou à gaz Si l on utilise un tuyau de raccordement composé de deux sections la partie supérieure doit être placée en dehors de la partie inférieure Ne raccordez pas le conduit d aspiration d air de la hotte au même tuyau qui est utilisé pour aspirer l air chaud ou fumées provenant d autres appareils qui ne sont pas électriques 2 3 Montage de la...

Page 13: ... fig 3 tirer le raccord supérieur E vers le haut puis le bloquer à l aide des vis fournis sur les trous G du support Z fig 2 auparavant fixé au mur grâce aux trous A fig 3 3 EMPLOI 3 1 Si l appareil est muni des fonctions suivantes fig 5 A LUMIÈRE B OFF C VITESSE I D VITESSE II E VITESSE III F TIMER D ARRÊT AUTOMATIQUE 15 minutes Le timer d arrêt automatique retarde l arrêt de la hotte qui continu...

Page 14: ...ins tous les deux mois le filtre en suivant les indications suivantes Retirer les filtres de la hotte et les laver avec de l eau et un détergent liquide neutre laisser la saleté se décoller Rincer abondamment à l eau tiède et laisser sécher Les filtres peuvent également être lavés dans le lave vaisselle Après plusieurs lavages des panneaux en aluminium on peut constater un changement de leur coule...

Page 15: ...F E A B C D E 490 Z A D C B A C B Z D Fig 2 Fig 1 Fig 3 Fig 4 Fig 5 Fig 6 Y F E Z G A B C D E F ...

Page 16: ......

Reviews: