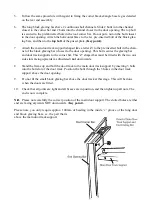
12. You can now attach the 3 vertical block glazing bars to the built in base cill in a similar man-
ner to 11 above, the longer bar to the middle hole, and the shorter ones to the outer holes. Be-
fore attaching the nuts to the shorter bars place the diagonal angles onto the bottom bolt and
put a nut on finger tip tight only. Attach the other end of the angle brace to the
bottom bolt
of the eave gusset plate, put on the nut and finger tip tighten.
(Key point).
Do the same with
the other diagonal brace.
13. Moving to the top of the greenhouse, insert 2 bolts into the shorter two block glazing bars and
2 bolts into the longer block glazing bar.
14. Now you can attach the long angle horizontal brace marked “rear end” in the box, to the
top bolts
of the eave gusset plates. The angle should be facing upwards, put the nuts on
and finger tip tighten.
15. You can now attach the 3 vertical block glazing bars
to the roof/corner bars. Slide the last bolt in each bar
you inserted in 13 above to the end of each bar and
insert them through the holes in the flange of the roof
corner bar, place the nuts on and finger tip tighten.
16. Now attach the horizontal brace to the 3 upright
block glazing bars utilising the 1st bolt you
inserted in 13 above. Put the nuts on finger tip
tight.
(Key point).
17. The built in base has a continuous bolt channel along
its length. Slide 5 bolts into this channel (if you are
installing the greenhouse onto hard standing) or 2
bolts (1 at each end if installing onto soft ground).
18. For hard standing. attach the slot of the corner bracket/base leg to the base section so that the
4 holes on the bracket are pointing downwards. Mark the point of the bracket where it is flush
with the bottom of the built in base, and then cut the bracket. The end of the corner bracket
with 4 holes is now surplus. If you are fitting your greenhouse onto soft ground, then do not
fit the corner bracket/angle base leg yet. If you are on soil, the corner bracket/base leg will go
into the ground at general assembly and be concreted in to form an anchor point.
19. The rear end is now almost complete. Before tightening all nuts check the corners to
ensure they are tightly up against each other and that all the vertical bars are tight up
against the angle of the rear end cill and corner bars. Tighten all nuts; the rear end is
now complete.
Summary of Contents for 7'5" WIDE TITAN
Page 1: ......
Page 2: ......
Page 3: ......
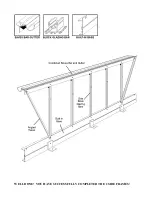
Page 9: ...WELL DONE YOU HAVE SUCCESSFULLY COMPLETED THE 2 SIDE FRAMES ...
Page 11: ...REAR END ASSEMBLY ...
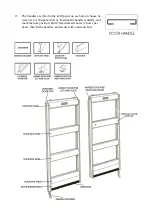
Page 16: ...DOOR END ASSEMBLY ...
Page 32: ...ELITE 1806 ...


