background image

Accessories for Evanesce Tension B Series 

Please


make


sure


all


accessories


listed


below


are


included


before


proceeding.


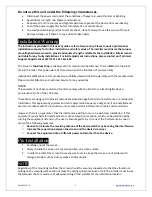
Control System for Evanesce Tension B Series


5

12


VOLT


TRIGGER


CABLE


Rev.102212

JA


3


www.elitescreens.com


1.


5

12V


Trigger

:


The


built

in


5

12V


trigger


input


allows


your


screen


to


synchronize


its


drop


&


rise


with


the


projector’s


power


cycle.


The


screen


deploys


when


the


projector


powers


up


and


will


retract


when


the


projector


powers


down.


The


5

12


volt


adaptor


connects


to


your


projector’s


trigger


output


via


a


separate


cable


that


may


or


may


not


be


provided


by


the


manufacturer


of


the


projector.


The


trigger


feature


will


not


work


without


an


output


cable


from


the


projector,


but


it


can


be


tested


by


connecting


the


Red


(+)


and


Green


(

)


cable


to


a


9

volt


battery.


2.


3

Way


Wall


Switch:


The


3

way


wall


switch


is


a


wall


mount


control


box


with


an


up/stop/down


button


and


plugs


directly


into


the


screen’s


RJ

45


input.


3.


IR


“Eye”


Receiver:


plugs


directly


into


the


screen’s


RJ

45


input


to


present


a


low


profile


line

of

sight


control


option


for


your


IR


remote


control


even


in


a


recessed


ceiling


installation.


A.


IR


Remote


B.


RF


Remote


D.


3

way


wall


switch


E.


IR


eye


receiver


G.


AAA


Batteries


x


2

C.


Remote


control


base


x


2


G.


Bubble


leveler


Red


+


Green

 ‐ 

F.


5

12v


trigger


cable


RJ45


input


Summary of Contents for Evanesce Tension B Series

Page 1: ...eration direct connection to a properly grounded power source is advised The power outlet supplying power to the unit should be close to the unit and easily accessible Do not install the unit on uneve...

Page 2: ...o comply with the limits for a Class B digital device pursuant to Part 15 of the FCC Rules These limits are designed to provide reasonable protection against harmful interference in a residential inst...

Page 3: ...cable that may or may not be provided by the manufacturer of the projector The trigger feature will not work without an output cable from the projector but it can be tested by connecting the Red and...

Page 4: ...n Series includes a 3 outlet If your stallation will be entirely concealed mends a rdwire connection Please refer to tion The Evanesce B allows access for above or below ceiling installation Please fo...

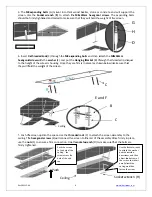
Page 5: ...rew G M8x16mmx1 5mm washers C and M8 shown below d secure each nut E as over the Hanging Bracket A and align with the hole as shown below according to th ght requirement for your installation ar Secur...

Page 6: ...end flange piece C on the edge of the housing as shown below to complete the assembly The sc Dimensions Table For Above ceiling installation reference the reen is now ready for installation Push end f...

Page 7: ...h is ot less than the screen size table A5 Consult the dimensions table on page 9 C1 in regards to accommodating the screen casing The tween 1 Measure and cut the ceiling installation slot The width s...

Page 8: ...rew across th hole of the end cap 8 ck wood beam the M8x40m ure that they xpanding bol the Hanging B y are firmly in readed rods he screen to t e thesocket w n he he d ms stone or mm hexagona y will h...

Page 9: ...ange cover between the gap and the screen to complete the installation Dimensions Table For below ceiling installation reference For local Elite Screens contact or Technical Support please visit www e...

Reviews: