PRODUCT WHITE PAPER
http://www.elitescreens.com
Elite Screens Inc. |Elite Screens Europe GmbH| Elite Screens India |Elite Screens China Ltd.
Elite Screens Taiwan Corp |Elite Screens Japan |Elite Screens Australia
5
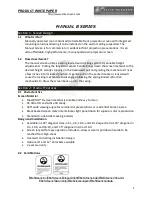
4.2 R-TYPE Installation Methods
A. Flush Wall Installation
1.
Measure the distance of the keyholes on the end caps and mark the location of where
the screen is to be installed for the pre-drilled hole.
2.
After marking the area and drilling the hole, insert the proper screw into the drilled
hole and leave about 1/8 of an inch from the wall to mount the screen.
3.
Mount your screen from the keyhole located on the back of the screen’s left and right end
caps.
B. Flush Ceiling Mounting (only for models 135” and above)
1. Measure the distance between the top screw holes located on the top of the end caps.
2.
Mark the location of where the screen is to be installed for the pre-drilled hole.
3.
Drill your hole, use a hollow wall anchor if needed
4.
Insert the proper screw into the drilled hole and secure the screen to the ceiling.
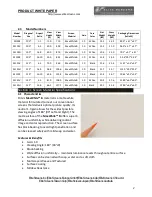
C. Suspended Ceiling Installation(for models 100”-120”)
1. You can hang the screen from the ceiling by using
chains (not included) and hooking them to the D-ring
loops on models 100”-120”, which are located on each end
of the end cap.
For models 135”- and above, D-ring or U-bolts (not
included) are required to create loops for hanging the
screen with chains from theend caps’ flanges.
Note:
Please consult with a hardware store professional for
proper screws for your specific wall or ceiling installation.
The installer must ensure that proper mounting hardware and
fasteners used are of adequate strength and suitable for the mounting surface.
Models: 100”-120”
D-ring
Keyhole located on
back of end cap
Front view
Side view
Flange with a pair
of screw holes
Example shown is the end cap for the 100” – 120” models.
Models: 135” and above*
*U-bolts and D-ring not included.


