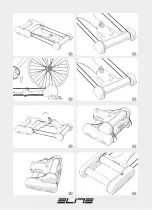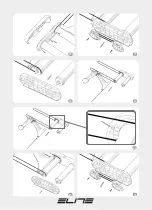
16
!CAUTION!
• Do not unscrew the knob completely!
• To avoid injuries when folding the hometrainer,
be careful of where your hands are placed.
• When transporting the hometrainer, the lower
handle must be tightened completely to avoid lo-
sing it (Ref. H). Without the knob the wheelbase
setting cannot be locked in place.
• Set the safety knob (Ref. L) to the “O” locking po-
sition (Pic. 18).
NOTE: The safety handle (Ref. L) only works when
the wheelbase adjustment is set to the minimum
distance.
2) The rollers work best with tyre that has a smo-
oth tread. If using a mountain bike, to reduce noise
and increase stability change the tyre for one with
a slick tread.
3) For beginners, position the rollers in an entrance
hall, in a doorway or near a stable object, in order
to have a support while acquiring the necessary
balance.
4) Make sure the Quick-Motion rests on a flat, sta-
ble surface.
5) The oscillating system guarantees maximum
functionality on a hard surface.
6) The Quick-Motion has 3 resistance levels: “1”
minimum resistance, “2” medium resistance, “3”
maximum resistance (Fig.19). Select the required
resistance level by shifting the slide to the required
resistance value. On acquiring greater skill on the
rollers, you can also use the bicycle’s gears to vary
the resistance level.
7) Start pedalling and look ahead, like riding on the
road. Even if you would instinctively tend to look at
the front wheel, you will keep better balance and
pedal “in a straight line” if you concentrate on an
object located 2.5 – 4 m. (10-15 feet) in front of you.
8) If you start leaning or shifting to one side of the
rollers, correct your position with light steering
movements. If you steer too much, you will lose ba-
lance or end up over the side of the rollers.
9) Maintaining a high and even pedalling rate will
help you keep balance on the rollers, thanks to
the gyroscopic effect of the speed of the wheels.
10) At first, pedalling on the rollers will give you
the feeling of instability, and moving the handlebar
too abruptly or pedalling at too strong a pace may
make you lose control. This is the big advantage of
the rollers compared to the standard training tools:
the rollers will teach you reduce movement of the
upper part of your body and keep a smooth pedal-
ling motion.
11) After gaining confidence with the Quick-Motion,
you can vary the resistance level by moving the re-
sistance slider to positions “2” (Fig. 16) or “3”.(Fig.
17).
12) Do not use the bicycle brakes to stop. Place
a foot on the Quick-Motion frame and allow the
bicycle to come to a halt.
13) Do not use the bicycle brakes to stop. Just pla-
ce your foot above the rear plate opposite the resi-
stance cursor (Ref. E) of the Quick-Motion until the
bicycle comes to a halt.
NOTE: to change wheelbase, unfold the roller and
loosen the transmission belt by pulling it out.
!CAUTION!
• Before each use, make sure the belts are pro-
perly placed in their housings at edges of the rol-
lers. Using the product when the belts are not pro-
perly positioned might damage both the belts and
the hometrainer.
• When using the hometrainer for prolonged pe-
riods of time with bigger bikes or with wheelbases
greater than 1044mm, the correct transmission of
the belt might not be guaranteed if it’s later used
with smaller bikes or with wheelbases smaller
than 1044mm. The installation of new transmission
belts may be required.
CARE AND MAINTENANCE
1) Prolonged exposure to direct sunlight can cause
deformation of the technopolymer rollers. Do not
use or keep the rollers in places where they are ex-
posed to direct sunlight.
2) Always clean the rollers after use. Only use a
damp cloth. Do not use solvents or harsh deter-
gents.
3) If the Quick-Motion is not going to be used for a
prolonged period, release the drive belt, bringing
it out of its seat, or close it, otherwise the belt’s
tension could cause early loss of transmission ef-
ficiency.
4) The coupled bearings on the roller do not require
lubrication and are practically maintenance-free.
5) Periodically check the roller clamping screws,
make sure that they are still tight but not so tight
as to damage the plastic frame.
6) In case of wear or breakage of the drive belt, re-
EN
Summary of Contents for 0162001
Page 2: ......
Page 3: ...2 3 4 5 X 6 TRAINER POSITION 1 ...
Page 4: ...7 8 9 10 ATTENTION Do not unscrew the knob completely 11 OK NO ...
Page 5: ...15 16 17 18 19 12 13 14 ...
Page 6: ...23 24 25 26 22 21 20 ...
Page 17: ...NOTES ...
Page 18: ...QUICK MOTION code 0162001 ...


