background image

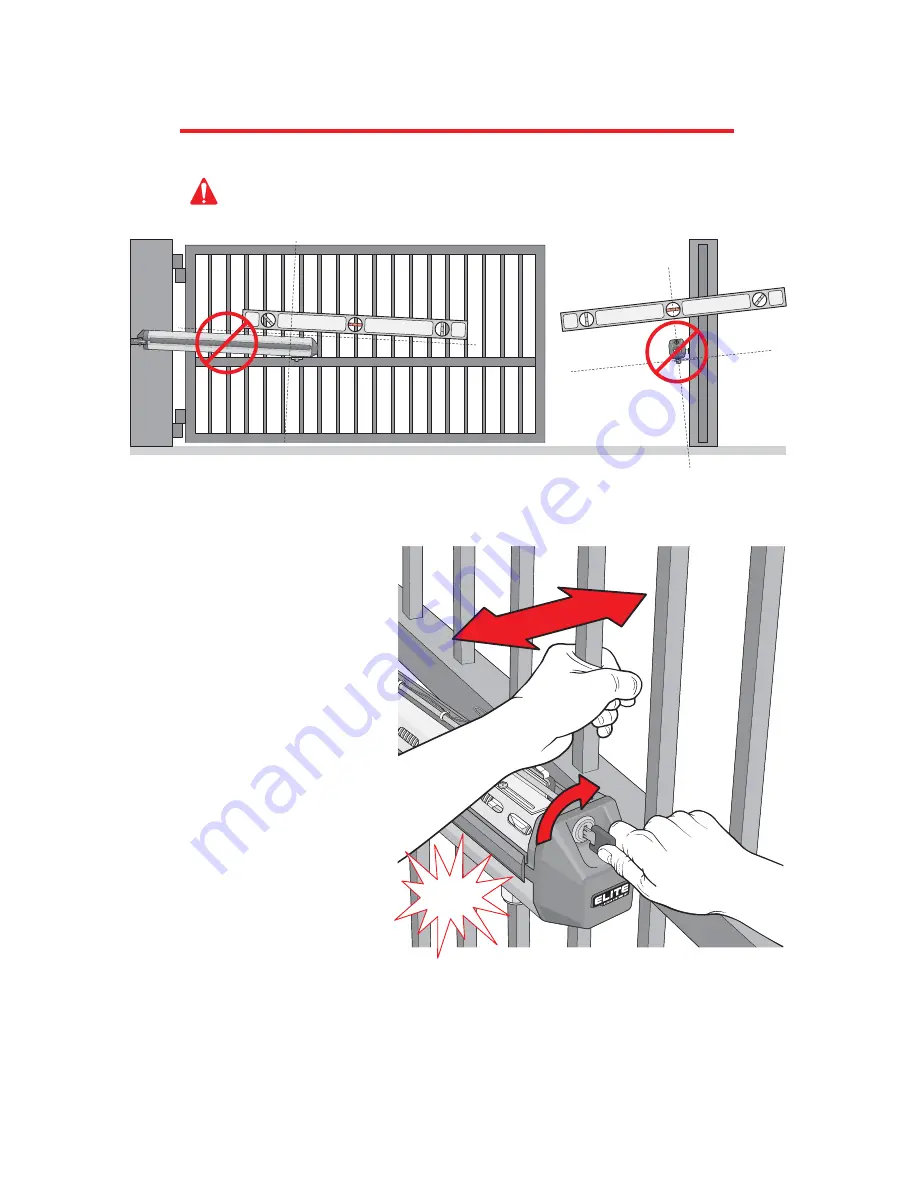
Click!

Push or Pu

ll

P R O C E D U R E   F O R   I N S T A L L A T I O N

Step 9:


Lock the operator by turning the 

key to the vertical position while pushing 
or pulling on the gate until you hear the 
key release click into place. the gate 
should not move after the operator has 
been locked. Completing this successfully 
finishes the basic mounting of the 
operator to the gate. The next steps are to 
make all electrical connections to the 
operator and control board.

Step 10:


The following pages show the correct electrical procedures needed for the operator. 

After completing 

all the electrical connections

, continue to step 11 to complete the final adjustments on the operator.

11 

M o u n t i n g   I n s t r u c t i o n s

Step 8:      

Make sure that the operator is 

level

 or it will not function properly. An off-level installation may 

cause the gate or operator to fail prematurely.

Summary of Contents for Miracle-One

Page 1: ...Click on the desired topic in the Bookmarks column or Table of Contents to select page ...

Page 2: ...ock Solenoid 25 Gate Opening Outside Installation of Maglock Solenoid 26 Emergency Key Release 27 Close Delay Option 28 29 Troubleshooting 30 32 Optional Solar Power 33 Miracle 1 Parts Illustration 34 Miracle 1 Parts List Maintenance 35 Miracle 1 Accessories 36 Features and Specifications 37 Please DO NOT Touch me Unless you are an Authorized Service Technician T A B L E O F C O N T E N T S T A B ...

Page 3: ...s must be supplied with a separate access opening The gate must be installed in a location so that enough clearance is supplied between the gate and adjacent structures when opening and closing to reduce the risk of entrapment Swinging gates shall not open into public access areas The gate must be properly installed and work freely in both directions prior to the installation of the gate operator ...

Page 4: ... both inside and outside of a vehicular horizontal slide gate One or more contact sensors shall be located at the bottom edge of a vehicular vertical lift gate One or more contact sensors shall be located at the pinch point of a vehicular vertical pivot gate A hard wired contact sensor shall be located and its wiring arranged so that the communication between the sensor and the gate operator is no...

Page 5: ...ct with a rigid object or stop when an object activates the non contact sensors After adjusting the force or the limit of travel retest the gate operator Failure to adjust and retest the gate operator properly can increase the risk of injury or death Use the emergency release only when the gate is not moving Make sure the power for the gate operator is off KEEP GATES PROPERLY MAINTAINED Read the m...

Page 6: ... home of one to four single family dwelling or a garage or parking area associated therewith Commercial General access vehicular gate operator Class II A vehicular gate operator or system intended for use in a commercial location or building such as a multi family housing unit five or more single family units hotel garages retail store or other building servicing the general public Commercial Gene...

Page 7: ... Doing this will cause the wires to eventually break DO NOT install on uphill or downhill gates Be sure to read and follow all these important instructions before installation of the gate operator Elite Access Systems Inc is not responsible for improper installation or failure to comply with local building and electrical codes 6 IMPORTANT SAFETY INSTRUCTIONS WARNING To reduce the risk of severe in...

Page 8: ...ar Behind Gate Hinges for Maximum Strength Heavy Steel Plates for Reinforcement Not Supplied Heavy Steel Plates for Reinforcement Not Supplied Gate Hinge Gate Hinge Steel Re Bar 10 Minimum Back Steel Bracket Reinforce if necessary Back Steel Bracket Reinforce if necessary Gate Hinge Gate Hinge 7 Indexing on central hole in the back steel bracket Indexing on mounting hole in the front steel bracket...

Page 9: ...hole in the front steel bracket This Plate Not Supplied Back Steel Bracket Reinforce if necessary Back Steel Bracket Reinforce if necessary Heavy Steel Plates for Reinforcement Not Supplied Heavy Steel Plate Gate Hinge Gate Hinge Gate Hinge 6 6 Miracl e 1 in Open Positio n Miracle 1 in Closed Position Important Weld Re Bar Behind Gate Hinges for Maximum Strength Steel Re Bar Gate Hinge Heavy Steel...

Page 10: ...d reinforcement plates See next page Tack weld brackets and plates in position Step 1 Remove the 4 screws and lift the operator cover off Step 2 Release the mechanical lock by turning the key to the horizontal position If using a gate crossbar weld bar across all pickets Do not weld the crossbar on a few pickets or they will bend The Miracle 1 can be mounted on top of the gate frame 9 Important Ta...

Page 11: ...operator removed completely weld around the brackets and plates on the gate Step 6 Remove the nut bolt and bushing from the back operator bracket Place the metal bushing in the hole of the steel bracket that will be used Secure operator with the nut and bolt See Below Step 7 Remove the nut from the traveler carriage at the front of the operator Secure operator to the front bracket with the washer ...

Page 12: ...mounting of the operator to the gate The next steps are to make all electrical connections to the operator and control board Step 10 The following pages show the correct electrical procedures needed for the operator After completing all the electrical connections continue to step 11 to complete the final adjustments on the operator 11 M o u n t i n g I n s t r u c t i o n s Step 8 Make sure that t...

Page 13: ...d full closed positions Re tighten armature bolts when gate positions are correct Step 12 Reinstall the operator cover with the 4 screws to complete the installation Outside Limit Switch Outside Limit Switch Inside Limit Switch Inside Limit Switch Limit Switch Armature Limit Switch Armature Adjustment Bolts Adjustment Bolts 12 P R O C E D U R E F O R I N S T A L L A T I O N A d j u s t i n g t h e...

Page 14: ...les provided 8 8 13 POWER CHARGE OK BATTERY LOW ACCESS SYSTEMS INC ACCESS SYSTEMS INC MAGLOCK REPLACE FUSE WHEN LED IS ON REVERSE SENSOR SYSTEM ON ALARM ALARM SENSOR OPEN INSIDE OFF NO YES ON TIMER CENTRAL STRIKE OPEN SAFETY LOOP RADIO REC CENTER LOOP CONTROL 60 3 STOP BY POSITIVE STOP OPEN OUTSIDE MAGLOCK ALARM MADE IN USA OPEN INSIDE STOP BY POSITIVE STOP NO YES OPEN OUTSIDE REVERSE SENSOR ALARM...

Page 15: ...4 2 9 7 5 3 1 Conduit and flex connector secured to control box 8 14 Important MAGLOCK ALARM MADE IN USA OPEN INSIDE STOP BY POSITIVE STOP NO YES OPEN OUTSIDE REVERSE SENSOR ALARM SENSOR ON TIMER POWER REPLACE FUSE WHEN LED IS ON CHARGE OK BAT LOW CENTRAL STRIKE OPEN SAFETY LOOP CENTER LOOP RADIO REC CONTROL 60 3 OFF SYSTEM ON 8A 125V WARNING FOR CONTINUED PROTECTION AGAINST FIRE REPLACE ONLY WITH...

Page 16: ...d Brown Blue Green White Red Brown Blue Green 10 12 14 16 8 6 4 2 9 11 13 15 7 5 3 1 Operator 1 Master Operator 2 Slave 15 Wire Gauge 16 AWG 200 Ft Important MAGLOCK ALARM OPEN IN OFF POS STOP ON POS STOP CLOSE DLY ON CLOSE DLY OFF OPEN OUT REVERSE SENSOR MASTER SLAVE ALARM SENSOR ON TIMER POWER REPLACE FUSE WHEN LED IS ON CHARGE OK BATTTERY LOW CENTRAL STRIKE OPEN SAFETY LOOP CENTER LOOP RADIO RE...

Page 17: ...N AGAINST FIRE REPLACE ONLY WITH SAME TYPE VOLTAGE FUSE ACCESS SYSTEMS INC ACCESS SYSTEMS INC C H O O S I N G G A T E M O V E M E N T D I R E C T I O N S E N S O R A D J U S T M E N T Switch the Open Inside Open Outside switch on the control board to the corresponding position for the proper direction Important It is necessary to still adjust your limit switch at the close position The controller ...

Page 18: ...WITH SAME TYPE VOLTAGE FUSE 16 15 14 13 12 11 10 9 8 7 6 5 4 3 2 1 J3 Plug Connector J3 Plug J3 Plug Control Board C O N N E C T I N G P O W E R S U P P L Y Connect the two yellow wires from the J3 plug connector to low voltage direct burial landscape lighting cable 14 gauge 300 watt not exceeding 500 ft 10 AWG up to 1000 ft Connect the lighting cables into Elite s plug in transformer 24 VAC Inclu...

Page 19: ...4 and 5 will be recognized as a Three Push Button command The First command will open the gate The Second command will stop the gate The Third command will close the gate black 1 24V Ground 2 Relay 3 Radio Power 24V white red Elite Entry Phone Pin 7 and 12 for Open Only command Input for 3 push button control Exit Loop Detector 1 2 3 Mount receiver inside the control board box as shown using velcr...

Page 20: ...ide Three Wire Layers 1 1 2 1 4 J3 Plug Connector Twisted Wires From Loop Cuts 16 15 14 13 11 10 9 3 2 1 12 12 7 5 4 8 6 Center Loop YELLOW BLUE BLUE YELLOW Safety Loop OUT IN Safety Loop Safety Loop Center Loop 19 4 Be sure to twist wires together Important If the gate is closing and receives a safety loop command the gate WILL NOT reopen It will stop and resume closing once the car clears the lo...

Page 21: ...ct or potential entrapment installation Follow the installation instructions provided with the photocell sensor for accurate placement of the photocell and the reflector Elite Part A OMRON If multiple sensors are being used all of the photo beam sensors are to be connected in parallel at the sensor input on the control board If you are going to use a non contact sensor as a secondary entrapment pr...

Page 22: ...arging Power Fuse 28 27 26 25 24 23 22 21 20 19 18 17 16 15 14 13 12 11 10 9 8 7 6 5 4 3 2 1 1 Board Fuse Replace Charging Power Fuse LED Replace Board Power Fuse LED Timer Pot 3 to 60 sec Timer Active LED Switch Timer On Off Stop by Positive Stop Option Switch Switch Open Inside Outside Reverse Sensor Adjustment Alarm Sensor LED System On LED Reverse Sensor LED Burglar Alarm Audio Alarm Output Co...

Page 23: ...ing Power Fuse 29 28 19 20 21 22 23 24 25 26 18 17 16 15 10 11 12 13 14 8 9 7 6 5 4 3 1 Board Fuse Replace Charging Power Fuse LED Replace Board Power Fuse LED Timer Active LED Timer Pot 3 to 60 sec Switch Timer On Off Overlapping Gate On Off Stop by Positive Stop Option Switch Switch Open Inside Outside Alarm Sensor LED Reverse Sensor Adjustment Reverse Sensor LED System On LED Burglar Alarm Audi...

Page 24: ...nnection Burglar Alarm Relay Output 1 Common 2 N O UL Audio Alarm Connection 3 and 4 UL Audio Alarm 1 2 2 1 or 3 3 4 Connect for Open Outside 2 Ground 3 Power for Open Outside Maglock Connection Alarm Connection Relay Contact Rating 0 5 A 125 VAC 1 A 24 VDC Use the harness provided with the unit to make your connections to these alarm outputs OR 23 ...

Page 25: ...received by one of the commands in column A but NOT column B A B Strike Open J3 7 12 Safety Loop J3 6 12 Relay Contact Rating 0 5 A 125 VAC 1 A 24 VDC Use the harness provided with the unit to make your connections to these alarm outputs 1 2 U L A U D I O A L A R M B U R G L A R A L A R M Center Loop J3 8 12 Radio Receiver J3 4 5 The control board provides a relay with a normally open contact to i...

Page 26: ...FUSE ACCESS SYSTEMS INC ACCESS SYSTEMS INC Yellow Wire N O Contact Rating 125 VAC 0 5 A Blue Wire N C Power for Maglock Power for Solenoid White Wire Common White Wire Common Control Board Solenoid Lock Wiring Magnetic Lock Wiring Yellow Normally Open N O White Common Blue Normally Closed N C G A T E O P E N I N G I N S I D E I N S T A L L A T I O N O F Orange Wires 1 Power Plug in orange wire to ...

Page 27: ... ONLY WITH SAME TYPE VOLTAGE FUSE ACCESS SYSTEMS INC ACCESS SYSTEMS INC G A T E O P E N I N G O U T S I D E I N S T A L L A T I O N O F Yellow Wire N O Contact Rating 125 VAC 0 5 A Blue Wire N C Power for Maglock Power for Solenoid White Wire Common White Wire Common Control Board Solenoid Lock Wiring Magnetic Lock Wiring Yellow Normally Open N O White Common Blue Normally Closed N C Orange Wires ...

Page 28: ...to the full open position 90 Push or Pull Click Step 3 Re Lock the operator by turning the key clockwise while pushing or pulling on the gate until you hear the key release click into place The operator can resume normal operation as soon as power is restored Key Provided Unlock Unlock Lock Lock Full Open Position 90 Degrees E M E R G E N C Y K E Y R E L E A S E 27 ...

Page 29: ... ONLY WITH SAME TYPE VOLTAGE FUSE 3A 250V 15A 250V 1 5A 250V WARNING FOR CONTINUED PROTECTION AGAINST FIRE REPLACE ONLY WITH SAME TYPE VOLTAGE FUSE C L O S E D E L A Y O P T I O N M a s t e r S l a v e O n l y This option is to be used when there is a master slave installation with overlapping gates Opening Inside and Overlap to the Outside Master operator delays to close the gate Master Slave Ins...

Page 30: ...ONLY WITH SAME TYPE VOLTAGE FUSE 3A 250V 15A 250V 1 5A 250V WARNING FOR CONTINUED PROTECTION AGAINST FIRE REPLACE ONLY WITH SAME TYPE VOLTAGE FUSE C L O S E D E L A Y O P T I O N M a s t e r S l a v e O n l y This option is to be used when there is a master slave installation with overlapping gates Opening Outside and Overlap to the Outside Master operator delays to close the gate Master operator ...

Page 31: ...INUED PROTECTION AGAINST FIRE REPLACE ONLY WITH SAME TYPE VOLTAGE FUSE T R O U B L E S H O O T I N G Check the Fuses If the gate is not moving in any direction be sure to check all of the LED displays on the control board If the board power or charging power LEDs are on change the corresponding fuse on the right side of the board If the motor will not work and all LED s on the board are ok check t...

Page 32: ... has malfunctioned in the ON position The Gate Will Not Open Symptom The radio receiver LED on the control board remains OFF when using the remote control Possible Solutions Dead battery in the remote control Remote control code switches are different from radio receiver code switches The radio receiver has malfunctioned in the OFF position CENTRAL CONTROL Control Board LED CENTRAL CONTROL Control...

Page 33: ...INUED PROTECTION AGAINST FIRE REPLACE ONLY WITH SAME TYPE VOLTAGE FUSE ACCESS SYSTEMS INC ACCESS SYSTEMS INC T R O U B L E S H O O T I N G You will SEE the alarm LED ON when The gate is too heavy or the operator or gate is installed incorrectly 1 2 A foreign object is on the gate frame while the gate is moving Vertical Gate Level line Horizontal Gate Level line SYSTEM ON REVERSE SENSOR ALARM SENSO...

Page 34: ...ector from Miracle One Solar Panel Wires Solar Panel Elite Part SOLAR 3 Stand Not Included DC Power Adapter Elite Part A SOLAR ADP Contact your local dealer for more information 33 MAGLOCK ALARM MADE IN USA OPEN INSIDE STOP BY POSITIVE STOP NO YES OPEN OUTSIDE REVERSE SENSOR ALARM SENSOR ON TIMER POWER REPLACE FUSE WHEN LED IS ON CHARGE OK BAT LOW CENTRAL STRIKE OPEN SAFETY LOOP CENTER LOOP RADIO ...

Page 35: ...STEMS INC MAGLOCK REPLACE FUSE WHEN LED IS ON REVERSE SENSOR SYSTEM ON ALARM ALARM SENSOR OPEN INSIDE OFF NO YES ON TIMER CENTRAL STRIKE OPEN SAFETY LOOP RADIO REC CENTER LOOP CONTROL 60 3 STOP BY POSITIVE STOP OPEN OUTSIDE ACCESS SYSTEMS INC ACCESS SYSTEMS INC MAGLOCK REPLACE FUSE WHEN LED IS ON REVERSE SENSOR SYSTEM ON MASTER ALARM SLAVE ALARM SENSOR OPEN IN OFF TIMER POWER CHARGE OK BATTERY LOW...

Page 36: ...or Q223 Control Board Master Slave Q224 Power Harness Master Slave Q226 Power Harness Single Operator Q227P Plastic Control Board Box Nuts and Bolts for Battery Rack Q229 Replacement Key Operator made Pre 3 14 99 Q230 Steel Bracket Mounting Plates 2 Q231 Radio and Accessory Harness Q232 Bottom Washer and Nut for Traveler Carriage Bolt Go to Parts Illustrations Page Q233 Bolt Bushing Nut Fits Rear ...

Page 37: ...less Entry System Transmitters 24V Photo Electric Eye 24V DC External Loop Detectors Solar Panel DC Power Adapter Elite Part SOLAR 3 Elite Part A 24 Center Loop Safety Loop Elite Part A SOLAR ADP Elite Part A 3060 Elite Part A 1099 Elite Part A 3089 Elite Part A RM 201K Elite Part A 4200 Elite Part A OMRON 36 ...

Page 38: ...ile opening or closing the gate will reverse for 1 second then go into neutral so it can be pushed by hand Can be set from 3 to 60 seconds or push open stop close operation Dictates synchronized movement between two gate operators Anti tailgating system uses a stop only method of operation Will not work as a commercial loop system Can be interfaced with any home alarm system Alarm will sound if th...

Reviews: