background image

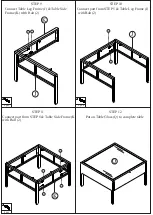
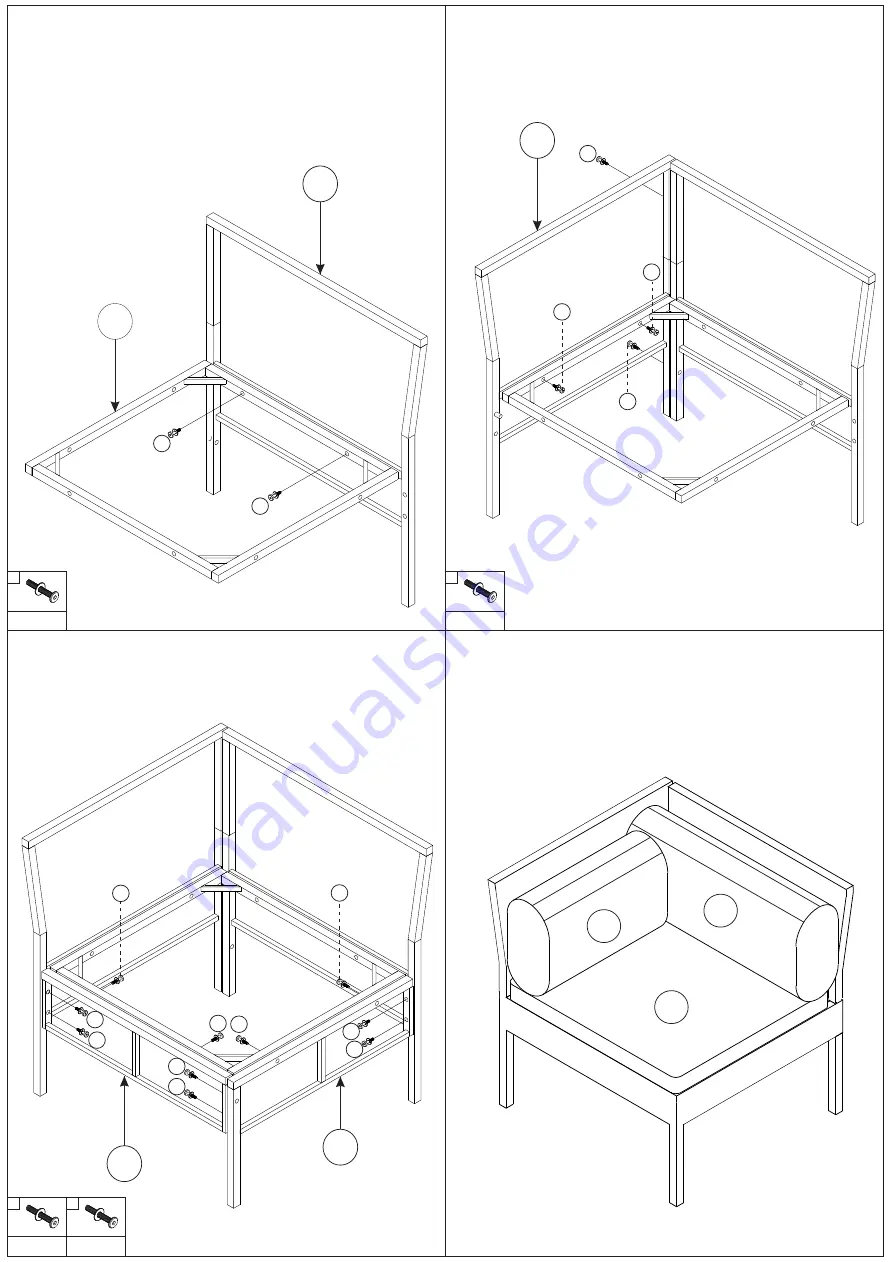
STEP 5

Connect Corner Small Frame (F) & Corner Seat 
Frame (G) with Bolt (1)

STEP 6

Connect part from STEP 5 & Corner Big Frame (E)
 with Bolt (1) 

STEP 7

STEP 8

Put on Corner Seat Cushion (M), Corner Big Back
Pillow (O) & Corner Small Back Pillow (P) 
to complete corner chair

Connect part from STEP 6,Corner Side Frame (I)
Corner Front Frame (H) with Bolt (1) &(2)

1

1

1

1

1

2

2

2
2

2

2

1 1

1

1

P

M

O

F

G

E

I

H

2 pcs

1

1

4 pcs

1

4 pcs

1

6 pcs

2

Summary of Contents for CHB-0554PCSGRY

Page 1: ...NOTE 50 TIGHTEN BEFORE FIXING ALL BOLTS ASSEMBLY INSTRUCTION Item NO CHB 0554PCSGRY CHB 0554PCSBLK Cohiba 4 Seater Sofa Set Black Item name Cohiba 4 Seater Sofa Set Grey...

Page 2: ...n align with each other Then tighten completely the screws Thus you achieve and optimal alignment of the product and prevent wobbling Don t sit find Your new product was made by hand Slightly irregula...

Page 3: ...sembly please loosen all the other screws to 50 and continue the assembly process 5 If the item is not stable please loosen all the screws adjust it on a flat ground and tighten up all screws again 6...

Page 4: ...t Frame 2 pcs Seat Frame 2 pcs Corner Big Frame 3 pcs Corner Small Frame 3 pcs Corner Seat Frame 3 pc Corner Front Frame 3 pcs Corner Side Frame 3 pcs Table Leg Frame 2 pcs Table Side Frame 2 pcs Seat...

Page 5: ...P Q 1 Part List Hardware 2 3 Corner Small Back Pillow 3 pcs Table Glass 1 pc Bolt M6x40mm 46 pcs Bolt M6x30mm 42 pcs Allen key 1 pc...

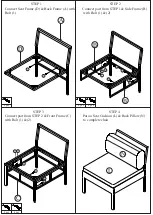
Page 6: ...Connect part from STEP 1 Side Frame B with Bolt 1 2 STEP 3 STEP 4 Put on Seat Cushion L Back Pillow N to complete chair Connect part from STEP 2 Front Frame C with Bolt 1 2 1 1 1 1 1 1 2 2 2 2 1 1 2...

Page 7: ...r Big Frame E with Bolt 1 STEP 7 STEP 8 Put on Corner Seat Cushion M Corner Big Back Pillow O Corner Small Back Pillow P to complete corner chair Connect part from STEP 6 Corner Side Frame I Corner Fr...

Page 8: ...Frame K with Bolt 2 STEP 10 Connect part from STEP 5 Table Leg Frame J with Bolt 2 STEP 11 STEP 12 Put on Table Glass Q to complete table Connect part from STEP 6 Table Side Frame K with Bolt 2 2 2 2...

Reviews: