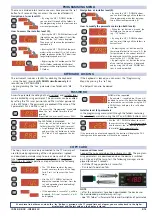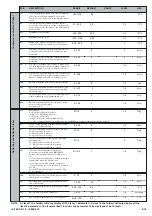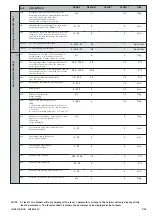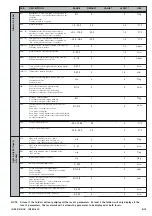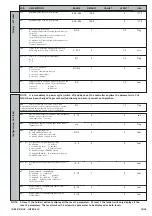
To access the Machine Status menu, press
the “set” button and quickly release it.
If no alarms are present, the label “SEt”
appears. By using the “UP” and “DOWN”
buttons you can scroll through the other
folders in the menu:
-AL: alarm folder (if alarms present, except
for faulty probes/probe errors;
-SEt: Set point setting folder.
-rtc: Real Time Clock folder
-Pb1: probe 1 value folder;
-Pb2: probe 2 value folder;
-Pb3: probe 3 value folder (if present);
Set setting
Access the “Machine Status” menu, press
the “set” button and quickly release it. The
“Set” folder label appears. To display the
Set point value, press the “set” button
again.
The Set point value appears on the display.
To change the Set point value, use the
“UP” and “DOWN” buttons within 15 sec-
onds. If the parameter is LOC = y the Set
point cannot be changed.
Alarm on
If an alarm condition exists when the
Machine Status menu is accessed the “AL”
folder label appears (see section on
“Diagnostics”).
Real Time Clock
By pressing the “set” button when the
“rtc” label appears, the label d00 (days) is
displayed. Use the “UP” and “DOWN” but-
tons to set days. If you do not use the but-
tons for over 2 seconds or if you press
“set” you switch to the hours (h00) and
minutes (‘00) folders: use the “UP” and
“DOWN” buttons to set the hours and
minutes respectively. If you do not use the
keyboard for over 15 seconds (time-out)
or if you press the “fnc” button once, the
last value shown on the display is con-
firmed and you are taken back to the pre-
vious screen mask.
NOTE: Always use the “set” button to
confirm the hours/minutes/days setting.
NOTE2: We recommend considering the
first day d00 as SUNDAY.
Displaying probes
If you press the “set” button when the
corresponding label appears, the value of
the probe associated with it is displayed.
FnC FUNCTION FOLDER
The FnC folder (last folder visible from
the Programming Menu, level 1) con-
tains the following functions.
They are activated using the “set” but-
ton
If the unit is switched off, the function
labels go back to their default status.
ACTIVATING MANUAL DEFROST CYCLE
To activate the defrost cycle manually,
press the “UP” button (if configured =1)
for 5 seconds. If the right defrosting con-
ditions are not present (the temperature
of the evaporator probe is higher than the
end of defrost temperature, for example)
or parameter OdO different than 0, the
display will flash three (3) times to indicate
that the operation will not be performed.
ADVANCED FUNCTIONS
DOOR SWITCH INPUT
This is a clean contact digital input with
programmable polarity.
The door switch input functions are con-
trolled by the values of the following para-
meters:
If activation state forcing is enabled (dOA
is not 0), the compressor and/or fan out-
puts can be activated when the time set in
parameters dCO and dFO expires.
Parameter H11 is used to configure the
digital input with values between -9 and
+9. Positive and negative values are used
to select the polarity assigned to the input
and:
NOTE:
the sign “-” indicates that the input is
activated when the contact is closed
The ‘+’ sign indicates that the input is
activated when the contact is open
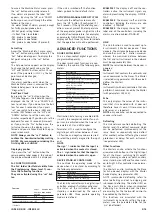
DEVICE STAND-BY CONTROLLER
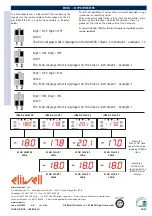
This controls the operating mode of the
device when it is on stand by according to
the following parameters:
The Stand-by controller can be digital input
or button enabled if suitably configured.
The status of the instrument when on
stand-by is determined by the value of
parameter H08. Three possible operating
modes are defined:
EXAMPLE 1
: the display is off and the con-
trollers active, the instrument signals any
alarms by reactivating the display - OFF DIS-
PLAY
EXAMPLE 2
: the display is off and all the
controllers, including the alarms, are also
disabled - STAND-BY
EXAMPLE 3
: the display shows the “OFF”
label and all the controllers, including the
alarms, are also disabled- STAND-BY
LINK
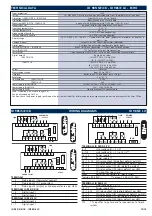
The Link function is used to connect up to
8 instruments (1 Master device and 7 slave
devices). The distance between one device
and another must be 7 metres maximum
whereas the maximum distance between
the first and last instrument in the network
must be approximately 50m.
NOTE
: the serial link between the devices is
powered.
Master
Instrument that controls the networks and
sends commands to the Slaves. The Master
is selected using parameter L00 (the value 0
defines the Master)
Slave
Instrument(s) with own controllers that also
perform(s) commands issued by the Master
(with parameters L03..L06).
Echo
This only displays the values of the instru-
ment that it is associated with (it does not
therefore have its own I/O resources but
only serves as a repeater).
NOTE
: only one Echo can be connected to
anyone instrument.
Defrosting
The Link network controls defrosting. The
Master sends the defrost command which
can be performed synchronously (at the
same time) or sequentially (one defrost
after another) without affecting the normal
protections or delays for each instrument
(see parameter L03).
Other Functions
The Master can also activate the functions
associated with buttons or the Digital Input
for all the Slaves: switching lights on/off,
alarm silencing, auxiliary set point, auxiliary
relay, stand-by (on/off) and functions relat-
ed to Night & Day controller (see parame-
ter L05).
The Master can also synchronize the Slave
(or Echo device) displays with the Master
device display (see parameter L04).
NOTE: synchronized defrosting refers to
actual defrosting and not to dripping and
subsequent defrosting. The defrost LED on
the Slave units blinks when synchronized
defrosting has terminated and the Slaves
are awaiting for the thermostat control to
be enabled by the Master.
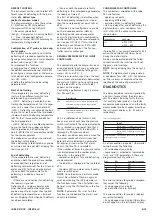
The functions are associated with the
instruments by correctly setting the para-
meters (see the parameter table for the
“Lin” label folder)
ID 985/S/E/CK - ID985/E LX
3/14
Function
Reduced set point
Aux
Pressure switch alarm reset
**default
Function label
NOT ACTIVE
SP**
AoF
rAP
Label
Function
ACTIVE
OSP
Aon
rAP
Par
Description
PAO
alarm exclusion at start-up
OdO
Output delay from power-on
H08
Operating mode in stand-by.
Par
Description
dOd Digital input switches off loads
dAd
D.I. activation delay
OAO
Alarm signal delay after disabling the digi-
tal input (door closed)
tdO
Time out door open. Time out signalled
when D.I is activated.
(door open)
dOA
Forced behaviour from
digital input
PEA
Enables forced behaviour from door
switch and/or external alarm
dCO
Delay in enabling compressor with
consensus
dFO
Delay in enabling fans with
consensus
H11
Digital output configurability/polarity 1
H21...H25
Digital output configurability 1...5


