Page 4
1000004301 (Rev. D - 07/19)
LZS8WS_2FWR, LZWSR_2CWR
Operation: Start-Up
Operation: Bottle Filler Control Board Set-Up
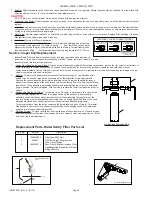
Figure 6
BOTTLE FILLING UNIT
WALL MOUNTING PLATE
12.
With the power cord, wire(s), and waterline through hole on top of water cooler place Bottle Filler on
the three (3) angled tabs protruding from the wall mounting plate, installed on wall (See Fig. 6). Make
sure round boss in gasket fits in hole of basin.
13.
Once Bottle Filler is installed on wall plate tabs, water line, wire(s) and power cord are installed properly,
push top of Bottle Filler toward wall and line up top cover two (2) holes.
14. Reinstall Top Cover on Bottle Filler (See Fig. 3) with two mounting screws from step 1 above. Caution:
do not over tighten screws.
15.
Install remaining tube insulation to the water line from bottle filler, connect Bottle Filler waterline inside
of the water cooler by connecting the 3/8” water line to the tee.
16. Install filter cartridge, remove filter from carton, remove protective cap, attach filter to filter head by firmly
inserting into head and rotating filter clockwise. NOTE: If existing plumbing rough in locations (Drain,
Water In, and Electric Supply) do not allow the filter to be mounted inside the cooler cabinet, the filter
can be installed horizontally below the unit. A retrofit kit is available to mount the filter beneath the cooler.
17. Turn water supply on and inspect for leaks. Fix all leaks before continuing.
18.
Once unit has been inspected for leaks and any leaks found corrected, connect plug end of International
Cord Sets from the Cooler and Bottle Filler into electrical outlet. Be sure to reinstall fuse to the circuit
or switch the circuit breaker back to the “ON” position.
19. Once power is applied to Bottle Filler, the GREEN LED light should illuminate showing good filter status along with the LCD Bottle Counter.
20.
Verify proper dispensing by placing cup, hand, or any opaque object in front of sensor area and verify water dispenses. Note: the first initial
dispenses might have air in line which may cause a sputter. This will be eliminated once all air is purged from the line.
21.
Once unit tests out, install Lower Panel back on water cooler(s). Units are now ready for use.
1.
Turn on the building water supply and check all connections for leaks.
2.
Ensure unit is plugged into electrical supply. Unit must have electrical power to have water flow.
WARNING
3.
Purge air from all water lines by:
•
Depressing button or front push bar of cooler/fountain.
•
Placing cup, hand, or any opaque object in front of Bottle Filler sensor area to dispense water.
NOTE:
Steady stream of water assures all air is removed.
4.
Recheck all water and drain connections with water flowing through system.
5.
Replace the lower front panel ensuring that the top metal edges are secured inside of the upper shroud. Replace all four (4) screws previously
removed.
VERIFY CONTROL BOARD SOFTWARE
1) To verify the software program of the control board the unit will
need to be shut down and restarted. The chiller (if present) does
not need to be shut down and restarted.
2) The units lower panel must be open to access the power cord and
wall outlet.
3) Shut down the unit by unplugging the power cord from the wall
outlet.
4)
Restart the unit by plugging the power cord back into the wall
outlet.
5) Upon start up, the bottle count display will show the software
designation of BF11.
ACCESSING THE PROGRAMMING BUTTON
1) To access the program button remove the top cover of the bottle-
filler. Remove the two (2) screws holding top cover to bottle-
filler with a 5/32” allen wrench. Remove top cover. Do not discard
mounting screws, they will be needed to reinstall the top cove
after
programming operations are completed. The programming button
is located at the top right side of the unit on the control board.
RESET THE FILTER MONITOR
1) Instructions apply to filtered units only.
2) Depress the program button for approximately 2 seconds until
the display changes then release. The display will change and
scroll through two messages:
“RST FLTR” – Reset Filter Monitor
“SETTINGS” – System Settings Sub Menu
If the program button is not pushed again the display will scroll
through the two messages above for three cycles and then default
back to bottle count and be back in run mode.
3) When the display changes to “RST FLTR”, depress the button
again. The display will change to show “FLTR =”. Depress the
button again and the display will show “FLTR =0”
4) The Green LED should be illuminated indicating that the visual
filter monitor has been reset.
SETTING RANGE OF THE IR SENSOR
1) Depress the program button for approximately 2 seconds until
the display changes then release. The display will change and
scroll through two messages:
“RST FLTR” – Reset Filter Status LED
“SETTINGS” – System Settings Sub Menu
If the program button is not pushed again the display will scroll
through the two messages above for three cycles and then default
back to bottle count and be back in run mode.
2) When the display changes to “SETTINGS”, depress the button
again. The display will change to show
“RNG SET” - Range set for IR sensor.
“UNIT TYP” - Type of unit (REFRIG or NON-RFRG)
“FLT SIZE” - Select filter capacity
“RST BCNT” - Reset bottle count
3) When display shows “RNG SET” push program button once the
display will show current value (can be 1 – 10) e.g. “RNG = 3”.
4) Once display shows current value push the program button to
scroll through value of 1 – 10. Select the desired range setting,
"1" being closest to sensor and "10" being farthest away.
5) Once range is selected allow approximately 4 seconds to pass and
then the display will go back to bottle counter and be in run mode.
6) Test bottle filler by placing bottle or hand in front of sensor to
make sure water is dispensed.
SETTING UNIT TYPE
1) Depress the program button for approximately 2 seconds until the
display changes then release. The display will
change and scroll
through two messages:
“RST FLTR” – Reset Filter Status LED
“SETTINGS” – System Settings Sub Menu
If the program button is not pushed again the display will scroll
through the two messages above for three cycles and then default
back to bottle count and be back in run mode.
Continued on next page:


