Page 1 of 8
PRODUCT INSTRUCTIONS
Mini Standard V7 3phase Controller
Dallimore Rd, Wythenshawe,
Manchester. M23 9NX
T: +44 (0)161 945 4561
F: +44 (0)161 945 4566
Stock Code
Description
Doc No:
PI-110
01003
Dalmatic Mini Standard V7 Controller
Iss:
1
Controller
Specification
Supply voltage:
3ph - 400VAC ± 10% L1,L2,L3,PE (‘N’ not required)
50/60Hz,
Mains supply protection should be provided by
either 10A/phase MCB Type ’C’ or fuse equivalent
Maximum Load
Max motor load by 3 x 400VAC: 4 kW
Temperature range
-10…+50°C (operating)
Humidity:
Up to 93% RH non-condensing.
Auxiliary Supply
24VDC ± 20% (non-regulated)
Max load: 250mA
(without additional plug-in options)
Safety edge input:
Pneumatic air switch (N/C Contact)
Electric type - 8k2 termination ± 10%
Optical type (Fraba OSE or Dalmatic TSS/RSS)
Photo sensor input
Photo-sensor, 24 VDC, Relay O/P N/C
Description
The Mini-Std controller has been designed as a controller which provides the
capabilities to operate an industrial door safely under electrical control by means of
a pushbutton station or key switch
Its intended use is to be connected to a suitable motor not exceeding the load for
the controller
The unit incorporates safety features to protect people or property from damage by
automatically reversing a closing door should they be activated
This together with the auto closing function and additional facilities for plug in Loop
Detectors and radio control make this unit very versatile
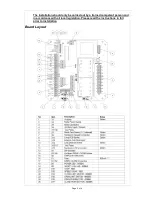
Connections are provided for Mains supply, Motor power, Travel Limits switches,
Push Buttons, Photocell and Safety Edge and 24VDC Auxiliary power (250mA max)
Summary of Contents for Mini Standard V7
Page 8: ...Page 8 of 8...


