background image

3. Installation Preparation.

4. Hanging Bracket Installation.

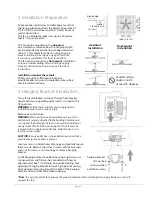
Turn off circuit breakers to current fixture from breaker 
panel and be sure operating light switch is turned to the 
OFF position. 

WARNING: 

Failure to disconnect power supply prior to 

installation may result in serious injury.

Remove existing fixture. 

WARNING:

 When using an existing outlet box, be sure the 

outlet box is securely attached to the building structure and 
can support the full weight of the fan. Ensure the outlet box is 
clearly marked "Suitable for Fan Support." If not, it must be 
replaced with an approved outlet box. Failure to do so can 
result in serious injury.

CAUTION

: Be sure outlet box is grounded properly and that a 

ground wire (green or bare) is present.

Locate screws in slotted holes of canopy and partially loosen 
these screws. Remove the other 2 screws and lock washers 
and 

save for later use

. Twist canopy to remove hanging 

bracket.

Install hanging bracket to outlet box using original screws, 
spring washers and flat washers provided with new or 
original outlet box.

*

 If installing on a vaulted ceiling, face 

opening of hanging bracket towards high point of ceiling. 
Arrange electrical wiring around the back of the hanging 
bracket and away from the bracket opening.

page 3

To prevent personal injury and damage, ensure that 
the hanging location allows the blades a clearance of 
7ft. (2.13m) from the floor and 30in. (76cm) from any 
wall or obstruction. 
This fan is suitable for room sizes up to 400 square 
feet (37.2 square meters). 

This fan can be mounted with a 

downrod

on a normal or vaulted ceiling. The hanging length 
can be extended by purchasing a longer downrod 
(0.5in./1.27cm diameter). 

After installing hanging 

bracket,

 c

ontinue to Section 5 on page 4 for those 

instructions. Installation" for those instructions. 

This fan can also mount as a 

flushmount

 installation 

only

 on a normal ceiling. 

After installing hanging 

bracket, continue to Section 6 on page 5 for those 
instructions.

Installation requires these tools:

Phillips screwdriver, flathead screwdriver, 
adjustable pliers or wrench, stepladder, wire cutters, 
and rated electrical tape.

Vaulted ceiling 
angle is not to 
exceed 25 degrees.  

  downrod
installation

ON

OFF

ON

OFF

blade edge

7 feet

(2.13m)

(76cm)

30 

inches

hanging bracket

spring washers

outlet box screws

flat washers

*Note

: It is very important that you use the proper hardware when installing the hanging bracket as this will 

support the fan. 

flushmount

installation

12f

t.

 - 20f

t.

12ft. - 20ft.

(3.66m - 6.1m)

(3.66m - 6.1m)

Summary of Contents for E-PD52ABZ5C4

Page 1: ...7 8 Testing Your Fan pg 8 Troubleshooting pg 9 Warranty pg 9 Parts Replacement pg 9 Installation Guide For Models E PD52ABZ5C4 E PD52BP5C4 E PD52WW5C4 net weight of fan 17 64 lb 8kg E124404 READ THESE INSTRUCTIONS AND SAVE THEM FOR FUTURE USE Federal regulations require all ceiling fans with light kits manufactured or imported after January 1 2009 to limit total wattage consumed by the light kit t...

Page 2: ...ad wires from the fan If your house wire is larger than 12 gauge or there is more than one house wire to connect to the two fan lead wires consult an electrician for the proper size wire connectors to use 5 Electrical diagrams are for reference only Light kits that are not packed with the fan must be UL listed and marked suitable for use with the model fan you are installing Switches must be UL ge...

Page 3: ...t all parts have been included 2 Parts Inventory a canopy 1 piece b hanging bracket pre attached to canopy 1 piece c 4in downrod and hanging ball with pin and clip 1 piece d motor housing 1 piece e blade arm 5 pieces f switch housing cap 1 piece g blade 5 pieces h light kit fitter 1 piece i glass shade 4 pieces j hardware packs a b c d e g h i j f required bulbs 4 x 40 watt candelabra bulbs includ...

Page 4: ... Arrange electrical wiring around the back of the hanging bracket and away from the bracket opening page 3 To prevent personal injury and damage ensure that the hanging location allows the blades a clearance of 7ft 2 13m from the floor and 30in 76cm from any wall or obstruction This fan is suitable for room sizes up to 400 square feet 37 2 square meters This fan can be mounted with a downrod on a ...

Page 5: ...t down the longer downrod B the top of the downrod should be noted as having a set screw hole use this hole when setting the set screw Insert stop pin into top of extended downrod and raise hanging ball Be sure stop pin aligns with slots on the inside of the hanging ball Tighten set screw securely Loosen yoke set screws and nuts at top of motor housing Remove pin and clip from downrod if you have ...

Page 6: ...eal 6 holes Notice that 3 of these holes are larger than the others If there are only 3 screws in top of motor housing please proceed to next paragraph If there are 6 screws in top of motor housing remove every other screw and lock washer Thread wiring through canopy Place canopy over yoke aligning larger holes in canopy with the 3 existing screws in top of motor housing Insert the 3 screws and 3 ...

Page 7: ......

Page 8: ...provided Connect all GROUND GREEN wires together from fan to BARE GREEN wire from ceiling with wire connector provided If you intend to control the fan light with a separate light switch connect BLUE wire from fan to the BLACK supply from the independent switch Wrap each wire connector separately with electrical tape as an extra safety measure This fan is remote control adaptable remote control so...

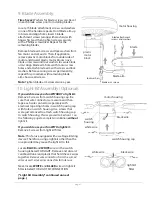
Page 9: ...nnectors for later use Next locate WHITE and BLACK wires in light kit fitter labeled FOR LIGHT KIT CONNECTION Light Kit Assembly continued on next page blade attachment screws and washers blade arm screws lock washers motor housing switch housing cap switch housing black wire white wire black wire white wire Time Saver Washers for blade screws can be set on each blade screw prior to installing bla...

Page 10: ......

Page 11: ...efore finalizing installation Restore power from circuit box and wall switch if applicable Test fan speeds with the pull chain on the switch housing Start at the OFF position no blade movement First pull will set the fan to HI Second pull will set the fan to MEDIUM Third pull will set the fan to LOW Fourth pull will re set the fan to OFF setting Test lights with the pull chain in the middle Refer ...

Page 12: ...he original household purchaser for indoor use under the following provisions 1 YEAR WARRANTY ELLINGTON LITEX INDUSTRIES LTD will replace or repair any fan which has faulty performance due to a defect in material or workmanship Contact Litex Customer Service at 1 800 527 1292 to arrange for return of fan Return fan shipping prepaid to Litex Industries Ltd We will repair or ship you a replacement f...

Reviews: