background image

9

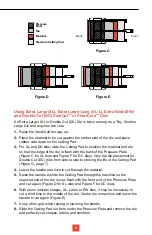
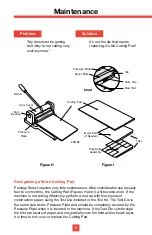
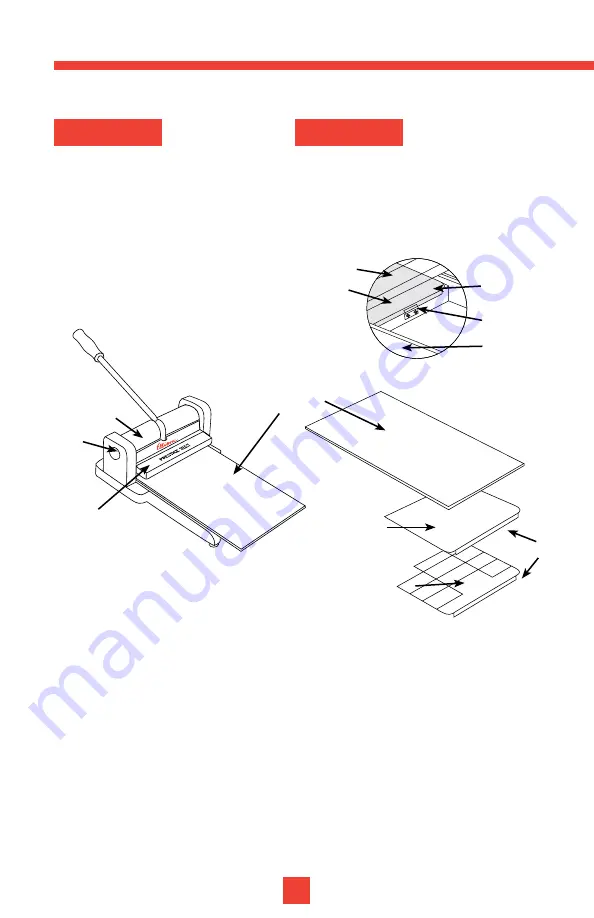
Figure H

Figure I

Cutting Pad

Step Shim

Assembly

BACK

End 

Bearing

FRONT

Mylar Shim
(If Needed)

Cam Cover

Shim Clip

Pressure Plate 

Mylar Shim

Side Rail

Tab

Inset

Pressure

Plate

Tabs

“My dies must be getting 
dull–they’re not cutting very 
well anymore.”

It’s not the die that needs 
replacing–it’s the Cutting Pad!

Problem

Solution

Recognizing a Worn Cutting Pad

Prestige Select requires very little maintenance. After considerable use (usually 
four to six months), the Cutting Pad (Figures H and I) will become worn. If the 
machine is not cutting effectively, perform a test cut with four pieces of  
construction paper, using the Test Die included in the Tool Kit. The Test Die is 
the same size as the Pressure Plate and should be completely covered by the 
Pressure Plate when it is inserted in the machine. If the Test Die cuts through 
the first two layers of paper and only partially cuts the third and/or fourth layer, 
it is time to turn over or replace the Cutting Pad.

Maintenance

Summary of Contents for PRESTIGE SELECT

Page 1: ...Instruction Booklet...

Page 2: ...SureCut and ClearCrop Dies Using Extra Large Extra Large Long Extra Wide and Double Cut Dies Using SureCut Crease Rule Dies Suggestions for Successful Cutting Helps Hints Maintenance Recognizing a Wo...

Page 3: ...ry when a machine is used near children Do not contact moving parts Only use attachments recommended or sold by the manufacturer Do not use outdoors Hitting Hazard Keep clear of handle arc and cutting...

Page 4: ...t the material that has been cut Place the dies decorative shapes letters and numbers sold separately in the Die Storage Racks sold separately See Helps and Hints for a suggested storage method page 8...

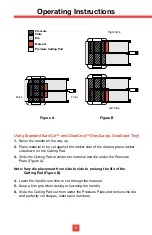
Page 5: ...ubber side down on the Cutting Pad 3 Slide the Cutting Pad to center the material and die under the Pressure Plate Figure A Note Vary die placement from side to side to prolong the life of the Cutting...

Page 6: ...ies and Figure F for DC dies Vary the die placement for Double Cut DC dies from side to side to prolong the life of the Cutting Pad Figure G page 7 4 Lower the handle one time to cut through the mater...

Page 7: ...n the middle of the die Prestige Select can be used to cut anything scissors can cut See Materials Guide on pages 13 and 14 for suggestions Turn the Cutting Pad over routinely weekly for high usage tu...

Page 8: ...the machine under the Pressure Bearings A convenient way to store the dies is on their sides Place the Die Storage Rack on its side so the dies sit vertically in the rack not horizontally Insert the...

Page 9: ...ry little maintenance After considerable use usually four to six months the Cutting Pad Figures H and I will become worn If the machine is not cutting effectively perform a test cut with four pieces o...

Page 10: ...distribute cutting pressure in the machine 5 Insert new Cutting Pad into the machine on top of the Step Shim Assembly 6 Check the Cutting Pad height using the following procedures a Place the Test Die...

Page 11: ...y push the rule slightly apart This cleaning is especially important if cutting thick materials such as Flexible Magnetic Sheets Pop Up Sponge or Self Adhesive Felt Recognizing Worn Bearings After man...

Page 12: ...nly part of letter or design If solutions 1 and 2 have been tried and the dies still don t cut completely try cutting fewer pieces of material at a time Very large or intricate shapes e g Snowflake or...

Page 13: ...ts of material with a few very intricate shapes e g Snowflake or Spider Use only one sheet of material when cutting with a SureCut CreaseRule Die Number of Pieces Product 1 Aluminum 016 1 Balsa Wood 3...

Page 14: ...rvice What Will Ellison Do Ellison will repair or replace any manufacturing defects for Products returned during the Product s lifetime Warranties 3 PaperWood 1 Personalized Embossing Plastic PEP 1 Pl...

Page 15: ...ALSO HAVE OTHER RIGHTS WHICH VARY FROM STATE TO STATE How Do You Get Warranty Service If you believe that there is a manufacturing defect in your Product during the warranty period contact Ellison Cus...

Page 16: ...16 Instructions in Other Languages French German Spanish 17 22 27...

Page 17: ...ce de travail Mettre l appareil sur la surface de travail en positionnant le c t de l appareil face l utilisateur et le devant de l appareil sur la droite figure A p 5 Mode d emploi Utilisation des ma...

Page 18: ...e p 10 NE JAMAIS mettre de mat riau sur les matrices Certaines matrices Ellison sont fournies avec une cale de d coupe rapide Quick Cut Shim pr assembl e et accompagn e d instructions Aucune autre mat...

Page 19: ...apis de d coupe en respectant la proc dure suivante a Placer la matrice de test disponible dans le Kit d accessoires face caoutchout e vers le bas sur le tapis de d coupe et faire glisser dans l appar...

Page 20: ...r le paragraphe Remplacer le tapis de d coupe p 10 Si le probl me persiste ajouter une ou plusieurs cales de mylar sous le tapis de d coupe jusqu l obtention d un d coupage acceptable Veiller toujours...

Page 21: ...rts sous cette garantie Avis de non responsabilit ELLISON NE PEUT TRE TENU RESPONSABLE DES DOMMAGES INDIRECTS ET ACCESSOIRES DES DOMMAGES POUR PR JUDICE CORPOREL Y COMPRIS LE D C S ET DES DOMMAGES AUX...

Page 22: ...rbeitsfl che dass die Seite der Maschine auf den Benutzer und die Vorderseite nach rechts zeigt siehe Abb A Seite 5 Bedienungsanleitung Bei Verwendung von regul ren SureCut und ClearCrop Stanzeisen gr...

Page 23: ...e auf Seite 10 Legen Sie AUF KEINEN FALL Schnittmaterial auf die Stanzeisen Einige Ellison Stanzeisen werden mit einem vormontierten Quick Cut Ausgleichsst ck und einer entsprechenden Anleitung gelief...

Page 24: ...tanzeisen im Werkzeugsatz mit der Gummiseite nach unten auf die Stanzplatte und schieben Sie es OHNE Papier in das Ger t Dr cken Sie dann den Heben einmal nach unten b Nehmen Sie das Stanzeisen und di...

Page 25: ...N heres hierzu finden Sie unter Auswechseln der Stanzplatte Seite 10 Wenn das Problem damit nicht behoben wird f gen Sie unter der Stanzplatte weitere Mylar Ausgleichsst cke hinzu bis die Stanzung fun...

Page 26: ...aftungsausschl sse ELLISON BERNIMMT KEINE HAFTUNG F R NEBEN ODER FOLGESCH DEN PERSONENVERLETZUNGEN EINSCHLIESSLICH SOLCHE MIT TODESFOLGE ODER SACHSCH DEN DIE DAUER VON STILLSCHWEIGENDEN GARANTIEN IST...

Page 27: ...asar el borde de la superficie de trabajo Coloque la m quina en la superficie de trabajo con el lateral de la m quina mirando al usuario y la parte delantera de la misma a la derecha Figura A p gina 5...

Page 28: ...rte y reempl cela con una nueva consulte C mo reemplazar la almohadilla de corte p gina 10 NUNCA coloque ning n material en la parte superior de los troqueles Algunos troqueles Ellison vienen con una...

Page 29: ...lmohadilla de corte usando los siguientes procedimientos a Coloque el troquel de prueba se encuentra en el Kit de herramientas con el lado de goma hacia abajo en la almohadilla de corte y desl celo en...

Page 30: ...a por ambos lados des chela adecuadamente y c mbiela por una almohadilla de corte nueva Revise C mo reemplazar la almohadilla de corte p gina 10 Si el problema persiste a ada una o m s cu as Mylar baj...

Page 31: ...xoneraciones de la garant a ELLISON NO SER RESPONSIBLE POR DA OS EMERGENTES Y ACCIDENTALES DA OS POR LESIONES PERSONALES INCLUIDA LA MUERTE Y DA OS A BIENES LA DURACI N DE TODAS LAS GARANT AS IMPL CIT...

Page 32: ...ed 09 15 08 For additional help call Ellison within USA 800 253 2238 or outside USA 949 598 8822 or within UK 0871 222 2277 or outside UK 44 0 845 345 2277 within USA Fax 800 253 2240 or outside USA F...

Reviews: