126
ENGLISH
OPERA
T
ION OF THIS
CAMERA
1.
When the OSD menu is in display, hide the OSD menu by operating the front operating
panel or repeatedly pressing the [BACK] button on the wireless remote control.
When [
HIDE MENU] is ON, cancel it.
2.
Press the [
] button on the front operating panel
or the [
] button on the wireless remote control
to switch the output video to the camera video.
3.
Insert the SD card into the SD card slot
of the side panel.
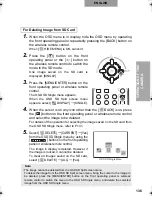
1.
When the OSD menu is in display, hide the OSD menu by operating the front operating
panel or repeatedly pressing the [BACK] button on the wireless remote control.
When [
HIDE MENU] is ON, cancel it.
2.
Press the [
] button on the front operating panel
or the [
] button on the wireless remote control
to switch the output video to the camera video.
3.
Push in the SD card lightly with your finger.
The SD card can be removed.
Using SD Card (Option)
For Inserting SD Card
For Removing SD Card
Note:
• When inserting the SD card into the SD card slot, confirm that the output video has been switched to the camera
video beforehand. If not, the contents of the SD card may be destroyed or the SD card may be broken.
• Since the SD card is made up of components susceptible to static electricity, the SD card may
have false operation or its contents may be destroyed under the influence of static electricity.
Therefore, treat the SD card with utmost care not to be affected by static electricity.
• All image data that can be displayed on the Camera is only the image data saved in the
Camera and that converted by using the bundled software.
• If the display of any image data in any undisplayable form is attempted, the output screen is blackened or grayed.
• If the video is switched to the SD card image without inserting the SD card in the SD card
slot, the output screen is blackened and the warning of "NO CARD" is displayed there.
• After using the SD card, do not leave it inserted but remove it and keep it safe.
• It is recommendable that the SD card to be used should be Panasonic 256MB or 512MB. The resolutions available to
the images to be saved are 1280x1024 (SXGA output), 1280x720 (HD 720P output) and 1280x960 (XGA output).
• The Camera is capable of controlling up to 2048 images.
• ELMO Co., Ltd. is not liable to any damages and passive damages due to the loss of the data on the SD card.
• In the SD mode, the bundled software cannot be used.
• The Camera is not compatible with SDHC card.
SD card
Push in
02_ 本機の操作 .fm 126 ページ 2008年1月25日 金曜日 午後12時49分
Summary of Contents for Document Camera P30S
Page 2: ...81 ...


