104
OPERA
TION
PR
OCEDURE
English
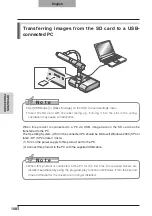
Presentation using an SD card
(commercially-available)
N o t e
• Before starting, insert a commercially available SD card into the SD card slot on the
side panel. Push the card again to remove the SD card.
• Insert the SD card with the label facing up. Forcing it into the slot in the wrong
orientation may cause a malfunction.
• Before loading or unloading the SD card or turning the power off, be sure to select
the camera image by pressing the camera button [
] on the operating panel, and
confirm that the output image has been switched to camera image. Otherwise, the SD
card contents could be damaged or the camera could malfunction.
• The SD card is composed of parts vulnerable to static electricity. Therefore, due to
static electricity, the SD card could malfunction or its contents could be destroyed.
When handling the SD card, take care to avoid static electricity.
• You may not be able to display image data other than that saved in this product or
converted using the conversion function of the software supplied. Also, images of
7MBs or more cannot be displayed.
• When displaying image data in an unsupported format, [
] or [
] is displayed on
the output screen.
• If you try displaying image data on an SD card without inserting an SD card, a black
screen with the message [
] is displayed.
• After using the SD card, do not leave it inserted in this product; be sure to remove it.
• W e r e c o m m e n d u s i n g S D c a r d s ( 5 1 2 M B , 1 G B , a n d 2 G B ) m a d e b y
Panasonic, and SDHC cards (up to 4GB) made by Panasonic.
The resolution for the stored images is 1280x1024 (for SXGA output),
1280x800 (for WXGA output), and 1280x960 (for XGA output).
This product can store up to 2048 images.
• ELMO is not liable for any damage caused by the loss of the data in the SD card or
passive damage.
• When an SD card is inserted, "Card Reading" is displayed on the screen, and
to allow this device to check the contents of the SD card, it may take some time
between inserting the card and the JPEGs being displayed and captured.
In that case, please wait a short time before performing any of the operations
mentioned above.
• When an SD card is inserted and then the power to the main unit is turned on, it may
take a while before operations can be performed on the main unit.
• Please wait a short time until the power switch on the main unit lights blue before
performing any operations.
Summary of Contents for L-1EX
Page 2: ......
Page 3: ......
Page 4: ......
Page 5: ...AC AC...
Page 6: ...AC AC AC AC AC AC...
Page 7: ...AC AC AC AC AC...
Page 8: ...AC AC AC AC AC AC...
Page 9: ...AC AC AC100V 50Hz 60Hz 0 40 30 85 CMOS CMOS AC FD MO MD...
Page 10: ...CD DVD LED SD Ni Cd 4...
Page 12: ...10 Manual 55 56 56 57 58 60 61 PinP 62 63 6 64 64 7 66 66 67 67 68 68...
Page 13: ...11 P 15 P 35 P 49 P 35 AF P 50 P 35 P 16 P 12 P 45 P 35 Image Mate CD ROM P 14 1...
Page 14: ...12...
Page 18: ...16 4 2 4...
Page 20: ...18 7 30 7m 30 3 0 3 0 3 0 3 0 3 0 3 0 3 0 3 0...
Page 21: ...19 OSD On Screen Display OSD OSD OSD OSD OSD 1 MENU OSD 2 MENU...
Page 22: ...20 1 2...
Page 23: ...21 Image Setting Function Setting Back OSD MENU OSD P 54 Camera OSD...
Page 30: ...28 1 2 90 180 2...
Page 31: ...29 3 AC DC IN 12V AC P 30 POWER 4 POWER ON POWER ON...
Page 32: ...30 AC RGB RGB OUT RGB PC RGB RGB IN RGB RGB OUT DC IN 12V VIDEO OUT TV RGB IN USB PC PC PC PC...
Page 34: ...32 1 POWER OFF POWER 2 OFF 2 AC AC 3 90 3 OFF...
Page 35: ...33 4 180 AC OFF...
Page 37: ...35 PC ON P 49 AF P 50 BRIGHTNESS BRIGHTNESS P 53 ON OFF ON OFF...
Page 45: ...43 P 45 PC ON OSD Microscope Set AF Image Mode 1 Graphics1...
Page 47: ...45 1 2 3...
Page 48: ...46 4 5 20mm 28mm...
Page 49: ...47 PC ON AF OSD Focus Manual P 50 BRIGHTNESS BRIGHTNESS P 53 ON OFF ON OFF 50mm...
Page 50: ...48 OSD Image Rotation On 180 110 110 50mm OFF...
Page 51: ...49 ZOOM OUT ZOOM IN 5 2 8 SD SD 5 L 1ex...
Page 52: ...50 AF 50mm SD SD...
Page 53: ...51 OSD Focus OSD AF AF Mode Zoom Sync...
Page 54: ...52 ON OFF ON OFF OFF LED LED ON OFF ON OFF...
Page 56: ...54 RGB RGB IN SD RGB RGB IN RGB VIDEO VIDEO PC PC RGB OUT PC VIDEO CAMERA...
Page 58: ...56 OSD Preset 1 3 USB OSD Preset ON Power On USB 4 1 3 ON AF E x i t O N 3 2 1 ZOOM IN...
Page 59: ...57 OSD Call 1 3 OSD Call ON Power On OSD Call Default USB E x i t O N 3 2 1...
Page 60: ...58 OSD Function Setting Highlight Darkness Size...
Page 61: ...59 SD PC OSD...
Page 62: ...60 OSD Function Setting Mask Darkness SD PC...
Page 63: ...61 OSD Function Setting Scroll 2 3 4 SD PC...
Page 64: ...62 PinP 1 4 PinP 1 4 PinP PinP SD PC PinP 1 4...
Page 65: ...63 RGB 1 OFF 2 3 ON 1 2 MENU ENTER...
Page 67: ...65 SD SD SD SD SD 2 1 2 LED...
Page 82: ...80 PART NAMES AND FUNCTIONS English Functions 1 2 6 7 8 11 13 3 9 4 5 14 10 12 Operating Panel...
Page 210: ......
Page 247: ...245 INBETRIEBNAHME Deutsch Pr sentation mit einer SD Karte im Handel erh ltlich...
Page 282: ......
Page 283: ......


