121
VARIOUS
FUNCTIONS AND
OPERA
TIONS
English
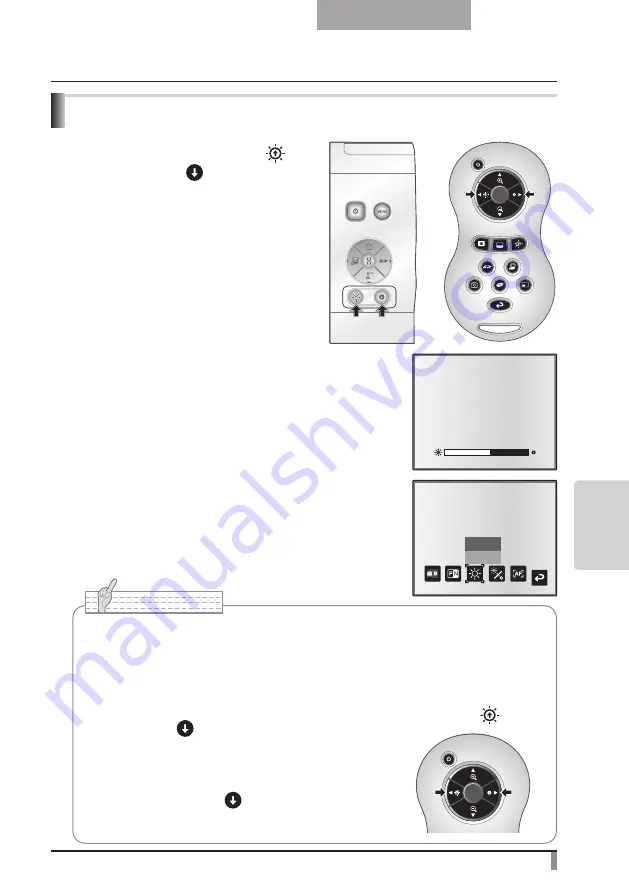
Adjusting the brightness
P r e s s t h e [ B R I G H T N E S S
] o r
[ B R I G H T N E S S
] bu t t o n s o n t h e
operating panel or on the remote control to
adjust image brightness.The following two
adjustment modes can be set by selecting
[Brightness] from the OSD menu.
Automatic brightness adjustment
([Brightness]
→
[Auto] in the OSD) The brightness of the
image changes automatically according to the brightness of
the object.
Manual brightness adjustment
([Brightness]
→
[Manual] in the OSD)
The brightness of the image is fixed to the specified level.
■
■
Auto
> Manual
N o t e
• Factory setting is set to [Auto].
• Manual adjustment fixes the brightness and does not adjust to changes in
brightness of the object.
• When the brightness becomes dark, the frame rate slows, and the image may
become hard to see.
• By setting [Guide] to [On] in the OSD menu, the setting details are displayed on the screen.
• To go back to the factory settings, press the [BRIGHTNESS
] and
[BRIGHTNESS
] buttons on the operating panel at the
same time, or set [Reset Brightness] from the OSD menu.
• In places where the object is exposed to bright sunlight
(e.g. near a window), or extremely bright lights, the
brightness of the screen may not dim sufficiently, even
when the [BRIGHTNESS
] button is pressed.
In such cases, adjust the amount of light by closing the
curtains or moving the source of the light.
Summary of Contents for L-1EX
Page 2: ......
Page 3: ......
Page 4: ......
Page 5: ...AC AC...
Page 6: ...AC AC AC AC AC AC...
Page 7: ...AC AC AC AC AC...
Page 8: ...AC AC AC AC AC AC...
Page 9: ...AC AC AC100V 50Hz 60Hz 0 40 30 85 CMOS CMOS AC FD MO MD...
Page 10: ...CD DVD LED SD Ni Cd 4...
Page 12: ...10 Manual 55 56 56 57 58 60 61 PinP 62 63 6 64 64 7 66 66 67 67 68 68...
Page 13: ...11 P 15 P 35 P 49 P 35 AF P 50 P 35 P 16 P 12 P 45 P 35 Image Mate CD ROM P 14 1...
Page 14: ...12...
Page 18: ...16 4 2 4...
Page 20: ...18 7 30 7m 30 3 0 3 0 3 0 3 0 3 0 3 0 3 0 3 0...
Page 21: ...19 OSD On Screen Display OSD OSD OSD OSD OSD 1 MENU OSD 2 MENU...
Page 22: ...20 1 2...
Page 23: ...21 Image Setting Function Setting Back OSD MENU OSD P 54 Camera OSD...
Page 30: ...28 1 2 90 180 2...
Page 31: ...29 3 AC DC IN 12V AC P 30 POWER 4 POWER ON POWER ON...
Page 32: ...30 AC RGB RGB OUT RGB PC RGB RGB IN RGB RGB OUT DC IN 12V VIDEO OUT TV RGB IN USB PC PC PC PC...
Page 34: ...32 1 POWER OFF POWER 2 OFF 2 AC AC 3 90 3 OFF...
Page 35: ...33 4 180 AC OFF...
Page 37: ...35 PC ON P 49 AF P 50 BRIGHTNESS BRIGHTNESS P 53 ON OFF ON OFF...
Page 45: ...43 P 45 PC ON OSD Microscope Set AF Image Mode 1 Graphics1...
Page 47: ...45 1 2 3...
Page 48: ...46 4 5 20mm 28mm...
Page 49: ...47 PC ON AF OSD Focus Manual P 50 BRIGHTNESS BRIGHTNESS P 53 ON OFF ON OFF 50mm...
Page 50: ...48 OSD Image Rotation On 180 110 110 50mm OFF...
Page 51: ...49 ZOOM OUT ZOOM IN 5 2 8 SD SD 5 L 1ex...
Page 52: ...50 AF 50mm SD SD...
Page 53: ...51 OSD Focus OSD AF AF Mode Zoom Sync...
Page 54: ...52 ON OFF ON OFF OFF LED LED ON OFF ON OFF...
Page 56: ...54 RGB RGB IN SD RGB RGB IN RGB VIDEO VIDEO PC PC RGB OUT PC VIDEO CAMERA...
Page 58: ...56 OSD Preset 1 3 USB OSD Preset ON Power On USB 4 1 3 ON AF E x i t O N 3 2 1 ZOOM IN...
Page 59: ...57 OSD Call 1 3 OSD Call ON Power On OSD Call Default USB E x i t O N 3 2 1...
Page 60: ...58 OSD Function Setting Highlight Darkness Size...
Page 61: ...59 SD PC OSD...
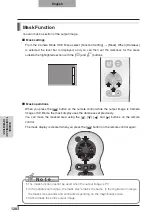
Page 62: ...60 OSD Function Setting Mask Darkness SD PC...
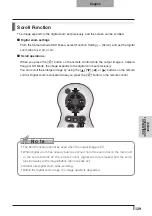
Page 63: ...61 OSD Function Setting Scroll 2 3 4 SD PC...
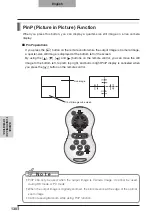
Page 64: ...62 PinP 1 4 PinP 1 4 PinP PinP SD PC PinP 1 4...
Page 65: ...63 RGB 1 OFF 2 3 ON 1 2 MENU ENTER...
Page 67: ...65 SD SD SD SD SD 2 1 2 LED...
Page 82: ...80 PART NAMES AND FUNCTIONS English Functions 1 2 6 7 8 11 13 3 9 4 5 14 10 12 Operating Panel...
Page 210: ......
Page 247: ...245 INBETRIEBNAHME Deutsch Pr sentation mit einer SD Karte im Handel erh ltlich...
Page 282: ......
Page 283: ......


