background image

36

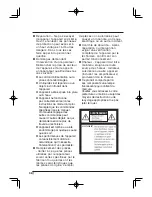
de pièces non autorisées peut 

causer un incendie, un risque 
électrique ou un autre incident.

 Contrôle de sécurité – Après 

réparation ou intervention, 
exiger une vérification 
complète de l’appareil par le 
technicien, confirmant son 
parfait fonctionnement.

 Chaleur - L’appareil doit être 

maintenu éloigné de toute 
source de chaleur : radiateur, 
cuisinière ou autre appareil 
(incluant les amplificateurs) 
produisant de la chaleur.

 Ce produit comporte parmi 

ses composants une lampe 
fluorescente qui contient du 
mercure.
Veuillez vous adresser à votre 
préfecture ou mairie au sujet des 
moyens de destruction ou de 
recyclage appropriés et ne pas 
jeter tel quel.

AVERTISSEMENT

AVERTISSEMENT :

 Réparation – Ne pas essayer 

de réparer l’appareil soi-même. 
Ouvrir et enlever les panneaux 
de protection peut exposer à 
un haut voltage et à d’autres 
dangers. Dans tous les cas, 
faire appel à du personnel 
qualifié.

 Dommages  demandant 

l’intervention d’un réparateur - 
Débrancher la prise de secteur 
de l’appareil et faire appel à 
un réparateur qualifié dans les 
cas suivants :

 Le cordon d’alimentation ou la 

prise sont endommagés.

 Un liquide s’est répandu ou un 

objet s’est introduit dans 
l’appareil.

 L’appareil a été exposé à la pluie 

ou à l’eau.

 L’appareil ne fonctionne 

pas correctement selon les 
instructions du mode d’emploi. 
Ne régler que les commandes 
spécifiées dans le manuel. 
Un mauvais réglage des 
autres commandes peut 
causer d’autres dégâts ce qui 
demandera encore plus de 
travail au technicien. 

 L’appareil est tombé ou a été 

endommagé par quelque cause 
que ce soit.

 Les performances de l’appareil 

ont sensiblement diminué : 
cela indique qu’il nécessite 
l’intervention d’un spécialiste.

 Remplacement des pièces 

- Veiller à ce que les pièces 
utilisées par le réparateur 
soient celles spécifiées par le 
fabricant ou qu’elles ont les 
mêmes caractéristiques que 
les pièces d’origine. L’emploi 

Summary of Contents for TT-02

Page 1: ...OPERATION PROCEDURE VARIOUS FUNCTIONS AND OPERATIONS TROUBLESHOOTING SPECIFICATIONS English P1 P32 Teacher s Tool TT 02 INSTRUCTION MANUAL Please read this instruction manual carefully before using th...

Page 2: ...rious injury to a child or adult and serious damage to the product Use only with a cart stand tripod bracket or table recommended by the manufacturer or sold with the product Any mounting of the produ...

Page 3: ...st them paying particular attention to cords at plugs convenience receptacles and the point where they exit from the product Lightning For added protection for this product during a lightning storm or...

Page 4: ...part Unauthorized substitutions may result in fire electric shock or other hazards Safety Check Upon completion of any service or repairs to this product ask the service technician to perform safety...

Page 5: ...erence by one or more of the following measures Reorient or relocate the receiving antenna Increase the separation between the equipment and receiver Connect the equipment into an outlet on a circuit...

Page 6: ...zene Do not directly point the camera lens into the sun or the camera may be damaged Luminescent and Black Spots There may be some pixels that do not properly operate due to the use of CCD Area Image...

Page 7: ...sfer with your closest attention to prevent the camera head from shocking When a magnetic sheet is brought close to a cathode ray tube Braun tube a speaker a CD player a DVD or cellular phone etc the...

Page 8: ...ials etc Using the stage 19 Presentation using a Microscope 20 Shooting a 3 D object 21 Shooting wall surface or distant view 22 5 VARIOUS FUNCTIONS AND OPERATIONS 23 Zoom 23 Focus 24 Auto focus 24 Ma...

Page 9: ...1 4 5 6 3 2 Name of Each Part Appearance No Name No Name 1 Camera head 6 Stage positioning P 19 2 Zoom dial P 23 7 Rear panel P 11 3 AF Button P 24 8 Stage P 19 4 Camera column 9 Magnetic sheet P 19...

Page 10: ...2 OSD operation MENU To display delete MENU OSD 7 PC RGB IN terminal image To output the image inputted to RGB IN terminal from RGB output terminal P 27 3 Direction To select the OSD item 8 RGB IN te...

Page 11: ...NTSC PAL system monitor e g TV monitor P 16 5 OUTPUT DIP Switch To switch the following Left key Output terminal Right key VIDEO output system When switching the DIP switch key settings be sure to tur...

Page 12: ...er lower arrows F N To focus manually P 24 Brightness Auto Mode to change brightness which automatically follows the object P 26 Manual Mode to fix the brightness of the image to a specific level P 26...

Page 13: ...Color B W Color To switch the color B W of the camera image Use this function to make B W document easy to read B W Edge Effect 3 To set the level of edge enhancement when the Graphics mode is selecte...

Page 14: ...urn the power switch of the main unit ON 90 Note Proper set up position of the camera head is as shown in the right figure Never apply excessive force to the camera head Note Be sure to hold the lower...

Page 15: ...he analog RGB input terminal of this product Signal allocation 10 9 8 7 6 5 4 3 2 1 15 14 13 DSUB 15P shrink terminal Female 12 11 Video signal Horizontal synchronized signal Vertical synchronized sig...

Page 16: ...plug of the supplied AC adapter to the DC IN 12V terminal on the rear panel before inserting the AC adapter in an outlet Note As for switching over of the image output refer to OUTPUT DIP switch on pa...

Page 17: ...ble 3 Turn the camera head to the direction shown in the figure Note Proper storing position of the camera head is as shown in the figure on the right Never apply excessive force to the camera head Pa...

Page 18: ...nnect the main unit to the projector or the PC monitor and then turn the power switch of the main unit ON Adjusting the size Place an object adjust the position of the object with the zoom dial so tha...

Page 19: ...supplied magnet sheet to properly fix the printed materials etc on the stage Adjusting the size Place an object on the stage adjusting the position of the object with the zoom dial so that the objecti...

Page 20: ...the focus Adjust focus by pressing the AF button In a case when the object can not be brought into focus with the AF button adjust focus with the manual focus by selecting Focus in the OSD menu P 25...

Page 21: ...a head as shown in the above figure to shoot a 3 D object Adjusting the size Adjust the position of the object with the zoom dial so that the objective part fits the screen size Adjusting the focus Pr...

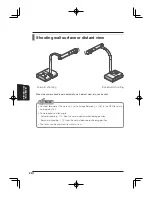
Page 22: ...t Forward shooting Backward shooting Note To shoot forward of the main unit set to Image Rotation On in the OSD to rotate the image by 180 Camera head rotation angle Forward shooting 110 from the norm...

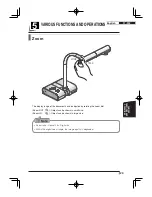
Page 23: ...P32 Zoom The display range of the document can be adjusted by rotating the zoom dial Zoom OUT Object can be shown in small size Zoom IN Object can be shown in large size Note Zoom ratio Optical 5 3x...

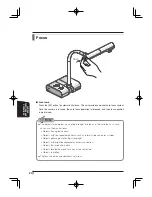
Page 24: ...objects listed below may not be brought into focus in the auto focus In such cases use the manual focus Objects having low contrast Objects with fine repeated patterns such as lateral stripes and cros...

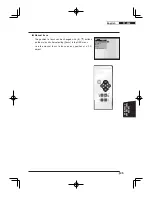
Page 25: ...P1 P32 Manual focus The position to focus can be changed with buttons on the main unit after selecting Focus in the OSD menu Use the manual focus to focus on any position of a 3 D object Focus Bright...

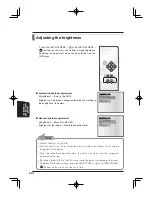
Page 26: ...Brightness of the image is fixed to the specified level Note Factory setting is set to Auto Manual adjustment fixes the brightness and does not follow the change in brightness of the object When the...

Page 27: ...essing the CAMERA button and the PC button respectively By using these functions output images can be switched without disconnecting cables Note The PC button can not be used when the dip switch is se...

Page 28: ...nual Setting to White Balance Manual for the OSD fixes the white balance to allow R Gain and B Gain for the OSD to be adjustable Note The automatically followed color temperature ranges from approx 30...

Page 29: ...setting Note The saved conditions are retained even if the power is turned OFF SELECT Gamma Preset Call Guide Language 1 2 3 Power On MENU OK SELECT Gamma Preset Call Guide Language 1 2 3 Power On De...

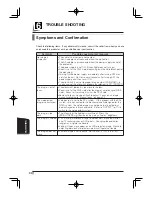
Page 30: ...The document object is too close to the lens Zoom is set at the TELE side after focusing at a wide angle WIDE side Focus to its maximum limit at the TELE side Some auto focus may be difficult to adjus...

Page 31: ...top Optical zoom 5 3X Digital zoom 8X Focus Auto Manual Image pick up element 1 3 CCD Total pixels Horizontal 1077 Vertical 788 Approx 850 000 pixels Effective pixels Horizontal 1024 Vertical 768 Sync...

Page 32: ...l 1 Warranty Card 1 Trademark is the trademark of ELMO Co Ltd VESA and SVGA are the registered trademarks of Video Electronics Standards Association VGA and XGA are the trademark registered trademark...

Page 33: ...DE FONCTIONNEMENT DESCRIPTION DES FONCTIONS D PANNAGE CARACTERISTIQUES TECHNIQUES Fran ais P33 P64 Outil enseigner TT 02 MODE D EMPLOI Lire attentivement ce mode d emploi avant de mettre le Pr sentate...

Page 34: ...appareil pr s de l eau comme par exemple pr s d une baignoire d un lavabo d un vier de cuisine ou de buanderie dans un sous sol humide pr s d une piscine ou autres endroits similaires Support Ne pas...

Page 35: ...dons d alimentation lectrique Les cordons doivent tre install s de telle sorte qu ils ne puissent pas tre pi tin s ou cras s par des objets plac s sur eux ou pr s d eux Veiller particuli rement aux ex...

Page 36: ...ngers Dans tous les cas faire appel du personnel qualifi Dommages demandant l intervention d un r parateur D brancher la prise de secteur de l appareil et faire appel un r parateur qualifi dans les ca...

Page 37: ...rer could void the user s authority to operate the equipment FOR UNITED STATES USERS INFORMATION This equipment has been tested and found to comply with the limits for a Class B digital device pursuan...

Page 38: ...ux et sec Ne pas utiliser de solvants comme le benz ne ou un diluant Ne pas diriger l objectif vers le soleil sous peine d endommager la cam ra Points lumineux et points noirs Le pr sentateur utilise...

Page 39: ...rs de son utilisation y compris mise en marche et rangement ou de son transport faire tr s attention de ne pas heurter la t te de cam ra Lorsqu une feuille magn tique est plac e proximit d un tube ray...

Page 40: ...vue au moyen d un microscope 52 Prise de vue d un objet en 3D 53 Prise de vue d un mur ou d un paysage lointain 54 5 DESCRIPTION DES FONCTIONS 55 Zoom 55 Mise au point 56 Mise au point automatique 56...

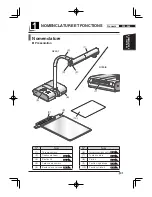
Page 41: ...menclature Pr sentation N Nom N Nom 1 T te de cam ra 6 Positionnement de la platine P 51 2 Cadran de zoom P 55 7 Tableau arri re P 43 3 Bouton AF P 56 8 Platine P 51 4 Colonne de cam ra 9 Feuille magn...

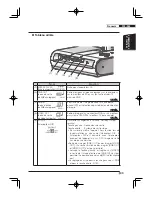
Page 42: ...e 2 Op ration OSD MENU Pour l affichage annulation d OSD MENU 7 PC image de borne RGB IN Sortie des images d entr e dans la borne RGB IN par la borne de sortie RGB P 59 3 D placement S lection d un ch...

Page 43: ...PAL moniteur TV par exemple P 48 5 SORTIE Interrupteur DIP Assurer les changements suivants Left key Output terminal Touche gauche Connecteur de sortie Touche droite Syst me de sortie vid o S assurer...

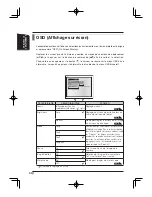
Page 44: ...de brillance lors du suivi automatique de l objet P 58 Manual Mode pour r gler la brillance de l image un niveau quelconque P 58 Mode Text3 Pour renforcer les caract res et les lignes en noir et blanc...

Page 45: ...ma Normal Nega Color B W Color Commutation couleur noir et blanc de l image cam ra Utiliser cette fonction afin de faciliter la lecture d un document en noir et blanc B W Edge Effect 3 R glage du nive...

Page 46: ...Mettre l interrupteur principal de l appareil sous tension ON 90 Note La position correcte de la t te de cam ra est indiqu e sur la figure droite Ne jamais exercer de force sur la t te de cam ra Note...

Page 47: ...emelle 12 11 Signal vid o Analogique 0 7 V p p termin 75 Signal de synchronisation horizontale Niveau TTL polarit positive n gative Signal de synchronisation verticale Niveau TTL polarit positive n ga...

Page 48: ...i au connecteur DC IN 12V sur le panneau arri re avant de brancher l adaptateur CA la prise de courant Note Pour la commutation de la sortie d image voir SORTIE interrupteur DIP la page 43 S assurer d...

Page 49: ...eur CA et le c ble vid o 3 Faire pivoter la t te de cam ra dans le sens indiqu sur la figure Note La position correcte de la t te de cam ra est indiqu e sur la figure droite Ne jamais exercer de force...

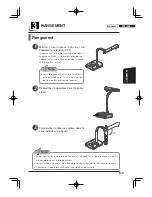
Page 50: ...sus le relier au projecteur ou un moniteur de PC et mettre l appareil sous tension R glage de la taille Placer un objet sur la platine et r gler sa position au moyen du cadran de zoom de mani re adapt...

Page 51: ...t utiliser la feuille magn tique fournie pour les fixer correctement sur la platine R glage de la taille Placer un objet sur la platine et r gler sa position au moyen du cadran de zoom de mani re adap...

Page 52: ...ise au point Effectuer la mise au point en appuyant sur le bouton AF Si l objet ne peut pas tre mis au point l aide du bouton AF effectuer la mise au point manuelle l aide de la s lection Focus dans l...

Page 53: ...te de cam ra comme indiqu sur la figure ci dessus pour pr senter un objet en 3D R glage de la taille R gler la position de l objet au moyen du cadran de zoom de mani re adapter la partie de l objet p...

Page 54: ...t Prise de vue arri re Note Pour effectuer une prise de vue avant de l appareil principal faire tourner l image de 180 en appuyant sur le bouton Image Rotation On d OSD Angle de rotation de la t te de...

Page 55: ...d un document en faisant tourner le cadran de zoom Faire un zoom vers plan g n ral L objet appara t plus petit Faire un zoom vers gros pla L objet appara t plus grand Note Grossissement de zoom Optiq...

Page 56: ...est maintenue Note Les objets num r s ci dessous ne peuvent pas toujours b n ficier de la mise au point automatique Dans ce cas utiliser la mise au point manuelle Objets pauvres en contraste Objets c...

Page 57: ...on de mise au point peut tre chang e l aide des boutons sur l appareil principal apr s s lection du mode Focus dans le menu OSD Utiliser cette fonction pour obtenir la mise au point d une partie quelc...

Page 58: ...rrouiller la luminosit de l image un niveau quelconque Note Le r glage par d faut est Auto Dans le r glage manuel de la luminosit la luminosit une fois r gl e ne varie pas en fonction de la luminosit...

Page 59: ...ctivement sur le bouton PC Ces fonctions permettent de commuter des images de sortie sans d brancher des c bles Note La touche PC n est pas disponible lorsque l interrupteur DIP est r gl sur VIDEO Lor...

Page 60: ...mode Manual Lorsque White Balance Manual est choisi comme r glage sur l OSD l quilibre des blancs est verrouill et R Gain l ment rouge et B Gain l ment bleu d OSD peuvent tre r gl s Note Les temp ratu...

Page 61: ...d Note Les r glages sauvegard s sont maintenus m me apr s la mise hors tension SELECT Gamma Preset Call Guide Language 1 2 3 Power On MENU OK SELECT Gamma Preset Call Guide Language 1 2 3 Power On Def...

Page 62: ...pr s la mise au point sur un grand angle c t WIDE Effectuer la mise au point sur le maximum du c t TELE La mise au point automatique peut tre difficile dans certains cas Effectuer la mise au point man...

Page 63: ...se au point Automatique Manuelle l ment de prise d image DCC 1 3 Nombre total de pixels Horizontal 1077 Vertical 788 Environ 850 000 pixels Nombre efficace de pixels Horizontal 1024 Vertical 768 Signa...

Page 64: ...ets 1 Manuel d utilisation 1 Carte de garantie 1 Marques de commerce est une marque d pos e de ELMO Co Ltd VESA et SVGA sont des marques d pos es de Video Electronics Standards Association VGA et XGA...

Reviews: