background image

10

MODEL:eXperience 660

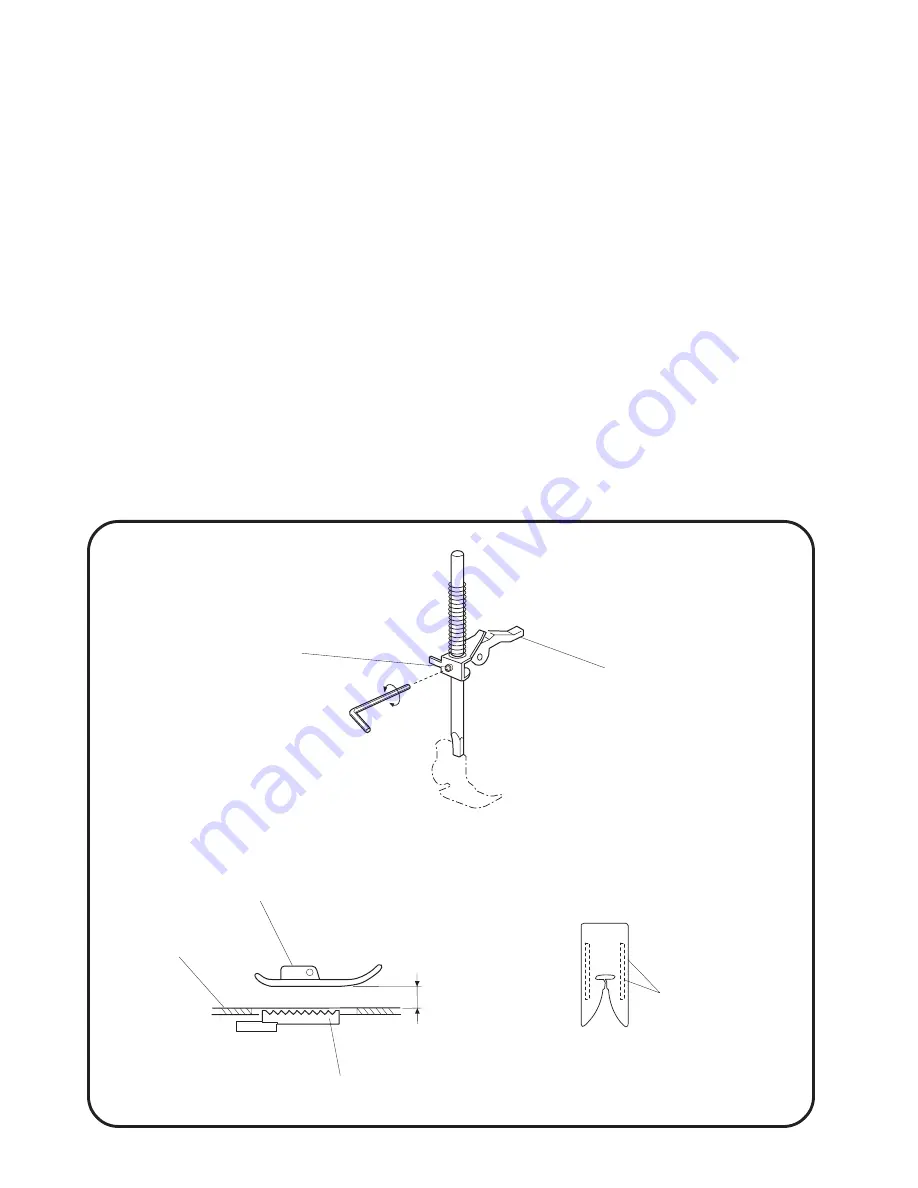
Presser foot lifter

Setscrew 4x8

Presser foot

Needle plate

[HEIGHT OF PRESSER FOOT]

[PRESSER FOOT ALIGNMENT]

Should be parallel

Feed dog

ADJUSTING PRESSER FOOT HEIGHT

AND ALIGNMENT

WHEN THE PRESSER FOOT IS RAISED, THE CLEARANCE BETWEEN THE PRESSER FOOT

AND THE NEEDLE PLATE SHOULD BE 5.7 TO 6.3 MM.

1. Remove the face cover and raise the presser foot.

Loosen the setscrew to adjust presser foot height (6.0 mm) and presser foot alignment.

2. Tighten the setscrew firmly.

3. Attach the face cover.

5.7 to 6.3 mm

Summary of Contents for eXperience 660

Page 1: ...SERVICE MANUAL eXperience 660 ...

Page 2: ...T 16 ZIGZAG SYNCHRONIZATION 17 NEEDLE THREAD TENSION 18 STRETCH STITCH FEED BALANCE 19 REPLACEMENT AND ADJUSTMENT OF THE NEEDLE THREADER PLATE 20 CONNECTOR DIAGRAM 21 SELF DIAGNOSTIC TEST 22 25 REPLACING PRINTED CIRCUIT BOARD A 26 REPLACING PRINTED CIRCUIT BOARD K AND F 27 REPLACING DC MOTOR AND ADJUSTING MOTOR BELT TENSION 28 REPLACING THE FUSES 29 REPLACING MACHINE SOCKET UNIT 30 REPLACING THE T...

Page 3: ...E AND THREAD USE A 11 BLUE TIP NEEDLE ADJUST THE PRESSER BAR LEVEL TO MAKE THE PRESSURE STRONGER SEE MECHANICAL ADJUSTMENT NEEDLE BAR HEIGHT SEE MECHANICAL ADJUSTMENT NEEDLE TO SHUTTLE TIMING SEE MECHANICAL ADJUSTMENT CLEARANCE BETWEEN NEEDLE AND HOOK P 13 P 12 P 14 2 FABRIC NOT MOVING 1 PRESSER FOOT PRESSURE IS TOO WEAK 2 INCORRECT F D HEIGHT 3 F D IS IN DOWN POSITION 4 THREAD ON BOTTOM SIDE OF F...

Page 4: ...ORRECTLY THREADED BOBBIN 2 TOO MUCH THREAD IS AROUND ON THE BOBBIN 3 LINT IS STUCK INSIDE THE BOBBIN HOLDER 4 THREAD QUALITY IS TOO LOW 5 THREAD IS JAMMING AROUND THE BOBBIN THREAD BOBBIN CORRECTLY ADJUST THE POSITION OF STOPPER CLEAN THE SHUTTLE CHANGE TO A HIGH QUALITY SEWING THREAD CLEAR OUT THE JAMMING THREAD 5 NEEDLE BREAKS 1 NEEDLE IS HITTING THE NEEDLE PLATE 2 NEEDLE IS BENT OR WORN 3 NEEDL...

Page 5: ...STMENT BACKLASH LOWER SHAFT GEAR ELIMINATE THE LOOSENESS SEE PART REMOVAL AND REPLACEMENT DRIVING MOTOR DC MOTOR OIL ALL MOVING PARTS P 15 P 28 P 37 7 DEFORMATION PATTERN 1 INAPPROPRIATE FEED BALANCE 2 INAPPROPRIATE ZIGZAG SYNCHRONIZATION 3 UPPER THREAD TENSION IS TOO STRONG SEE MECHANICAL ADJUSTMENT STRETCH STITCH FEED BALANCE SEE MECHANICAL ADJUSTMENT ZIGZAG SYNCHRONIZATION SEE MECHANICAL ADJUST...

Page 6: ...4 MODEL eXperience 660 Setscrew Cap Face cover SERVICE ACCESS 1 FACE COVER UNIT TO REMOVE Remove the cap and setscrew Remove the face cover TO ATTACH Follow the procedure above in reverse ...

Page 7: ...IT TO REMOVE Raise the carrying handle and the setscrew A Open the top cover and remove the setscrew B Lift up the top cover and remove it from the rear side TO ATTACH Follow the procedure above in reverse Setscrew A Carrying handle Setscrew B Face plate ...

Page 8: ...handle Setscrew B Setscrew C Cap SERVICE ACCESS 3 REPLACING THE BELT COVER TO REMOVE Raise the carrying handle and loosen the screw A Remove the cap and the screw B Loosen the screw C and the belt cover TO ATTACH Follow the procedure in reverse ...

Page 9: ...ING THE BED COVER UNIT TO REMOVE Push the drop feed dog lever to the left Remove the setscrews A then remove the bed cover unit TO ATTACH Push the drop feed dog lever to the left Attach the bed cover unit and tighten the setscrews A REPLACING THE BASE TO REMOVE Remove the setscrews A B C D and E Remove the base TO ATTACH Follow the procedure in reverse ...

Page 10: ...NG THE FRONT COVER UNIT TO REMOVE Remove the face cover unit top cover unit and belt cover See page 7 8 Loosen the setscrews A B and C Then remove the front cover unit Disconnect the connector for printed circuit board F and flexible flat cable from the printed board A NOTE Never pull on cord when disconnect the cables from the circuit board TO ATTACH Follow the procedure in reverse ...

Page 11: ... 6 REPLACING THE REAR COVER TO REMOVE Remove the face cover unit top cover unit and belt cover See page 9 10 Loosen the setscrews A B C and D then remove the cap and setscrew F Lower the presser foot lifter and remove the rear cover from the presser lifter section first TO ATTACH Follow the procedure above in reverse ...

Page 12: ...JUSTING PRESSER FOOT HEIGHT AND ALIGNMENT WHEN THE PRESSER FOOT IS RAISED THE CLEARANCE BETWEEN THE PRESSER FOOT AND THE NEEDLE PLATE SHOULD BE 5 7 TO 6 3 MM 1 Remove the face cover and raise the presser foot Loosen the setscrew to adjust presser foot height 6 0 mm and presser foot alignment 2 Tighten the setscrew firmly 3 Attach the face cover 5 7 to 6 3 mm ...

Page 13: ...ot in the center of the needle plate hole when the straight stitch is selected or if the clearance between the needle and edge of the needle plate hole on both side is less than 0 2 mm when the stitch pattern is set to maximum zigzag width remove the face cover and loosen the setscrew then adjust the needle drop position by turning the eccentric pin NOTE Make sure the eccentric pin is positioned w...

Page 14: ...emove the needle plate and bobbin holder B Remove the bed cover see page 7 3 Lower the needle bar at its lowest position by turning the handwheel toward you 4 Loosen the screws of lower shaft gear 5 Raise the needle bar further 3 4 mm from the lowest position 6 Turn the lower shaft gear until the tip of rotary hook meets with the right side of the needle Tighten screws 2 pieces of the lower shaft ...

Page 15: ... needle drop position to 0 0 left most position then turn off the power switch 2 Remove the needle plate and bobbin holder 3 Align the tip of rotary hook with the right side of the needle in ascending travel of needle from its lowest position by turning the handwheel toward you 4 Remove the face plate and loosen the setscrew 5 Move the needle bar up and down to adjust the needle bar height 6 Make ...

Page 16: ... the tip of the hook behind the test pin and adjust the clearance between the test pin and the tip of rotary hook to 0 10 to 0 05 by moving the rotary hook set plate up or down 5 Tighten the screw A B C firmly 6 Check the rotary hook driver gear and the lower shaft gear backlash If gears mesh or engage tightly or loosely adjust backlash between hook drive and lower shaft gear 7 Reattach the bed co...

Page 17: ...ckwise and counterclockwise by finger Check the play It should be 0 8 mm or less If there is more than 0 8 mm play adjust as follows ADJUSTMENT PROCEDURE 1 Remove the bed cover and loosen the hexagonal screw C 2 Turn the lower shaft bushing D eccentric in the direction E when the play at shuttle hook tip is too small 3 Turn the lower shaft bushing D eccentric int the direction F when the play at t...

Page 18: ...til the feed dog comes to its highest position 3 Remove the bed cover see page 7 4 Loosen setscrew A and nut B 5 Turn the adjusting screw C in the direction of E to raise the feed or turn the adjusting screw C in the direction of D to lower the feed dog so that the feed dog highest is from 0 85 mm above the top surface of the needle plate 6 Tighten the nut and setscrew A 7 Attach the bed cover E t...

Page 19: ...ximum zigzag width 3 Turn the handwheel toward you and stop turning when the needle starts its sideward movement and loosen setscrew 4 If the needle height is higher than 7 5 mm turn the upper shaft shielding plate in the direction of A if the needle height is lower than 6 3 mm turn the upper shaft shielding plate in the direction of B 5 Make sure the upper shaft shielding plate is not touching th...

Page 20: ...T IT AS FOLLOWS ADJUSTMENT PROCEDURE 1 Set the thread tension at AUTO 2 Remove the face cover see page 9 3 Turn the lead screw to adjust the needle thread tension If the thread tension is too tight turn the lead screw in the direction of A If the thread tension is too loose turn the lead screw in the direction of B 4 Check the thread tension again and reattach the face cover Needle thread Polyeste...

Page 21: ... mark 3 Check the sewing results the standard figure length of five pieces of figure 8 is 33 39 mm 4 Remove the 2 setscrews Then remove the base cap 5 If the length is longer than 39 mm turn the adjusting screw in the direction of C 6 If the length is shorter than 36 mm turn the adjusting screw in the direction of D 7 Reattach the base cap and tighten the setscrews Setscrew TO ENTER THE ADJUSTING ...

Page 22: ...ST THE THREADER PLATE POSITION 1 If the hook on the threader plate touches the left or right side of the needle eye loosen setscrew C and adjust the hook position by moving the threader plate fig 2 2 If the hook on the threader plate touches the top or bottom side of the needle eye loosen setscrew D and adjust the hook position by moving the threader position set plate fig 3 Threader knob Hook Nee...

Page 23: ... TO CONNECT THE CONNECTORS 1 Be sure to connect the connectors with the connector posts of the same color 2 Position the connector correctly then push it straight down until it locks in place A MACHINE SOCKET SECONDARY CIRCUIT B ZIGZAG WIDTH MOTOR C FEED MOTOR D DC MOTOR E MACHINE SOCKET PRIMARY CIRCUIT F POWER TRANSFORMER PRIMARY CIRCUIT G POWER TRANSFORMER SECONDARY CIR CUIT H NEEDLE THREAD TENS...

Page 24: ...DER SPINDLE TO THE LEFT RAISE THE FEED DOG SHIFT THE SLIDE VOLUME TO THE LEFT REMOVE THE PRESSER FOOT AND RAISE THE PRESSER FOOT LIFTER TURN THE HANDWHEEL TOWARD YOU TO RAISE THE NEEDLE TO ITS HIGHEST POSITION NOTE BE CAREFUL THE SEWING MACHINE MAY START RUNNING BY ITS OWN WHILE IN TEST MODE TURN OFF THE POWER SWITCH BEFORE REPLACING ANY PARTS REPEAT THE DIAGNOSTIC TEST UNTIL THE PROBLEMS HAS BEEN...

Page 25: ... NEXT STEP CORRECT RESULTS BEEP SOUNDS WHEN BUTTONS ARE PRESSED LCD AND LED BLINKS IN 1 SEC INTERVALS LAMP LIGHTS UP PRESS BUTTON TO PROCEED TO THE NEXT STEP SELF DIAGNOSTIC TESTS 1 BUZZER LCD AND LED 1 2 3 DEFECTIVE RESULTS NO BEEP SOUND DOES NOT ENTER SELF DIAG NOSTIC MODE LCD AND LED DOES NOT BLINK REPLACE OR ADJUST REPLACE THE BOARD A K AND F CHECK THE FLEXIBLE FLAT CABLE CONNECTION 2 BUTTONS ...

Page 26: ...WHEN THE BUTTONHOLE LEVER IS FREE THE SCREEN DIS PLAYS L WHEN THE BUTTONHOLE LEVER IS PUSHED THE SCREEN DIS PLAYS H 2 TURN THE HANDWHEEL TO WARD YOU TO CHECK THE INDICATIONS THE INDICATION CHANGES FROM q TO t PRESS BUTTON TO PRO CEED TO THE NEXT STEP SELF DIAGNOSTIC TESTS 4 BH SENSOR DEFECTIVE RESULTS THE DISPLAY DOES NOT CHANGE THE INDICATED VALUE DE CREASES WHEN YOU MOVE THE SPEED CONTROL LEVER ...

Page 27: ...TER DEPRESS THE FOOT CONTROL TO RUN THE MACHINE WHEN THE SLIDE VOLUME IS LEFT THE MACHINE WILL RUN AT THE SPEED OF 80 SPM TO 100 SPM WHEN THE SLIDE VOLUME IS RIGHT THE MACHINE WILL RUN AT THE SPEED OF 800 SPM TO 840 SPM DEFECTIVE RESULTS THE MOTOR DOES NOT START AND DISPLAYS ERROR REPLACE OR ADJUST ADJUST THE MOTOR BELT TENSION REPLACE THE MOTOR REPLACE THE PRINTED BOARD A 8 ZIGZAG WIDTH MOTOR 9 D...

Page 28: ...IRCUIT BOARD A TO REMOVE 1 Remove the front cover see page 8 2 Unplug the connectors from the board A 3 Remove the 3 screws and remove board A TO INSTALL 4 To install follow the above procedure in reverse Setscrew Setscrew Print circuit board A ...

Page 29: ...t see page 8 2 Remove the set screws A and the printed board K TO INSTALL 4 To install the slide volume follow the procedure above in reverse Check to ensure that the slide volume moves smoothly back and forth REPLACING PRINTED CIRCUIT BOARD F TO REMOVE 1 Remove the front cover unit Remove the printed board K 2 Remove the setscrews B Remove the printed circuit board F TO INSTALL 3 To install the p...

Page 30: ...setscrews then remove the dc motor and belt TO ATTACH 3 Set the motor in machine and replace screws Replace the motor belt 4 When applying approximately 300 grams pressure in the middle of the belt it should deflect 7 to 9 mm when set properly 5 Tighten the setscrews 6 Attach the belt cover Pressure 300g Belt deflection 7 9 mm Motor connector Setscrews 2 DC motor Belt ...

Page 31: ...1 Remove the front covers see page 8 2 Remove the printed circuit board A Remove the four setscrews and remove the cover from the printed circuit board A 3 Remove the fuse pry up the fuse with a screwdriver NOTE 1 Replace the printed circuit board A if you notice any browning discoloration or other abnormalities 2 Only install fuses with the correct rating If the fuse is loose bend the fuse clips ...

Page 32: ... 1 Remove the front and rear covers see page 8 2 Remove the machine socket connector from the printed circuit board A 3 Remove the two set screws and remove the machine socket TO INSTALL 4 To install the machine socket follow the above procedure in reverse Connectors Machine socket Setscrew A ...

Page 33: ...Setscrew REPLACING THE TRANSFORMER REPLACING THE TRANSFORMER UNIT TO REMOVE 1 Remove the circuit board A See page 8 2 Remove the two setscrews and remove the transformer unit TO INSTALL 3 To install the transformer follow the above procedure in reverse ...

Page 34: ...emove the two setscrews A 3 Remove the two setscrews B and remove the zigzag width motor TO INSTALL 4 To install the zigzag width motor follow the above procedure in reverse NOTE 1 The setscrews A should be tightened at 5 7 kg of torque 2 Check to ensure that the upper shaft sensor mounted on the zigzag width motor does not interfere with the upper shaft shield plate 3 Adjust the needle drop posit...

Page 35: ...emove the belt cover and base 2 Remove the snap ring E 3 Remove the setscrews A B Remove the feed stepping motor TO ATTACH 4 Follow the above procedure in reverse Snap ring E Snap ring E Feed stepping motor Setscrew A Setscrew B Access the set screw B through this hole ...

Page 36: ... POSITION 4 Install the buttonhole foot R 5 Lower the buttonhole lever to its lowest position and insert a 1 6 mm thickness gauge 6 Turn the adjusting screw to the left until the screen display changes from L to H 7 Then turn the adjusting screw to the right until the screen display changes from H to L 8 Check if the lcd screen shows H when the clearance of the buttonhole foot is 1 4 mm and L when...

Page 37: ...n winder spindle is set to the bobbin winding position and or OFF when the bobbin winder spindle is returned to the sewing position 4 Tighten the setscrew 5 Attach the top cover Setscrews Switch fixing plate Bobbin winding shaft Bobbin winding on Bobbin winding position Bobbin winding off Sewing position TO ENTER ADJUSTING MODE Turn the power on while pressing the needle up down button and auto lo...

Page 38: ...MM 1 Remove the rear cover See page 9 2 Loosen the setscrews and move the knee lifter link to the right when the clearance between the needle plate and the foot is bigger than 12 7 mm Loosen the set screws and move the knee lifter link to the left when the clearance is smaller than 12 7 mm 3 Attach the rear cover Knee Lifter Link Stopper Knee lifter link Setscrews 12 7mm ...

Page 39: ...NG BUT YOU SHOULD STILL CHECK FOR POSSIBLE LUBRICATION NEEDS WHENEVER SERVICING MACHINES OIL Use good quality sewing machine oil at the points A B C D E F G H I J K indicated by the black arrows GREASE Use white grease such as molycote EM 40m at the points L M indicated by the white arrows A B C D F E G H I J K L M ...

Reviews: